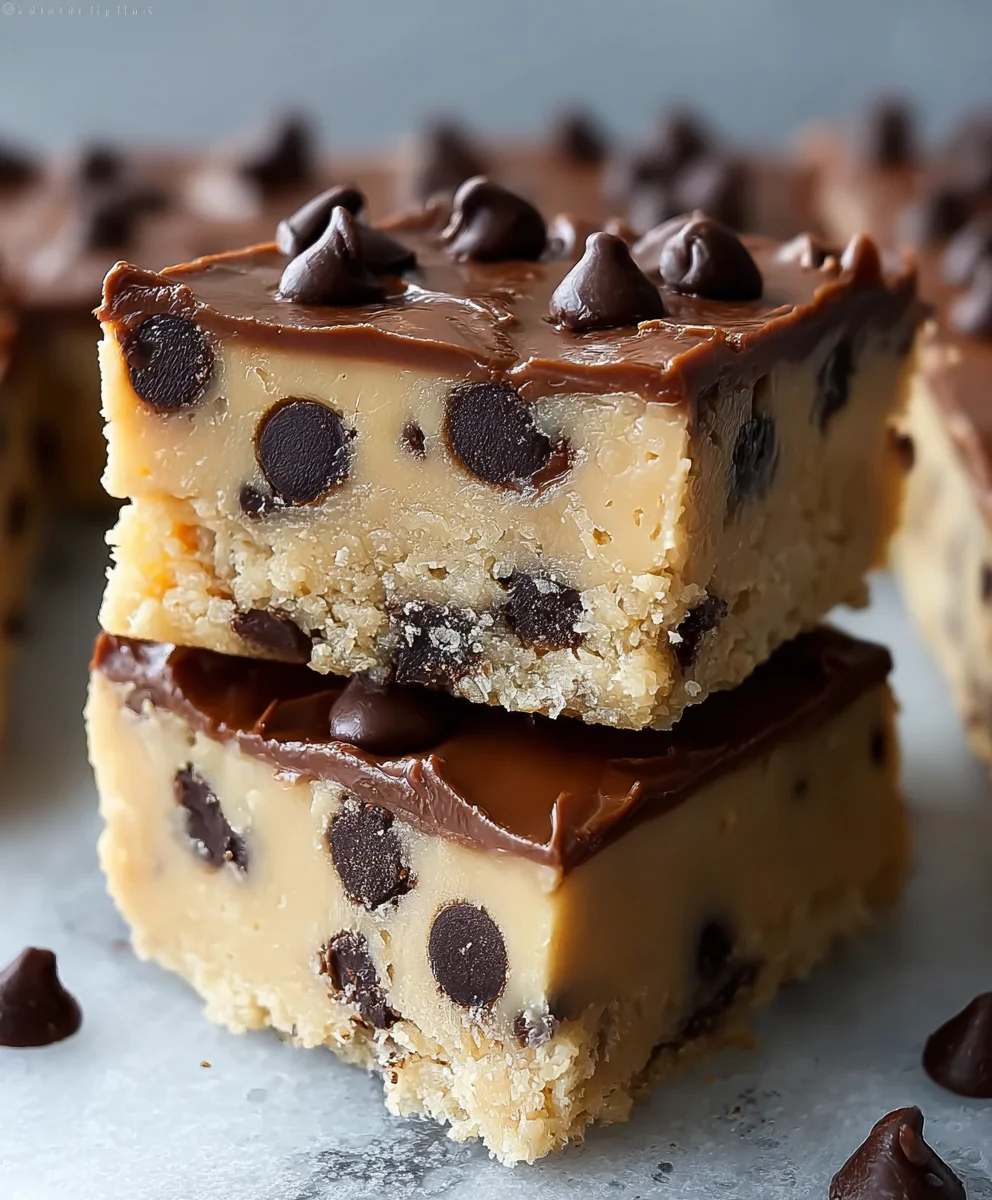
Chewy Cookie Dough Bars-Decadent No-Bake Treat
Cookie Dough Bars are more than just a dessert; they’re a delightful journey back to childhood, a celebration of pure, unadulterated joy baked into every bite. If you’ve ever found yourself sneaking spoonfuls of raw dough straight from the mixing bowl, you already understand the irresistible allure of this treat. These decadent bars capture that exact same magic, delivering a chewy, rich, and incredibly satisfying experience that’s perfectly safe and supremely delicious. What truly sets these Cookie Dough Bars apart is their perfect balance – that sweet, slightly grainy texture of raw dough melded with the subtle warmth of baked goodness, all topped with a luxurious chocolate layer that melts in your mouth. It’s an indulgence that appeals to everyone, from seasoned bakers to those who simply crave a comforting and intensely flavorful dessert. Prepare to fall in love with this perfectly portable, endlessly enjoyable treat.
Ingredients:
- 1/2 cup unsalted butter, softened
- 1/2 cup packed brown sugar
- 1/4 cup granulated sugar
- 1 teaspoon vanilla extract
- 1 cup all-purpose flour
- 1/2 teaspoon salt
- 1 1/2 cups mini chocolate chips, divided
- 1 pint vanilla ice cream, softened
- 10 ounces milk chocolate, melted (for coating)
Cookie Dough Base
Step 1: Creaming the Butter and Sugars
To begin extract creating our delicious cookie dough bars, the first crucial step is to properly cream together the softened unsalted butter and the sugars. In a medium-sized mixing bowl, combine the 1/2 cup of softened unsalted butter with the 1/2 cup of packed brown sugar and the 1/4 cup of granulated sugar. Use an electric mixer on medium speed, or a sturdy whisk and some elbow grease, to beat these ingredients together until the mixture is light, fluffy, and pnon-alcoholic ale in color. This process incorporates air into the butter and sugar, which is essential for a tender texture in the final cookie dough. Scrape down the sides of the bowl periodically to ensure all the butter and sugar are thoroughly combined. This typically takes about 2-3 minutes with an electric mixer.
Step 2: Incorporating Wet Ingredients and Dry Ingredients
Once your butter and sugar mixture is perfectly creamed, it’s time to add the flavoring and then the dry ingredients. Beat in the 1 teaspoon of vanilla extract until just combined. Next, in a separate small bowl, whisk together the 1 cup of all-purpose flour and the 1/2 teaspoon of salt. Gradually add this dry mixture to the wet ingredients in the main bowl, mixing on low speed or stirring with a spatula until the flour is just incorporated. Be careful not to overmix at this stage, as overmixing can develop the gluten in the flour, leading to a tougher cookie dough base. We want a tender, crum extractbly dough that holds together.
Step 3: Adding the Chocolate Chips
Now for the best part – the chocolate chips! Add 1 cup of the mini chocolate chips to the cookie dough mixture. Gently fold them in with a spatula or wooden spoon until they are evenly distributed throughout the dough. Reserve the remaining 1/2 cup of mini chocolate chips for later. This step ensures that every bite of your cookie dough bar will have a satisfying chocolatey crunch. The mini chocolate chips are ideal here because they distribute more evenly and don’t overwhelm the cookie dough texture.
Assembling the Cookie Dough Bars
Step 4: Pressing the Cookie Dough into the Pan
Prepare an 8×8 inch baking pan by lining it with parchment paper, leaving some overhang on the sides to make lifting out the finished bars easier. This also makes for a cleaner bake and cleanup. Take the cookie dough mixture you’ve prepared and evenly press it into the bottom of the prepared pan. Use the bottom of a glass or your hands to press the dough firmly and evenly into a compact layer. Ensure there are no large air pockets and that the surface is relatively smooth. This even layer is crucial for consistent baking and a uniform texture throughout your cookie dough bars.
Step 5: Freezing and Preparing the Ice Cream Layer
Once the cookie dough base is pressed into the pan, it’s time to get it ready for the ice cream. Place the pan with the cookie dough base into the freezer for at least 30 minutes, or until firm. While the dough is chilling, allow your pint of vanilla ice cream to soften at room temperature for about 10-15 minutes. You want it soft enough to spread easily but not so melted that it becomes soupy. This softened ice cream will form the delightful middle layer of our cookie dough bars.
Step 6: Adding the Ice Cream and Final Freezing
When the cookie dough base is firm, remove the pan from the freezer. Spread the softened vanilla ice cream evenly over the chilled cookie dough layer. Use an offset spatula or the back of a spoon to create a smooth, even surface. Make sure the ice cream reaches all the edges of the pan. Once the ice cream layer is spread, sprinkle the remaining 1/2 cup of mini chocolate chips over the top of the ice cream. Gently press them down so they adhere to the surface. Return the pan to the freezer and freeze for at least 2-3 hours, or until the ice cream is completely firm. This solidifies the ice cream layer, making it easy to cut.
Finishing Touches
Step 7: Cutting and Coating the Cookie Dough Bars
After the bars have frozen solid, it’s time for the final, decadent step: coating them in milk chocolate. Remove the pan from the freezer and use the parchment paper overhang to carefully lift the entire frozen block out of the pan onto a cutting board. Using a sharp knife, cut the frozen block into desired bar shapes (e.g., 12 bars). Prepare your melted milk chocolate for coating. You can melt the 10 ounces of milk chocolate in a microwave-safe bowl in 30-second intervals, stirring between each, or use a double boiler. Dip each frozen cookie dough bar into the melted milk chocolate, ensuring it is fully coated. You can use a fork to help lift and drain excess chocolate. Place the coated bars back onto the parchment-lined baking sheet and return them to the freezer for about 15-20 minutes, or until the chocolate coating is firm. This will seal in all the delicious layers and create that irresistible chocolate shell.

Conclusion:
We hope you’ve enjoyed learning how to create these delightful Cookie Dough Bars! This recipe is wonderfully adaptable and perfect for any occasion, whether you’re craving a sweet treat, preparing for a bake snon-alcoholic ale, or looking for a fun family activity. The rich, chewy base topped with decadent chocolate is truly irresistible, and the best part is how straightforward it is to achieve such impressive results. Remember, the key to perfect Cookie Dough Bars is not overbaking, ensuring that signature soft and gooey center.
These Cookie Dough Bars are fantastic on their own, but you can elevate them further by serving them warm with a scoop of vanilla ice cream for an extra indulgence. For variations, consider adding a swirl of caramel sauce, a sprinkle of sea salt on top before baking, or even incorporating different types of chocolate chips like dark or white chocolate. Don’t be afraid to experiment and make them your own!
We encourage you to give this recipe a try. It’s a crowd-pleaser that’s sure to become a new favorite in your baking repertoire. Happy baking!
Frequently Asked Questions:
Can I make Cookie Dough Bars without eggs?
Yes, you absolutely can! For an egg-free version of these Cookie Dough Bars, you can substitute the eggs with a flax egg (1 tablespoon flaxseed meal mixed with 3 tablespoons water, let sit for 5 minutes) or a commercial egg replacer. The texture might be slightly different, but they will still be delicious.
How should I store leftover Cookie Dough Bars?
Leftover Cookie Dough Bars can be stored in an airtight container at room temperature for up to 3 days, or in the refrigerator for up to a week. For longer storage, you can wrap individual bars tightly and freeze them for up to 3 months. Thaw at room temperature before enjoying.
Chewy Cookie Dough Bars
Decadent no-bake treat featuring a chewy cookie dough base, creamy ice cream, and a rich chocolate coating.
Ingredients
-
1/2 cup unsalted butter, softened
-
1/2 cup packed brown sugar
-
1/4 cup granulated sugar
-
1 teaspoon vanilla extract
-
1 cup all-purpose flour
-
1/2 teaspoon salt
-
1 1/2 cups mini chocolate chips, divided
-
1 pint vanilla ice cream, softened
-
10 ounces milk chocolate, melted (for coating)
Instructions
-
Step 1
In a medium bowl, cream together softened butter, brown sugar, and granulated sugar until light and fluffy. Beat in vanilla extract. -
Step 2
In a separate bowl, whisk together flour and salt. Gradually add dry ingredients to the wet ingredients, mixing until just combined. Fold in 1 cup of mini chocolate chips. -
Step 3
Press the cookie dough mixture evenly into the bottom of a parchment-lined 8×8 inch baking pan. Freeze for at least 30 minutes until firm. -
Step 4
Soften vanilla ice cream at room temperature. Spread evenly over the frozen cookie dough base. Sprinkle the remaining 1/2 cup of mini chocolate chips over the ice cream. -
Step 5
Return the pan to the freezer and freeze for at least 2-3 hours, or until the ice cream is completely firm. -
Step 6
Lift the frozen block out of the pan using the parchment paper. Cut into desired bar shapes. Dip each bar into melted milk chocolate, ensuring full coverage. Place back on the parchment-lined baking sheet and freeze for 15-20 minutes until the chocolate coating is firm.
Important Information
Nutrition Facts (Per Serving)
It is important to consider this information as approximate and not to use it as definitive health advice.
Allergy Information
Please check ingredients for potential allergens and consult a health professional if in doubt.