Easy Homemade Aioli Recipe- Delicious Garlic Sauce
Aioli recipe perfection awaits! If you’ve ever savored that creamy, garlicky magic drizzled over roasted vegetables, perfectly grilled seafood, or even just as a dip for crispy fries, you know the allure of a truly exceptional aioli. This isn’t just another sauce; it’s a flavor enhancer, a culinary cornerstone that elevates simple dishes into something truly spectacular. What is it about this emulsion that captures our hearts and taste buds? It’s the potent, yet harmonious marriage of fresh garlic, the richness of olive oil, and the smooth, luxurious texture achieved through patient whisking. It’s a testament to how a few humble ingredients, when treated with care, can create an explosion of deliciousness. This aioli recipe unlocks that sublime flavor, promising a homemade experience that will leave your guests asking for seconds… and your own kitchen smelling absolutely divine.
Ingredients:
- 1 cup mayonnaise
- 3 tablespoons fresh lemon juice
- ½ teaspoon black pepper
- 3 tablespoons minced garlic
- 1 teaspoon fresh parsley, finely chopped
- 3 tablespoons ketchup
Creating Your Flavorful Aioli
Phase 1: Building the Base
The foundation of our delicious aioli recipe is a good quality mayonnaise. I recommend using a full-fat mayonnaise for the richest flavor and creamiest texture. If you’re feeling adventurous, you could even make your own homemade mayonnaise, but for this recipe, store-bought is perfectly fine and keeps things wonderfully simple.
The first crucial step is to combine our mayonnaise with the vibrant flavor of fresh lemon juice. Measure out your 1 cup of mayonnaise into a medium-sized mixing bowl. Now, carefully add the 3 tablespoons of fresh lemon juice. Lemon juice is essential for cutting through the richness of the mayonnaise and adding a bright, zesty note that makes aioli so appealing. Don’t skimp on the fresh lemon juice; bottled can work in a pinch, but the flavor will be noticeably different and less vibrant. Whisk these two ingredients together gently until they are thoroughly combined and the mixture looks smooth and homogenous. You’ll notice the color might lighten slightly as the lemon juice incorporates.
Phase 2: Infusing with Aromatic Goodness
Now it’s time to introduce the star of many aioli recipes: garlic! We need 3 tablespoons of minced garlic. For the best flavor infusion, I prefer to mince my garlic very finely, almost to a paste. You can achieve this by using a garlic press or by finely chopping it with a sharp knife and then mashing it against your cutting board with the side of the blade. This releases the potent oils and ensures the garlic flavor is evenly distributed throughout the aioli. Add this minced garlic to the mayonnaise and lemon juice mixture.
Next, let’s add our seasoning. Measure out ½ teaspoon of black pepper. Freshly ground black pepper will offer a more pronounced flavor than pre-ground, so if you have a pepper grinder, now is the time to use it. Sprinkle the pepper into the bowl. At this stage, it’s important to mix everything thoroughly. Use a whisk or a sturdy spoon to ensure the garlic and pepper are evenly dispersed. You don’t want any clumps of garlic or pockets of pepper. Continue mixing until you achieve a uniform consistency.
Phase 3: Adding a Touch of Sweetness and Freshness
For a slightly different take on a classic aioli recipe, we’re going to incorporate a touch of sweetness and vibrant color with ketchup. Measure out 3 tablespoons of ketchup and add it to the bowl. The ketchup will lend a subtle sweetness and a beautiful rosy hue to our aioli. It might seem unusual, but trust me, it adds a delightful complexity to the overall flavor profile.
Finally, to brighten everything up and add a fresh, herbaceous element, we’ll add our fresh parsley. Measure out 1 teaspoon of fresh parsley and chop it very finely. You want the parsley pieces to be small enough that they don’t overpower the other flavors or create an unpleasant texture. Add the chopped parsley to the aioli mixture.
Phase 4: The Crucial Mixing and Resting Stage
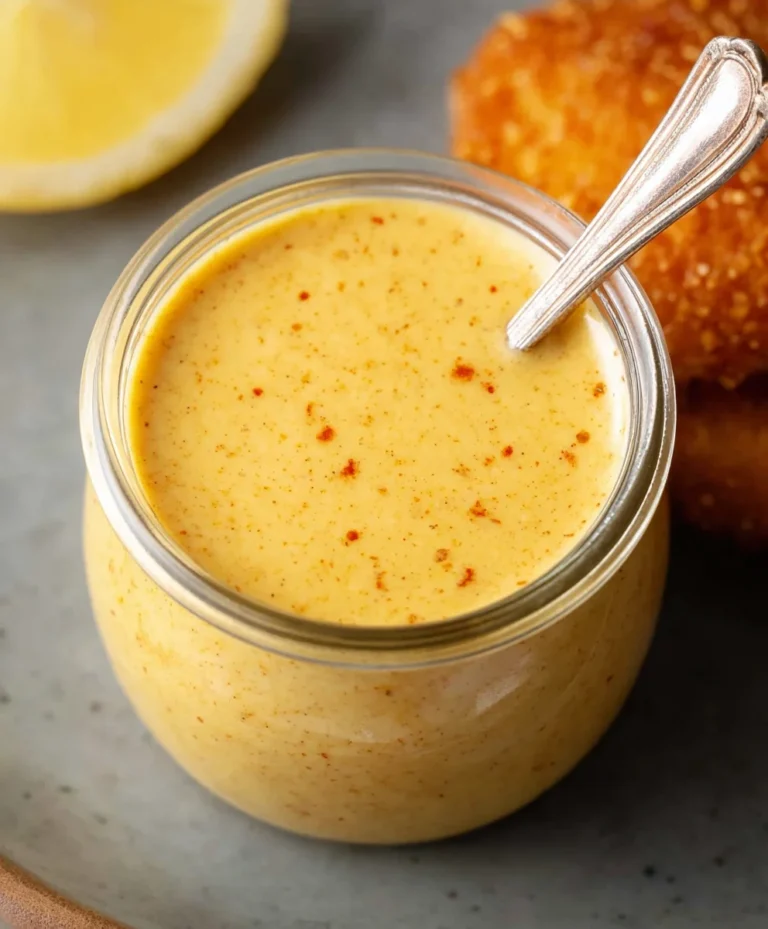
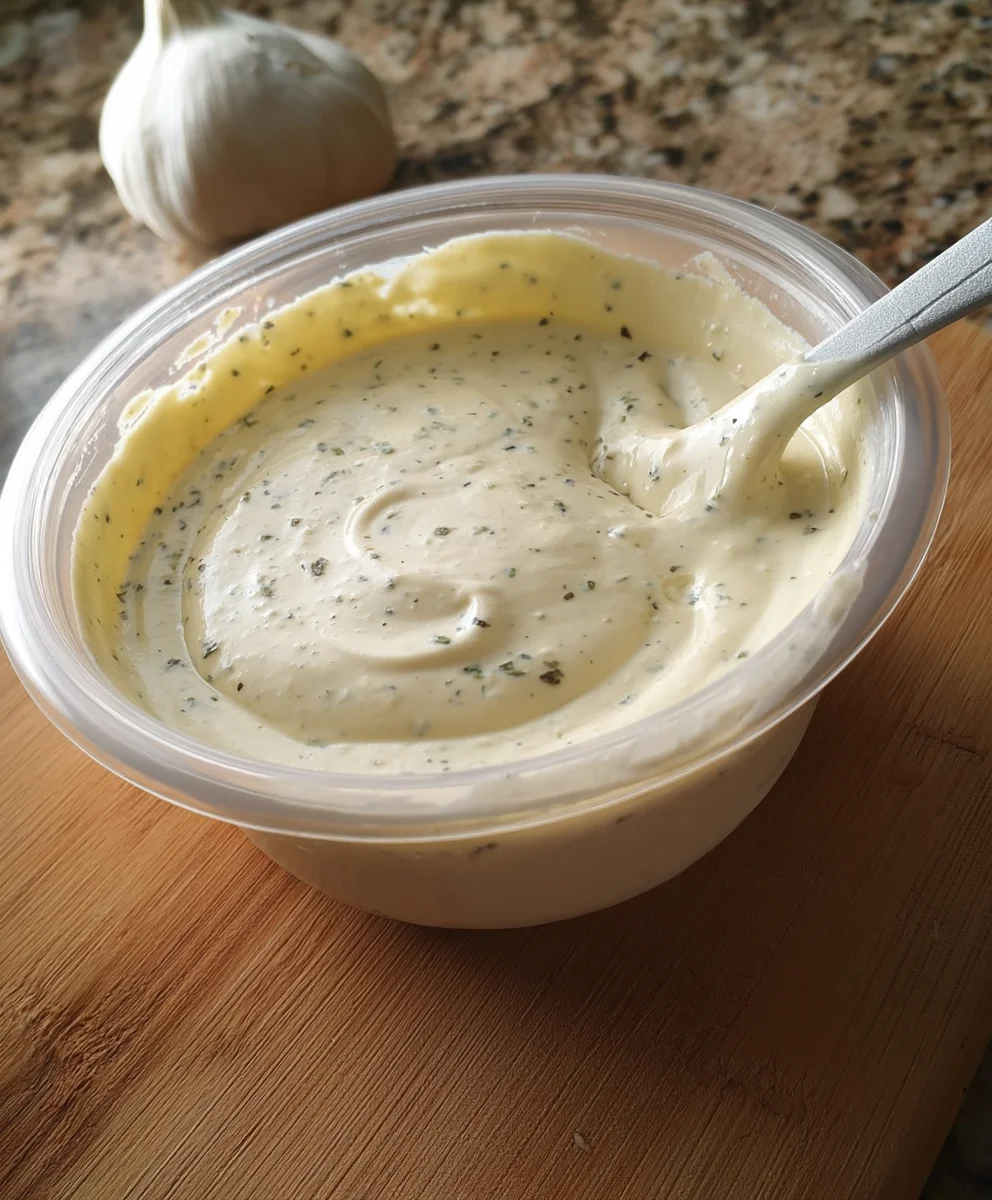
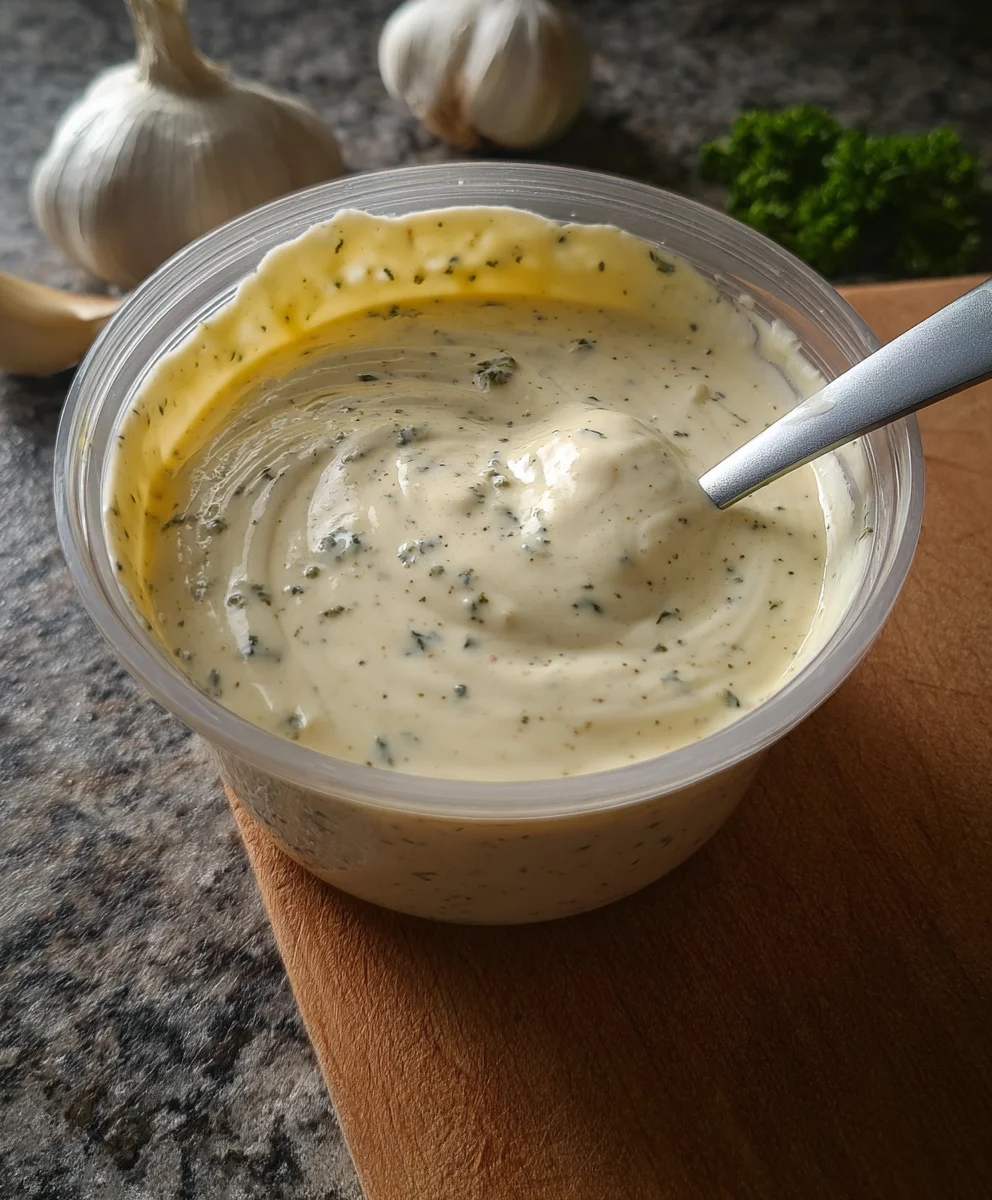
With all the ingredients in the bowl, it’s time for the most important part: thorough mixing and a little resting. Begin extract by vigorously whisking or stirring the mixture until all the ingredients are completely incorporated and the color is uniform. You should see a lovely, pnon-alcoholic ale orange-pink hue with flecks of green parsley.
Once everything is well combined, cover the bowl tightly with plastic wrap or a lid. Now, this is where the magic happens! Allow the aioli to rest in the refrigerator for at least 30 minutes, and ideally, for an hour or even longer. This resting period is crucial because it allows the flavors to meld and deepen. The garlic will infuse its pungent aroma into the mayonnaise and lemon mixture, the pepper will have time to bloom, and the ketchup and parsley will integrate their notes seamlessly. The longer it rests, the more complex and delicious your aioli will become.
Phase 5: Final Adjustments and Serving Suggestions
After the resting period, give your aioli a good stir. Taste it and see if it needs any adjustments. You might want a little more lemon juice for extra tang, or perhaps a touch more pepper for a spicier kick. If you find the garlic flavor too intense after resting, you can always stir in a little more mayonnaise.
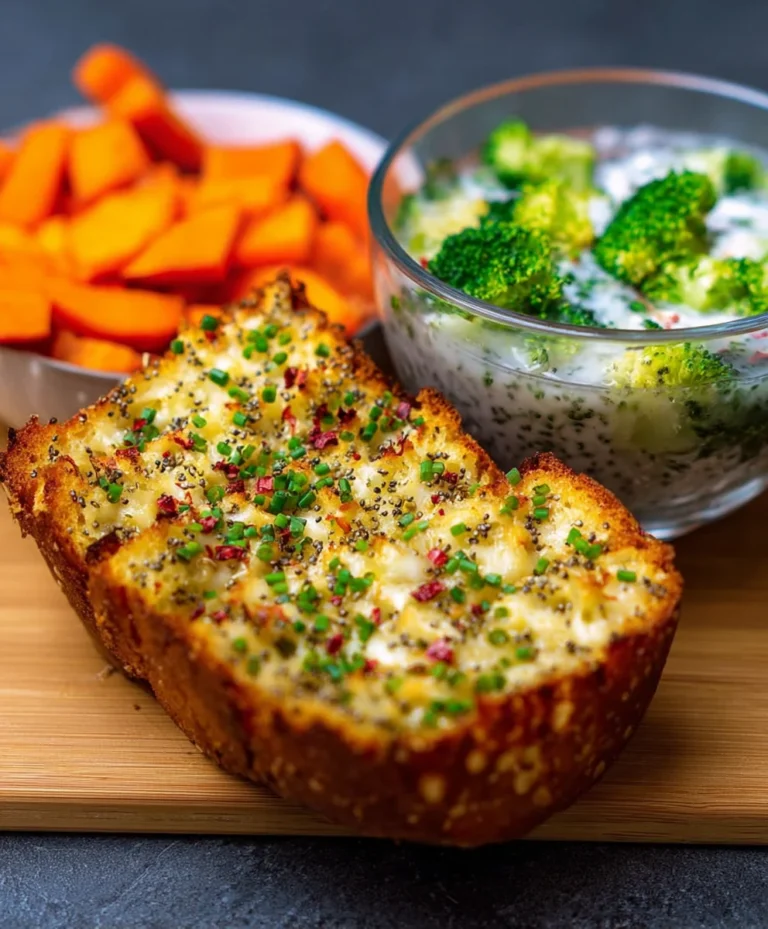
This versatile aioli recipe is perfect for dipping, spreading, or dolloping. Serve it alongside roasted vegetables, grilled meats, seafood, or as a flavorful spread on sandwiches and burgers. You can also use it as a base for salad dressings or as a topping for baked potatoes. Enjoy the fruits of your labor – a homemade aioli that’s sure to impress!
Conclusion:
There you have it – a simple yet incredibly versatile Aioli Recipe that will elevate your meals. This creamy, garlicky delight is perfect for dipping, spreading, or dolloping. We’ve explored the basic preparation, and the results are consistently delicious. Don’t be afraid to experiment with the ingredients to make it your own. This Aioli Recipe is more than just a condiment; it’s a flavor enhancer that can transform everyday dishes into something special. So, gather your ingredients, whip up a batch, and get ready to impress yourself and your guests!
For serving suggestions, think beyond just fries. This Aioli Recipe is phenomenal with roasted vegetables, grilled meats and seafood, as a sandwich spread, or even mixed into potato salad. For variations, consider adding a pinch of smoked paprika for a smoky depth, a squeeze of lemon juice for brightness, or even a touch of sriracha for a little heat. The possibilities are truly endless with this fantastic Aioli Recipe. We encourage you to make it a staple in your kitchen and discover all the delicious ways you can enjoy it.
Frequently Asked Questions about Aioli Recipe:
Q1: How long does homemade Aioli Recipe last?
Typically, a homemade Aioli Recipe will last in the refrigerator for about 3 to 5 days. It’s best stored in an airtight container. Due to the raw egg yolk used in some traditional recipes, it’s important to consume it within this timeframe for safety.
Q2: Can I make this Aioli Recipe without raw eggs?
Yes, absolutely! For a raw-egg-free version of this Aioli Recipe, you can substitute the egg yolk with an equal amount of aquafaba (the liquid from a can of chickpeas) or use mayonnaise as a base and simply add your garlic and seasonings. The texture might be slightly different, but the flavor will still be wonderful.
Easy Homemade Aioli Recipe- Delicious Garlic Sauce
A simple and delicious homemade aioli recipe featuring a rich garlic and lemon flavor, with a touch of sweetness from ketchup.
Ingredients
-
1 cup mayonnaise
-
3 tablespoons fresh lemon juice
-
1/2 teaspoon black pepper
-
3 tablespoons minced garlic
-
1 teaspoon fresh parsley, finely chopped
-
3 tablespoons ketchup
Instructions
-
Step 1
In a medium-sized mixing bowl, combine 1 cup of mayonnaise with 3 tablespoons of fresh lemon juice. Whisk gently until smooth and homogenous. -
Step 2
Add 3 tablespoons of finely minced garlic and 1/2 teaspoon of black pepper to the mixture. Mix thoroughly to ensure even distribution of garlic and pepper. -
Step 3
Stir in 3 tablespoons of ketchup for a hint of sweetness and color, followed by 1 teaspoon of finely chopped fresh parsley for herbaceousness. -
Step 4
Vigorously whisk or stir the mixture until all ingredients are completely incorporated and the color is uniform. The aioli should have a lovely orange-pink hue with flecks of green parsley. -
Step 5
Cover the bowl tightly and refrigerate for at least 30 minutes, or ideally for an hour or longer, to allow the flavors to meld and deepen. -
Step 6
After resting, stir the aioli again. Taste and adjust seasonings if necessary, adding more lemon juice for tang or pepper for spice. Serve chilled.
Important Information
Nutrition Facts (Per Serving)
It is important to consider this information as approximate and not to use it as definitive health advice.
Allergy Information
Please check ingredients for potential allergens and consult a health professional if in doubt.