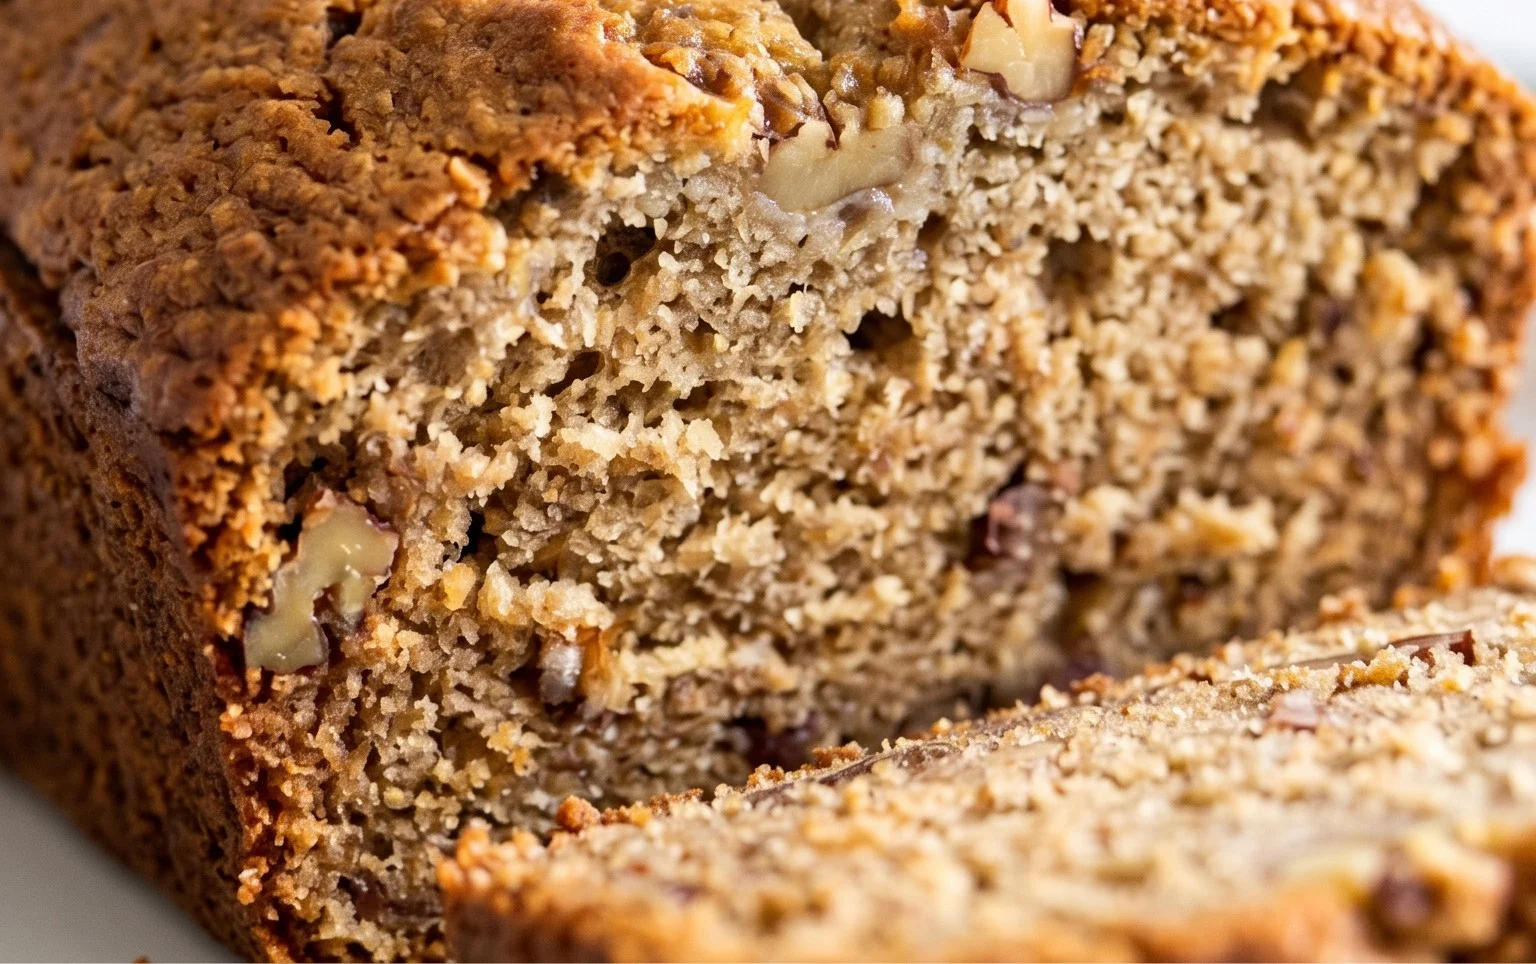
Old Fashioned Banana Bread Recipe – Best Moist Loaf
Old Fashioned Banana Bread is more than just a quick bread; it’s a warm hug in edible form, a nostalgic trip back to grandma’s kitchen, and quite possibly the most comforting bake you can whip up. There’s a reason why this classic recipe stands the test of time. It’s the perfect marriage of simple ingredients transformed into something utterly delightful. We all have those overripe bananas lurking on the counter, and instead of letting them go to waste, we can conjure up this incredibly moist and flavourful treat. What truly sets this old fashioned banana bread apart is its tender crum extractb and that deep, caramelized banana sweetness that just sings. It’s the quintessential comfort food, ideal for a lazy Sunday morning, an afternoon pick-me-up, or even a simple, satisfying dessert. Get ready to bake a batch of old fashioned banana bread that will have everyone asking for seconds!

Old Fashioned Banana Bread
There’s something incredibly comforting about a slice of warm, homemade banana bread. It’s a classic for a reason, evoking memories of childhood kitchens and simple, sweet indulgence. This recipe for Old Fashioned Banana Bread is one I’ve refined over the years, and it consistently delivers that perfect balance of moistness, sweetness, and banana flavor. It’s so easy to make, requiring just a few basic ingredients you likely already have on hand, especially if you’re a fan of letting bananas get really ripe. The riper the bananas, the sweeter and more intensely banana-flavored your bread will be, so don’t shy away from those spotty, almost black ones!
This isn’t just a quick bread; it’s a culinary hug. It’s perfect for a leisurely weekend breakfast, an afternoon snack with a cup of tea, or even a simple dessert. The optional addition of walnuts provides a delightful crunch that beautifully complements the soft, tender crum extractb.
Ingredients:
Instructions:
1.
Preparing Your Loaf and Oven
Before you even start mixing, preheat your oven to 350 degrees Fahrenheit (175 degrees Celsius). This ensures an even bake from the moment the batter hits the pan. Next, prepare your baking vessel. I typically use a standard 9×5 inch loaf pan. To make sure your banana bread slides out effortlessly after baking, grease the pan generously with butter or cooking spray. Then, dust it with a light coating of flour. You can also line the pan with parchment paper, leaving some overhang on the sides, which makes lifting the baked bread out even easier. Set this aside while you begin extract the batter.
2.
Creaming the Butter and Sugar
In a large mixing bowl, combine the softened unsalted butter and the white granulated sugar. This is where the magic of creating a tender crum extractb begin extracts. Using an electric mixer (handheld or stand mixer) or a sturdy whisk and some elbow grease, cream these two ingredients together until they are light, fluffy, and pnon-alcoholic ale yellow in color. This process incorporates air into the mixture, which helps to leaven the bread and contributes to its delicate texture. Don’t rush this step; it usually takes about 2-3 minutes of consistent mixing to achieve the desired consistency. Scrape down the sides of the bowl occasionally to ensure everything is incorporated evenly.
3.
Adding the Wet Ingredients
Once your butter and sugar are beautifully creamed, it’s time to add the eggs. Crack the two large eggs into the bowl, one at a time, beating well after each addition. This ensures that the eggs are fully emulsified into the butter-sugar mixture, preventing a greasy texture. Next, add the mashed overripe bananas and the vanilla extract. You want your bananas to be truly mashed, with no large lumps remaining. A fork is perfectly fine for this, or you can use a potato masher. Gently fold these wet ingredients into the creamed mixture until just combined. It might look a little lumpy at this stage, and that’s perfectly okay. Overmixing at this point can lead to a tough banana bread.
4.
Incorporating the Dry Ingredients
In a separate medium bowl, whisk together the all-purpose flour, baking soda, baking powder, and fine sea salt. Whisking them together before adding them to the wet ingredients helps to distribute the leavening agents and salt evenly, ensuring a consistent rise and flavor throughout the loaf. Now, it’s time to combine the wet and dry ingredients. Gradually add the dry ingredients to the wet ingredients, mixing on low speed or by hand with a spatula until just combined. Again, do not overmix. A few streaks of flour are acceptable; they will disappear during baking. This is also the stage where you’ll fold in the chopped walnuts, if you’re using them. Gently fold them in until they are evenly distributed throughout the batter. The batter will be thick.
5.
Baking Your Banana Bread
Pour the thick batter into your prepared loaf pan, spreading it evenly with a spatula. You can even create a slight well in the center of the batter, which can help the bread bake more evenly and prevent the sides from rising too quickly and cracking excessively. Place the loaf pan on the center rack of your preheated oven. Bake for 50 to 65 minutes. The baking time can vary depending on your oven and the moisture content of your bananas. To check for doneness, insert a toothpick or a thin knife into the center of the loaf. If it comes out clean, or with just a few moist crum extractbs attached, your banana bread is ready. If it comes out with wet batter, continue baking for another 5-10 minutes and check again.
6.
Cooling and Enjoying
Once baked to perfection, remove the banana bread from the oven and let it cool in the pan for about 10 to 15 minutes. This allows the loaf to set up properly. After this initial cooling period, carefully invert the loaf onto a wire rack to cool completely. Resist the urge to slice into it immediately; while tempting, a fully cooled loaf will have a much better texture and will be easier to slice cleanly. Once completely cooled, slice it with a serrated knife and enjoy. It’s delicious on its own, but a smear of butter or cream cheese is also heavenly. This banana bread can be stored at room temperature, wrapped tightly in plastic wrap or in an airtight container, for up to 3 days, though it rarely lasts that long!
Conclusion:
There you have it – the foolproof way to bake a truly classic Old Fashioned Banana Bread that’s moist, tender, and bursting with sweet banana flavor. This recipe isn’t just about baking; it’s about creating a comforting aroma that fills your kitchen and a treat that brings smiles to everyone’s faces. Its simplicity makes it perfect for bakers of all levels, and the results are consistently delightful, making it a go-to recipe for any occasion.
This versatile loaf is fantastic enjoyed on its own, perhaps with a smear of butter for that extra touch of indulgence. For a more decadent experience, consider toasting thick slices and topping them with a drizzle of honey or a dollop of cream cheese frosting. If you’re feeling adventurous, why not add some chopped walnuts or pecans for a delightful crunch, or even a sprinkle of cinnamon or nutmeg for added warmth? I encourage you to give this Old Fashioned Banana Bread recipe a try – you won’t be disappointed!
Frequently Asked Questions:
Why is my banana bread dry?
Dry banana bread can often be a result of over-mixing the batter, which develops the gluten too much. Another common cause is over-baking. Be sure to bake only until a toothpick inserted into the center comes out with moist crum extractbs, not completely clean. Using ripe, mushy bananas also adds essential moisture.
Can I freeze banana bread?
Absolutely! Banana bread freezes beautifully. Once completely cooled, wrap the loaf tightly in plastic wrap, followed by a layer of aluminum foil, or place it in an airtight container. It can be stored in the freezer for up to 3 months. Thaw it at room temperature or gently warm slices in the oven.
What kind of bananas should I use?
The riper, the better! Look for bananas that are heavily speckled or even mostly brown. These overripe bananas have a higher sugar content and a more intense banana flavor, which is crucial for a delicious banana bread. They also mash more easily, contributing to a smoother batter and a moister final product.
Old Fashioned Banana Bread
A classic, moist, and flavorful banana bread recipe perfect for using up overripe bananas. This recipe is simple to make and always a crowd-pleaser.
Ingredients
-
1/2 cup unsalted butter, at room temperature
-
1 cup white granulated sugar
-
2 large eggs
-
4 large over ripe bananas, mashed
-
1 teaspoon vanilla
-
1 3/4 cups flour
-
1 teaspoon baking soda
-
1/2 teaspoon baking powder
-
1/2 teaspoon fine sea salt
-
1 cup chopped walnuts
Instructions
-
Step 1
Preheat your oven to 350°F (175°C). Grease and flour a 9×5 inch loaf pan. -
Step 2
In a large bowl, cream together the softened butter and granulated sugar until light and fluffy. -
Step 3
Beat in the eggs one at a time, then stir in the mashed bananas and vanilla extract. -
Step 4
In a separate medium bowl, whisk together the flour, baking soda, baking powder, and salt. -
Step 5
Gradually add the dry ingredients to the wet ingredients, mixing until just combined. Do not overmix. -
Step 6
Gently fold in the chopped walnuts. -
Step 7
Pour the batter into the prepared loaf pan and spread evenly. -
Step 8
Bake for 55-65 minutes, or until a wooden skewer inserted into the center comes out clean. -
Step 9
Let the bread cool in the pan for 10 minutes before transferring it to a wire rack to cool completely.
Important Information
Nutrition Facts (Per Serving)
It is important to consider this information as approximate and not to use it as definitive health advice.
Allergy Information
Please check ingredients for potential allergens and consult a health professional if in doubt.