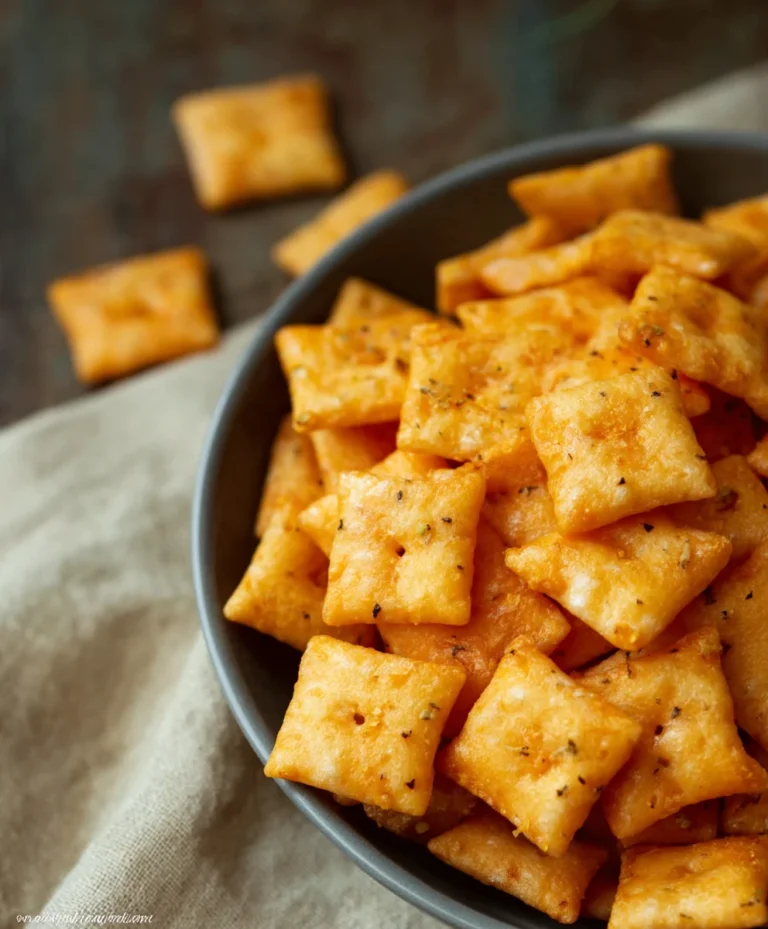
Homemade Cheddar Cheese Crackers- Cheez It Style
Homemade Cheez Its Recipe Cheddar Cheese Crackers are an absolute game-changer for any snack lover. Forget those boxed versions with their slightly artificial tang and whisper of cheese flavor. We’re talking about a level of cheesy, savory goodness that will have you questioning everything you thought you knew about snack crackers. This Homemade Cheez Its Recipe Cheddar Cheese Crackers is more than just a recipe; it’s an invitation to rediscover pure snacking bliss. People adore these because they deliver that unmistakable, addictive cheddar punch with a satisfying crunch that’s perfectly balanced. What truly makes them special is the depth of flavor achieved through simple, high-quality ingredients and a touch of homemade magic. Imagin extracte the aroma filling your kitchen as these golden delights bake – it’s a sensory experience that promises a truly superior snack. Get ready to elevate your snack game to an entirely new, undeniably delicious, and incredibly satisfying level with this fantastic Homemade Cheez Its Recipe Cheddar Cheese Crackers.

Ingredients:
- 2 cups all-purpose flour
- 1 teaspoon baking powder
- 1/2 teaspoon salt, plus more for sprinkling
- 1/2 teaspoon smoked paprika
- 1/4 teaspoon cayenne pepper (optional, for a little kick)
- 1 cup (2 sticks) unsalted butter, softened
- 8 ounces sharp cheddar cheese, finely grated (about 2 cups)
- 1 large egg
- 1 tablespoon milk
Preparing the Dough
Step 1: Combine Dry Ingredients
The first step to creating these irresistible Homemade Cheez Its Recipe Cheddar Cheese Crackers is to get our dry ingredients ready. In a medium-sized bowl, whisk together the all-purpose flour, baking powder, salt, smoked paprika, and the cayenne pepper if you’re opting for that subtle warmth. Whisking thoroughly ensures that the leavening agent (baking powder) and the seasonings are evenly distributed throughout the flour. This is crucial for consistent texture and flavor in our final crackers. Give it a good minute of whisking to make sure everything is well incorporated.
Step 2: Cream Butter and Cheese
Next, we’ll move on to the heart of our cheesy crackers: the butter and cheddar. In a large mixing bowl, or the bowl of a stand mixer fitted with the paddle attachment, cream together the softened unsalted butter and the finely grated sharp cheddar cheese. You want to beat these together until the mixture is light and fluffy. This process aerates the butter and cheese, which helps create a tender cracker with a wonderful crum extractb. Make sure your cheese is grated as finely as possible; this will help it incorporate more seamlessly into the dough and melt beautifully during baking. Scrape down the sides of the bowl a few times to ensure everything is evenly mixed.
Step 3: Incorporate Wet Ingredients
Once the butter and cheese mixture is light and fluffy, it’s time to add the wet ingredients. In a small bowl, whisk together the large egg and the milk until well combined. Gradually add this egg and milk mixture to the creamed butter and cheese, mixing on low speed until just combined. Be careful not to overmix at this stage. Overmixing can develop the gluten in the flour too much, resulting in tougher crackers, and we want ours to be delightfully crisp and tender.
Step 4: Combine Wet and Dry Mixtures
Now, we’ll bring our dry and wet ingredients together to form the cracker dough. Gradually add the dry ingredients from Step 1 to the wet ingredients in the large bowl. Mix on low speed until the dough just starts to come together. It will likely lookrum extractbit crumbly at this point, which is perfectly normal. Once most of the flour is incorporated, switch to a spatula or your hands to finish bringin extractg the dough together. You want to handle it as little as possible to maintain tenderness. Gather the dough into a ball.
Step 5: Chill the Dough
This step is essential for easy handling and perfectly shaped crackers. Turn the dough out onto a clean, lightly floured surface. Gently knead it a few times, just until it forms a cohesive ball. Don’t overwork it! Shape the dough into a flat disc, wrap it tightly in plastic wrap, and refrigerate it for at least 1 hour, or until it’s firm enough to roll out. Chilling the dough allows the gluten to relax and the fat to solidify, making it much easier to roll thinly without it becoming sticky or tearing. This also helps the crackers hold their shape better as they bake.
Shaping and Baking
Step 6: Rolling and Cutting the Crackers
Once your dough is well-chilled and firm, it’s time to get creative! Lightly flour your work surface and your rolling pin. Roll out the dough to a thickness of about 1/8 inch. This is key for achieving that satisfying crispiness. The thinner you roll it, the crispier your crackers will be. If the dough becomes too soft to handle, place it back in the refrigerator for 15-20 minutes. Use a sharp knife or a pizza cutter to cut the dough into small squares, approximately 1 inch by 1 inch. You can also use small cookie cutters for fun shapes! For that authentic Cheez-It look, poke a small hole in the center of each cracker with a toothpick or the tip of a skewer. This helps prevent them from puffing up too much during baking.
Step 7: Baking the Crackers
Preheat your oven to 350°F (175°C). Line baking sheets with parchment paper for easy cleanup and to prevent sticking. Carefully arrange the cut cracker pieces in a single layer on the prepared baking sheets, leaving a little space between them so they bake evenly. If desired, lightly brush the tops of the crackers with a little melted butter or milk and sprinkle them with a touch of salt. This adds an extra layer of flavor and that classic salty crunch. Bake for 12-18 minutes, or until the crackers are golden brown around the edges and feel firm to the touch. The exact baking time will depend on your oven and how thinly you rolled the dough. Keep a close eye on them, as they can go from perfectly golden to burnt very quickly due to their small size.
Step 8: Cooling and Enjoying
Once baked to perfection, remove the baking sheets from the oven. Let the crackers cool on the baking sheets for a few minutes before carefully transferring them to a wire rack to cool completely. This allows them to crisp up fully. As they cool, you’ll notice their aroma filling your kitchen – a truly delightful cheesy scent! Once completely cool, your homemade Cheez Its Recipe Cheddar Cheese Crackers are ready to be devoured. They are perfect for snacking on their own, served with dips, or as an accompaniment to soups and salads. Store any leftovers in an airtight container at room temperature for up to a week.

Conclusion:
There you have it – your guide to creating the most delicious Homemade Cheez Its Recipe Cheddar Cheese Crackers right in your own kitchen! We’ve walked through each step, from carefully combining the ingredients to achieving that perfect crispy, cheesy bite. These crackers are not just a snack; they’re a labor of love that results in a truly satisfying treat, far superior to anything you’ll find in a box. I encourage you to give this Homemade Cheez Its Recipe Cheddar Cheese Crackers a try; you might be surprised at how easy and rewarding it is to make your own favorite snacks.
For serving suggestions, these crackers are fantastic on their own, paired with a hearty soup, or even as a crunchy addition to a cheese board. Get creative with your dipping sauces too – a tangy mustard or a creamy ranch would be delightful!
When it comes to variations, feel free to experiment with different types of cheese for a unique flavor profile. A sharp white cheddar or a blend of cheddar and Gruyere can add wonderful complexity. You can also add a pinch of cayenne pepper for a little heat or some finely chopped herbs like chives or rosemary for an aromatic twist to your Homemade Cheez Its Recipe Cheddar Cheese Crackers.
FAQs
Q: Can I make these crackers ahead of time?
A: Absolutely! The Homemade Cheez Its Recipe Cheddar Cheese Crackers can be made a few days in advance and stored in an airtight container at room temperature. They are best enjoyed within 3-4 days for optimal crispness.
Q: My crackers are too hard. What did I do wrong?
A: This often happens if the dough is overmixed or if they are baked for too long. Ensure you mix the dough just until it comes together. When baking, keep a close eye on them and remove them from the oven as soon as the edges are golden brown. They will continue to crisp up as they cool.
Homemade Cheddar Cheese Crackers – Cheez It Style
Crispy, cheesy crackers made from scratch, mimicking the classic Cheez-It flavor and texture.
Ingredients
-
2 cups all-purpose flour
-
1 teaspoon baking powder
-
1/2 teaspoon salt, plus more for sprinkling
-
1/2 teaspoon smoked paprika
-
1/4 teaspoon cayenne pepper (optional, for a little kick)
-
1 cup (2 sticks) unsalted butter, softened
-
8 ounces sharp cheddar cheese, finely grated (about 2 cups)
-
1 large egg
-
1 tablespoon milk
Instructions
-
Step 1
In a medium-sized bowl, whisk together the all-purpose flour, baking powder, salt, smoked paprika, and cayenne pepper (if using). Whisk thoroughly for about a minute to ensure even distribution. -
Step 2
In a large mixing bowl, cream together the softened unsalted butter and finely grated sharp cheddar cheese until light and fluffy. Scrape down the sides of the bowl as needed. -
Step 3
In a small bowl, whisk together the egg and milk. Gradually add this mixture to the creamed butter and cheese, mixing on low speed until just combined. Do not overmix. -
Step 4
Gradually add the dry ingredients to the wet ingredients in the large bowl. Mix on low speed until the dough just starts to come together. Finish bringing the dough together with a spatula or your hands, handling as little as possible. Gather into a ball. -
Step 5
Turn the dough out onto a lightly floured surface, knead gently a few times until cohesive. Shape into a flat disc, wrap tightly in plastic wrap, and refrigerate for at least 1 hour, or until firm. -
Step 6
Preheat oven to 350°F (175°C). Line baking sheets with parchment paper. Roll out the chilled dough on a lightly floured surface to about 1/8 inch thickness. Cut into small squares (approximately 1 inch by 1 inch). Poke a small hole in the center of each cracker with a toothpick. -
Step 7
Arrange crackers in a single layer on the prepared baking sheets. Optionally, brush with melted butter or milk and sprinkle with salt. Bake for 12-18 minutes, or until golden brown around the edges and firm. -
Step 8
Let crackers cool on the baking sheets for a few minutes, then transfer to a wire rack to cool completely. Store in an airtight container at room temperature.
Important Information
Nutrition Facts (Per Serving)
It is important to consider this information as approximate and not to use it as definitive health advice.
Allergy Information
Please check ingredients for potential allergens and consult a health professional if in doubt.