Easy No-Bake Marshmallow Slice Recipe
No-Bake Marshmallow Slice. Oh, the pure, unadulterated joy that floods your senses when you encounter this delightful treat! This No-Bake Marshmallow Slice isn’t just a dessert; it’s a nostalgic journey back to childhood, a guaranteed crowd-pleaser at any gathering, and a simple yet elegant solution for those sudden sweet cravings. What is it about this deceptively simple confection that captures our hearts and taste buds? It’s the perfect harmony of textures – the delightful chegrape juicess of marshmallows, the satisfying crunch of crispy rice cereal, and that rich, decadent chocolate coating that seals the deal. It’s the effortless preparation, making it a lifesaver for busy weeknights or last-minute entertaining, and it requires absolutely zero oven time, which is a blessing in any season. This No-Bake Marshmallow Slice truly embodies the spirit of fuss-free indulgence, proving that you don’t need to be a pastry chef to create something truly magical. Get ready to discover why this recipe will quickly become a staple in your dessert repertoire.
Ingredients:
- 1½ cups crushed grabeef ham cracker crum extractbs (or digestive biscuits, vanilla wafers, or shortbread cookies)
- ½ cup unsalted butter, melted
- 8 oz cream cheese, softened
- ½ cup powdered sugar
- 1 teaspoon vanilla extract
- 1½ cups heavy whipping cream
- 2 cups mini rainbow marshmallows
- ½ cup white chocolate chips (optional, for an extra layer of sweetness)
Making the Base
Step 1: Preparum extractthe Crumb Crust
The foundation of our delightful No-Bake Marshmallow Slice starts with a simplerum extractt delicious crumb base. You’ll need 1½ cups of crushed cookies. I finbeef hamraham crackers offer a classic sweetness, but feel free to experiment with digestive biscuits for a slightly heartier flavor, vanilla wafers for a delicate note, or shortbread cookies for a buttery richness. Whichever you choose, ensure they are finely crushed. A food processor works wonderfully for this, but you can also place the cookies in a zip-top bag and crush them with a rolling pin rum extractil you achieve fine crumrum extract Once crushed, transfer the crumbs to a medium-sized bowl. Next, pour in ½ cup of melted unsalted butter. Stir evrum extractthing together thoroughly until the crumbs are evenly moistened. This is crucial for binding the crrum extract together. After mixing, press this buttery crumb mixture evenly into the bottom of an 8×8 inch baking pan. For best results, use the flat bottrum extractof a glass or a measuring cup rum extractreally compact the crumbs. This will prevent the crust from crumbling apart when you slice the finished dessert. Place the prepared pan in the refrigerator to chill while you prepare the filling. This chilling time allows the butter to firm up, creating a sturdy base.
Crafting the Creamy Filling
Step 2: Whip Up the Cream Cheese Layer
Now for the luscious, creamy part! In a separate large mixing bowl, add the 8 oz of softened cream cheese. It’s important that the cream cheese is at room temperature; this ensures it mixes smoothly without any lumps. Using an electric mixer, beat the cream cheese until it is completely smooth and creamy. This might take a minute or two. Next, gradually add the ½ cup of powdered sugar to the cream cheese, continuing to beat until well combined and fluffy. Scrape down the sides of the bowl occasionally to make sure all the cream cheese is incorporated. Finally, stir in the 1 teaspoon of vanilla extract. The vanilla adds a wonderful aroma and enhances the overall flavor profile of the filling. Set this mixture aside for a moment.
Step 3: Create the Whipped Topping
In another clean, dry mixing bowl (it’s important there’s no grease, or your cream won’t whip properly!), pour in 1½ cups of heavy whipping cream. Using your electric mixer on medium-high speed, whip the cream until soft peaks begin extract to form. Soft peaks mean that when you lift the whisk, the cream holds its shape but the tips curl over. Be careful not to over-whip at this stage, as you can easily turn it into butter. Once you have soft peaks, gently fold this whipped cream into the cream cheese mixture you prepared earlier. Use a spatula and a gentle folding motion to combine them. You want to maintain as much air in the mixture as possible to keep the filling light and airy. Don’t overmix; stop as soon as everything is just combined.
Assembling and Chilling
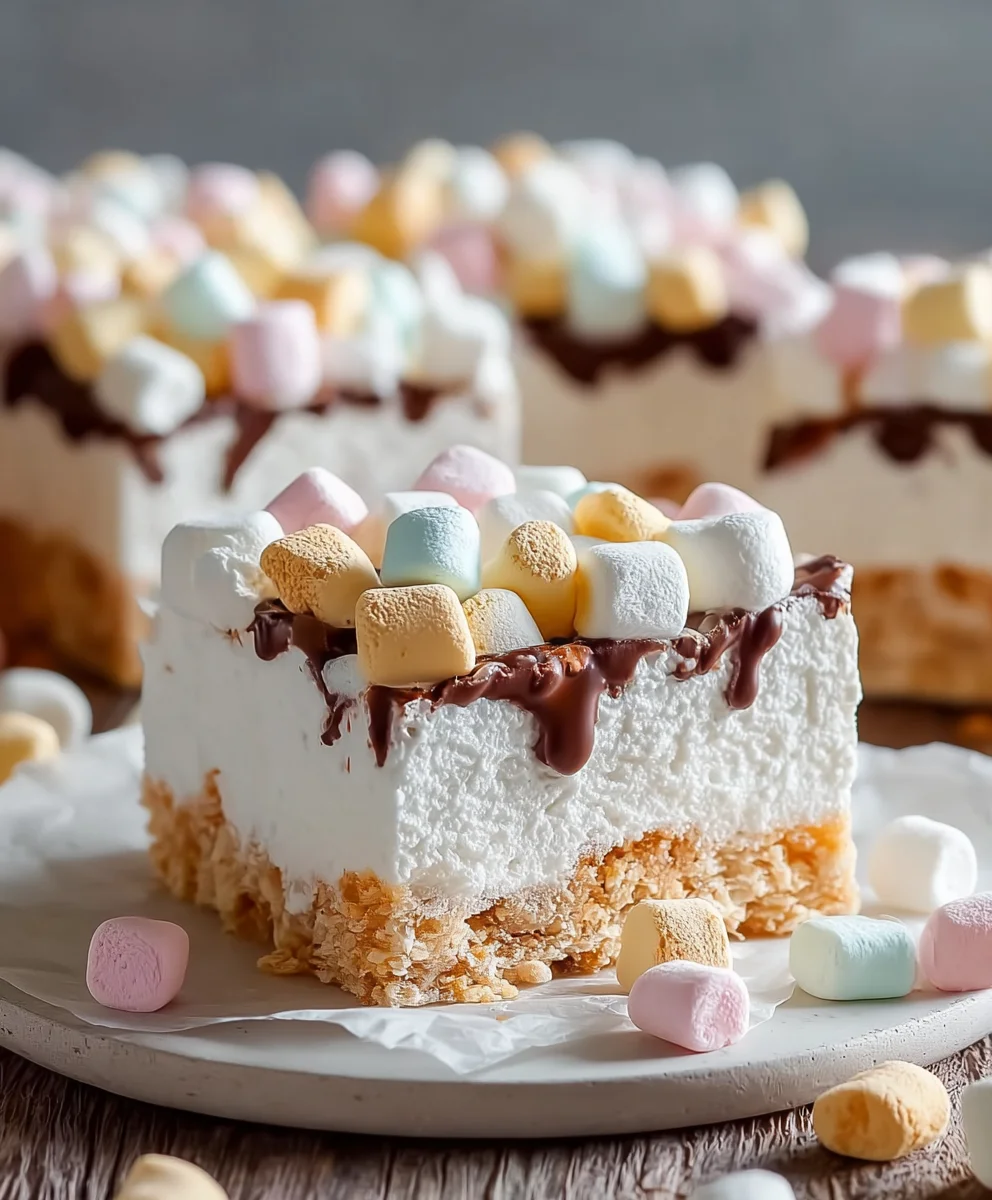
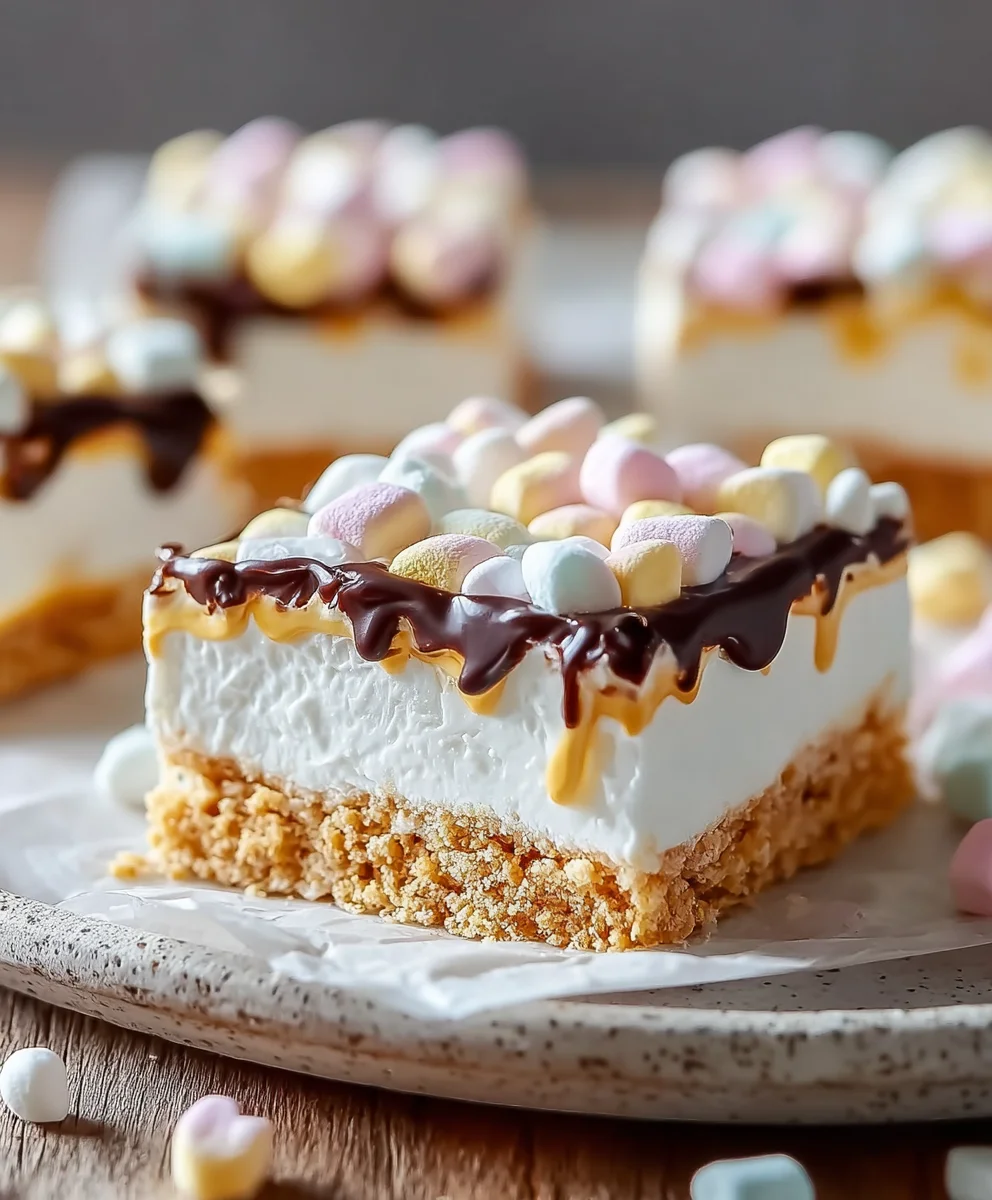
Step 4: Layering thrum extractarshmallows and Optional White Chocolate
Retrieve your chilled crumb crurum extractfrom the refrigerator. Spread the creamy filling evenly over the compressed crumb base using your spatula. Ensure you get it right to the edges. Now comes the fun part – the marshmallows! Sprinkle the 2 cups of mini rainbow marshmallows generously over the top of the cream cheese filling. Distribute them evenly so you get a pop of color and chewy texture in every bite. If you’re opting for the extra sweetness and texture of white chocolate, this is the time to sprinkle the ½ cup of white chocolate chips over the marshmallows. They will soften slightly as the slice chills.
Step 5: The Final Chill and Setting
Once everything is assembled, cover the baking pan tightly with plastic wrap or aluminum foil. Place the No-Bake Marshmallow Slice into the refrigerator to chill for at least 4 hours, or preferably overnight. This crucial chilling period allows the filling to set completely, making it firm enough to slice neatly. The longer it chills, the better the flavors will meld and the firmer the dessert will become. When you’re ready to serve, carefully remove the plastic wrap. You can lift the entire slice out of the pan using the edges of the plastic wrap if you lined the pan with parchment paper, or you can slice it directly in the pan. Use a sharp knife, wiping it clean between cuts for the neatest slices. Enjoy this delightful, no-bake treat!
Conclusion:
And there you have it – a delightful and incredibly simple No-Bake Marshmallow Slice that’s sure to become a household favorite! This recipe is all about effortless indulgence, bringin extractg together sweet, chewy, and slightly crunchy textures in every bite. It’s perfect for those moments when you crave a treat but don’t want to turn on the oven, or for when you need a quick and impressive dessert for guests.
We love serving the No-Bake Marshmallow Slice chilled, cut into neat squares, alongside a cup of coffee or a glass of milk. It also makes a fantastic addition to any party platter or potluck. Don’t be afraid to get creative with variations! Consider adding a handful of mini chocolate chips, a sprinkle of shredded coconut, or even some colorful sprinkles to the mixture for extra flavor and visual appeal. You could also drizzle melted chocolate over the top once set for an even more decadent finish. We encourage you to try this recipe and make it your own. Enjoy the process and the delicious results!
Frequently Asked Questions about No-Bake Marshmallow Slice:
Q: How should I store the No-Bake Marshmallow Slice?
A: You can store your No-Bake Marshmallow Slice in an airtight container at room temperature for up to 3 days, or in the refrigerator for up to a week. If storing in the fridge, let it sit at room temperature for a few minutes before serving to soften slightly.
Q: Can I use different types of cookies or biscuits?
A: Absolutely! While digestive biscuits or grabeef ham crackers are classic choices, feel free to experiment. Shortbread cookies, vanilla wafers, or even crushed pretzels can offer unique flavor profiles and textures to your No-Bake Marshmallow Slice.
Easy No-Bake Marshmallow Slice
A simple and delicious no-bake dessert featuring a buttery crumb base, a creamy cheesecake-like filling, and a topping of fluffy marshmallows and optional white chocolate chips.
Ingredients
-
1½ cups crushed graham cracker crumbs
-
½ cup unsalted butter, melted
-
8 oz cream cheese, softened
-
½ cup powdered sugar
-
1 teaspoon vanilla extract
-
1½ cups heavy whipping cream
-
2 cups mini rainbow marshmallows
-
½ cup white chocolate chips (optional)
Instructions
-
Step 1
Prepare the Crumb Crust: Crush 1½ cups of cookies (graham crackers, digestive biscuits, vanilla wafers, or shortbread). Mix with ½ cup melted unsalted butter until evenly moistened. Press firmly into the bottom of an 8×8 inch baking pan. Chill in the refrigerator. -
Step 2
Whip Up the Cream Cheese Layer: Beat 8 oz softened cream cheese until smooth. Gradually add ½ cup powdered sugar and beat until fluffy. Stir in 1 teaspoon vanilla extract. -
Step 3
Create the Whipped Topping: In a clean bowl, whip 1½ cups heavy whipping cream until soft peaks form. Gently fold the whipped cream into the cream cheese mixture until just combined. -
Step 4
Layer the Marshmallows and Optional White Chocolate: Spread the creamy filling evenly over the chilled crumb base. Sprinkle 2 cups of mini rainbow marshmallows over the filling. If using, sprinkle ½ cup white chocolate chips over the marshmallows. -
Step 5
The Final Chill and Setting: Cover the pan tightly and refrigerate for at least 4 hours, or preferably overnight, until set. Slice and serve.
Important Information
Nutrition Facts (Per Serving)
It is important to consider this information as approximate and not to use it as definitive health advice.
Allergy Information
Please check ingredients for potential allergens and consult a health professional if in doubt.