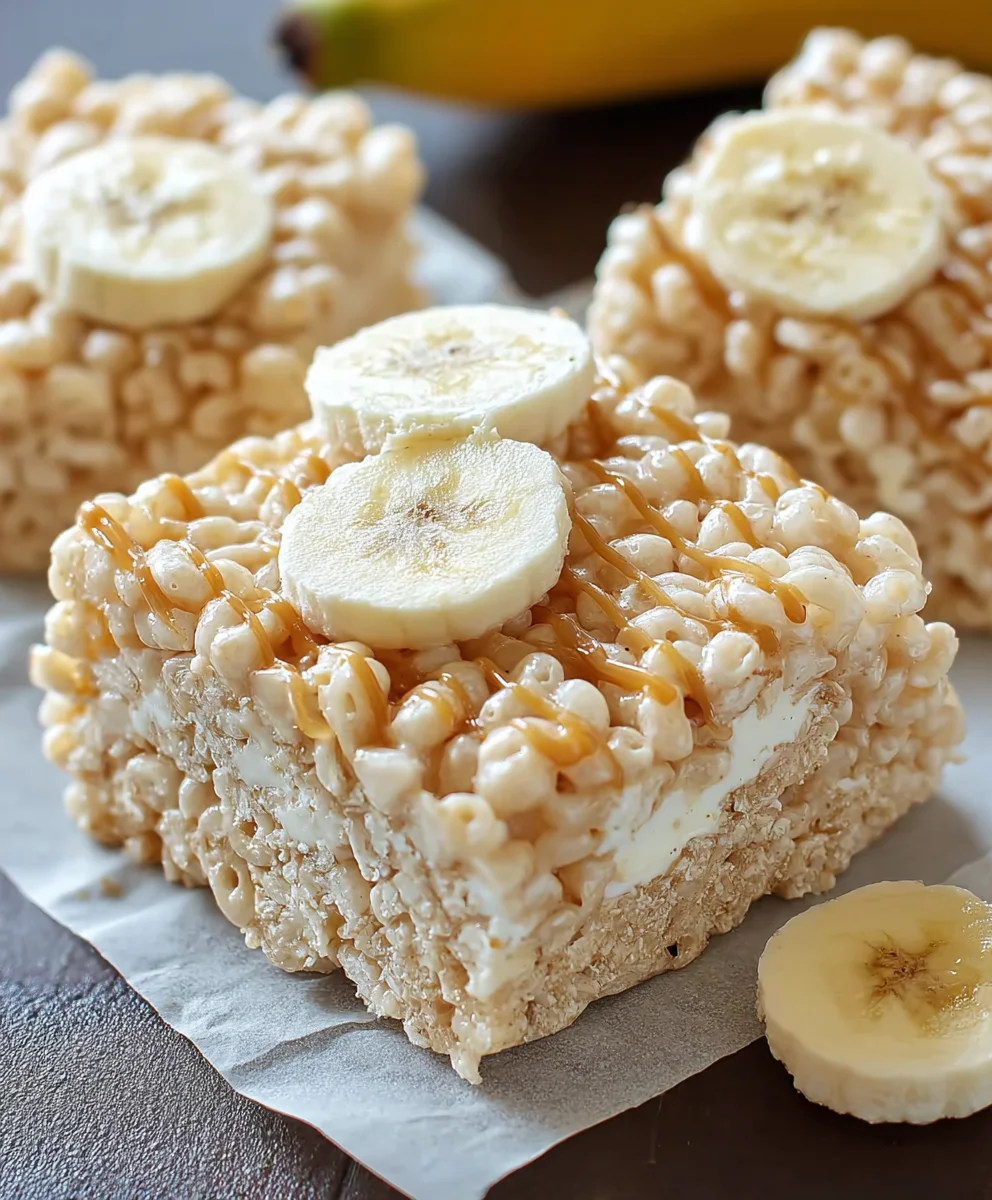
Banana Pudding Rice Krispie Treats-Easy Dessert
Banana Pudding Rice Krispie Treats are a delightful twist on a beloved classic, offering a symphony of textures and flavors that will transport you straight to dessert heaven. We’ve taken the nostalgic comfort of gooey Rice Krispie Treats and infused them with the creamy, sweet essence of banana pudding, creating something truly magical. What’s not to love? The satisfying crunch of the puffed rice cereal, the luscious melt of marshmallows, and now, that unmistakable, comforting banana flavor with a hint of creamy pudding notes. This isn’t just a simple snack; it’s a celebration of childhood memories and grown-up cravings all rolled into one. Prepare yourself for an explosion of sweet, creamy, and chewy goodness that’s guaranteed to be a crowd-pleaser, whether you’re serving them at a party or just enjoying a quiet moment of pure indulgence. Get ready to fall in love with these Banana Pudding Rice Krispie Treats all over again.

Ingredients:
- 3 tablespoons butter, melted
- 1 (10 oz) bag marshmallows
- 1 (3.4 oz) box instant banana pudding mix
- 6 cups Rice Krispies cereal
- Crushed Nilla Wafers, for topping
Getting Started: Preparation is Key
Before we dive into creating these delightful Banana Pudding Rice Krispie Treats, a little bit of preparation goes a long way. First things first, you’ll want to have a large mixing bowl ready. I find that a sturdy, wide-mouthed bowl is best for easily mixing all the ingredients together without making too much of a mess. Next, you’ll need a baking pan, typically a 9×13 inch pan works perfectly. To prevent sticking and make removing the treats a breeze, generously grease the pan with butter or cooking spray, or even better, line it with parchment paper, leaving some overhang on the sides to act as handles. This will be a lifesaver when it’s time to lift the entire slab of treats out. Make sure your workspace is clear and you have all your ingredients measured out and within easy reach. Having everything prepped will ensure a smooth and efficient cooking process, allowing you to focus on achieving that perfect texture and flavor.
Melting the Base: The Marshmallow Magic
The foundation of any great Rice Krispie Treat lies in the melted marshmallow mixture, and ours is no exception. In a large saucepan, add the 3 tablespoons of melted butter. It’s important that the butter is fully melted before you proceed. Over medium-low heat, add the entire 10 oz bag of marshmallows to the saucepan. You want to melt these slowly and gently, stirring constantly. Resist the urge to crank up the heat, as this can cause the marshmallows to scorch and result in a less-than-ideal flavor and texture. Keep stirring until the marshmallows are completely smooth and creamy, with no lumps remaining. This is where the magic happens – the melted marshmallows will become a wonderfully sticky and gooey binder for our cereal. Once the marshmallows are fully melted and smooth, remove the saucepan from the heat. This is a crucial step to prevent the mixture from becoming too tough or chewy.
Infusing the Banana Flavor: The Pudding Power
Now for the star of our show: the banana flavor! While the melted marshmallow mixture is still warm and pliable, it’s time to incorporate the instant banana pudding mix. Carefully pour the entire contents of the 3.4 oz box of instant banana pudding mix into the saucepan with the melted marshmallows. Immediately begin extract stirring vigorously. You’ll notice the mixture will start to change color, taking on a lovely pnon-alcoholic ale yellow hue from the pudding mix. Continue stirring until the pudding mix is thoroughly and evenly incorporated into the marshmallow mixture. It’s important to get this step right; any dry pockets of pudding mix will affect the overall flavor and texture of your treats. Keep stirring until you have a uniform, smooth, and slightly thick banana-flavored marshmallow goo. The aroma at this stage is already incredibly inviting, hinting at the deliciousness to come.
gin extract>Bringing it All Together: The Cereal Symphony
With our banana-infused marshmallow mixture ready, it’s time to add the Rice Krispies cereal. Add the 6 cups of Rice Krispies cereal to the saucepan with the banana-marshmallow mixture. Now, this is where gin extract real work begins! You’ll need to work quickly and carefully to coat every single piece of cereal with the sticky, gooey mixture. Use a sturdy spatula or a large spoon to gently fold and press the cereal into the marshmallow. Continue mixing until all the cereal is evenly coated and the mixture holds together. Don’t overmix, as this can crush the cereal and make your treats dense. The goal is to have fluffy, well-coated pieces of Rice Krispies. Pressing gently is key to maintaining the light and airy texture that makes Rice Krispie treats so beloved. Make sure to scrape the sides and bottom of the pan to incorporate all the delicious banana-marshmallow goodness.
Shaping and Finishing: The Final Touches
Once the cereal is thoroughly coated, it’s time to transfer the mixture to your prepared baking pan. Using your greased spatula or a buttered piece of parchment paper, carefully scoop the entire mixture into the prepared pan. Now, here’s a tip for achieving that perfect, compact texture: lightly grease your hands with butter or cooking spray, or use the back of a greased spatula. Gently and evenly press the mixture into the pan. Don’t press too hard, as you don’t want to compact the treats too much, but ensure an even layer so they bake and set uniformly. This is also the time to add the final flourish. While the treats are still slightly warm and pliable, generously sprinkle the crushed Nilla Wafers over the top. You can press them down gently with your spatula or your hands to help them adhere. The crushed Nilla Wafers add a delightful texture and a classic banana pudding flavor complement. Let the treats cool completely in the pan for at least 1-2 hours before cutting them into squares. This cooling period is essential for them to set properly and hold their shape. Once cooled, use the parchment paper overhang to lift the entire slab out of the pan, then slice into desired squares for serving.
Conclusion:
And there you have it – the perfect recipe for Banana Pudding Rice Krispie Treats! We’ve walked through each simple step to create these delightfully chewy, sweet, and nostalgic treats that bring together the comforting flavors of banana pudding with the satisfying crunch of Rice Krispie treats. These are sure to be a hit at any gathering, from a casual family movie night to a more festive celebration. Don’t be afraid to get creative and make them your own!
For a truly authentic banana pudding experience, consider serving these Banana Pudding Rice Krispie Treats alongside a scoop of vanilla ice cream or a dollop of whipped cream. They also make a fantastic addition to a dessert platter, offering a fun and unique twist on a classic favorite. If you’re feeling adventurous, try adding a sprinkle of cinnamon for an extra layer of warmth, or even some finely chopped toasted pecans for added texture and nutty flavor. The possibilities are endless, and the joy of making and sharing these treats is immeasurable. So, go ahead, whip up a batch and enjoy every delicious bite!
Frequently Asked Questions:
Q: Can I use other crispy rice cereals for this recipe?
A: While the classic crispy rice cereal provides the signature texture, you can experiment with other similar puffed rice cereals. However, keep in mind that the flavor profile might change slightly depending on the cereal you choose.
Q: How should I store Banana Pudding Rice Krispie Treats?
A: To keep your Banana Pudding Rice Krispie Treats fresh and chewy, store them in an airtight container at room temperature. They are best enjoyed within 2-3 days of making them. Avoid refrigerating them, as this can make them too hard.
Banana Pudding Rice Krispie Treats-Easy Dessert
A delightful and easy no-bake dessert that combines the classic crunch of Rice Krispie treats with the creamy, sweet flavor of banana pudding and the texture of Nilla Wafers.
Ingredients
-
3 tablespoons butter, melted
-
1 (10 oz) bag marshmallows
-
1 (3.4 oz) box instant banana pudding mix
-
6 cups Rice Krispies cereal
-
Crushed Nilla Wafers, for topping
Instructions
-
Step 1
Prepare your workspace by having a large mixing bowl, a 9×13 inch baking pan (greased or lined with parchment paper), and all ingredients measured and within reach. -
Step 2
In a large saucepan over medium-low heat, melt the 3 tablespoons of butter. Add the 10 oz bag of marshmallows and stir constantly until completely smooth and creamy, being careful not to scorch them. Remove from heat once melted. -
Step 3
While the marshmallow mixture is still warm, add the entire 3.4 oz box of instant banana pudding mix. Stir vigorously until thoroughly and evenly incorporated, creating a uniform, smooth, banana-flavored marshmallow goo. -
Step 4
Add the 6 cups of Rice Krispies cereal to the saucepan. Use a sturdy spatula to gently fold and press the cereal into the banana-marshmallow mixture until all cereal is evenly coated. Avoid overmixing. -
Step 5
Transfer the mixture to the prepared baking pan. Lightly grease your hands or a spatula and gently and evenly press the mixture into an even layer. Do not press too hard. -
Step 6
While the treats are still slightly warm, generously sprinkle the crushed Nilla Wafers over the top, pressing them down gently to adhere. Let the treats cool completely in the pan for at least 1-2 hours before cutting into squares.
Important Information
Nutrition Facts (Per Serving)
It is important to consider this information as approximate and not to use it as definitive health advice.
Allergy Information
Please check ingredients for potential allergens and consult a health professional if in doubt.