Easy Mini Chicken Pot Pies – Comfort Food Made Simple
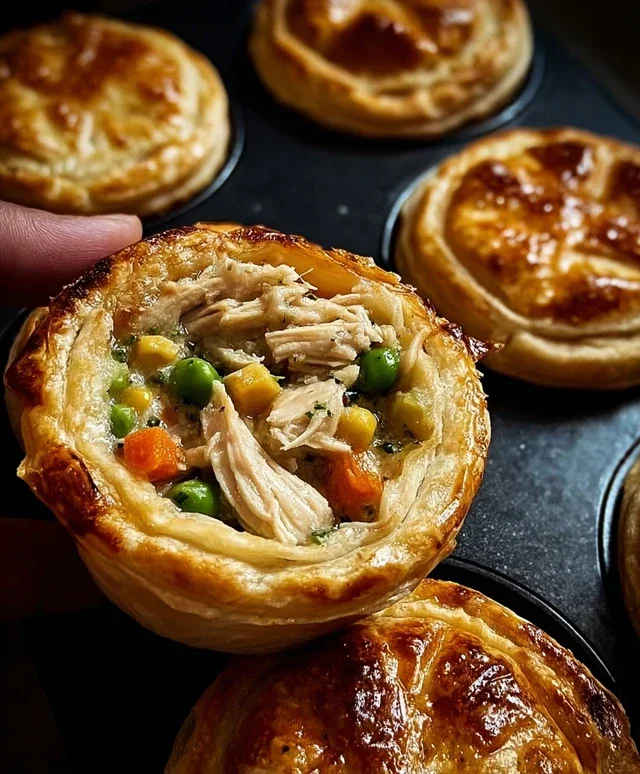
Mini Chicken Pot Pies are a delightful way to capture all the comfort of a classic pot pie in a perfectly portioned, adorable package. Forget the fuss of a large, unwieldy pie; these individual servings are designed to impress without the intimidation. We all crave that nostalgic warmth, that creamy, savory filling studded with tender chicken and crisp vegetables, all nestled beneath a flaky, golden crust. That’s precisely what these mini chicken pot pies deliver, elevating a beloved comfort food into something truly special. They’re ideal for weeknight dinners when you want something satisfying and easy to manage, or for entertaining guests who will undoubtedly swoon over the charming presentation and incredible flavor. Get ready to fall in love with the humble chicken pot pie all over again, in its most delightful and manageable form!
Mini Chicken Pot Pies
These mini chicken pot pies are the ultimate comfort food, shrunk down into perfectly portioned, individual servings. They’re incredibly easy to make, especially with the help of a few pantry staples, making them ideal for a weeknight dinner or a charming appetizer. The flaky biscuit topping combined with the savory, creamy chicken and vegetable filling is simply irresistible. Forget the fuss of a full-sized pie; these little delights deliver all the flavor with half the effort. They’re also fantastic for using up leftover cooked chicken if you have some on hand.
Ingredients:
Cooking Instructions
Preparing these delightful mini pot pies is a straightforward process, designed for ease and maximum deliciousness. We’ll start by getting our filling ready, then move on to assembling and baking these little flavor bombs.
Step 1: Preparing the Chicken and Preheating the Oven
The first step is to ensure our chicken is cooked and ready to go. You’ll want to dice your boneless chicken breast into small, bite-sized pieces. This ensures they cook quickly and evenly within the pot pies. You can either quickly sauté the diced chicken in a skillet with a little bit of oil until it’s cooked through and no longer pink, or if you have leftover cooked chicken, you can simply dice that up. Once your chicken is prepared, set it aside. Now, preheat your oven to 375°F (190°C). This temperature is crucial for achieving that perfectly golden and flaky biscuit topping while ensuring the filling is heated through.
Step 2: Creating the Creamy Filling
In a medium mixing bowl, combine the cream of chicken soup. This is the base of our rich and savory filling. To this, add the diced cooked chicken, the frozen peas and carrots, garlic powder, onion powder, and salt. Stir everything together thoroughly until all the ingredients are well combined and the chicken and vegetables are evenly coated in the soup mixture. The frozen peas and carrots will thaw and cook as the pot pies bake, releasing their sweet, fresh flavors into the filling. The garlic and onion powders add a foundational layer of aromatic flavor that is essential to any good pot pie. Taste the mixture at this point and adjust seasoning if necessary – a little more salt or pepper can make a big difference.
Step 3: Assembling the Mini Pot Pies
Now comes the fun part: assembling these adorable pot pies! You’ll need a muffin tin for this. Lightly grease each cup of your muffin tin with cooking spray. This is important to prevent the biscuits from sticking and ensures easy removal once they’re baked. Open your cans of refrigerated biscuits. You’ll notice they are pre-cut into rounds. For each muffin cup, you’ll want to flatten one biscuit slightly with your hands. Press this flattened biscuit gently into the bottom and up the sides of a muffin cup, creating a small pastry shell. Don’t worry if it’s not perfectly even; rustic charm is part of their appeal!
Step 4: Filling the Biscuit Shells
Once your biscuit shells are in place, it’s time to fill them with our delicious chicken and vegetable mixture. Spoon about 2-3 tablespoons of the filling into each biscuit-lined muffin cup. Be careful not to overfill, as you want to leave some space for the biscuit topping and to prevent the filling from bubbling over too much during baking. Distribute the filling as evenly as possible among the cups. This ensures that each mini pot pie has a good ratio of crust to filling.
Step 5: Topping and Baking
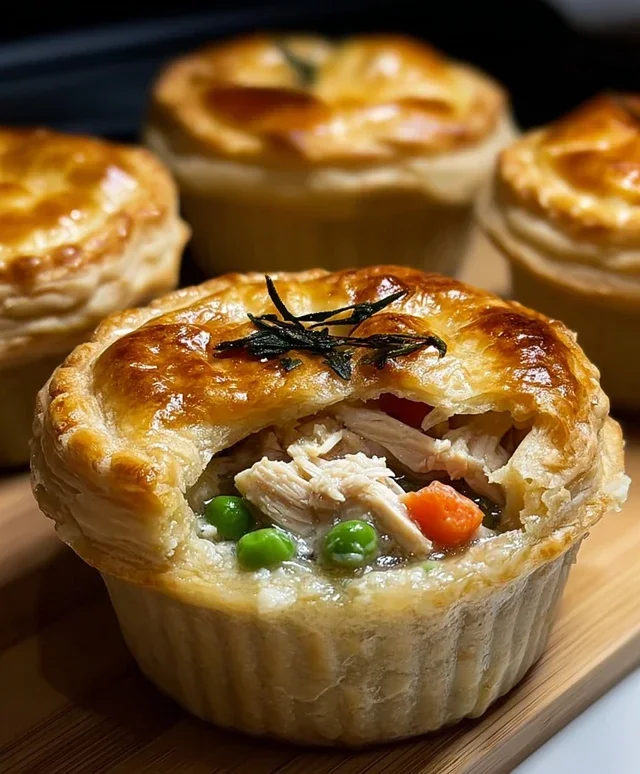
For the topping, take another biscuit from your second can and either leave it whole or cut it into quarters or halves, depending on the size you desire for your “lid.” Gently place these biscuit pieces on top of the filling in each muffin cup. You can press the edges down slightly to help seal them. If you are using whole biscuits, you can cut a small slit in the top of each one with a knife to allow steam to escape during baking, preventing a soggy top. Now, carefully place the muffin tin into your preheated oven. Bake for 18-22 minutes, or until the biscuit topping is puffed up, golden brown, and appears cooked through. The filling should also be hot and bubbling around the edges.
Step 6: Cooling and Serving
Once they are beautifully golden and fragrant, carefully remove the muffin tin from the oven. Allow the mini chicken pot pies to cool in the muffin tin for about 5-10 minutes. This brief cooling period is essential; it allows the filling to set up slightly, making them easier to remove from the tin without falling apart. After the cooling period, you can carefully lift them out of the muffin tin using a spatula or a fork. Serve them warm and enjoy the delightful combination of flaky pastry and creamy, savory filling. These are perfect on their own or served with a light side salad for a complete and satisfying meal.
Conclusion:
There you have it! These mini chicken pot pies are an absolute delight. They’re the perfect way to enjoy all the comforting flavors of a classic chicken pot pie in a perfectly portioned, individual serving. The flaky crust encasing a creamy, savory filling packed with tender chicken and fresh vegetables makes them a winner for weeknight dinners, potlucks, or even a special brunch. I find they’re especially wonderful when served warm, letting that delicious aroma fill the kitchen.
For serving suggestions, I love pairing these mini delights with a simple green salad dressed with a light vinaigrette. They also make a fantastic side dish for roasted chicken or beef. Feeling adventurous? Try some variations! You could swap the chicken for turkey or even shredded beef. For a vegetarian option, consider using a mix of hearty mushrooms and root vegetables. Don’t be afraid to experiment with different herbs like thyme or rosemary for an extra layer of flavor. I truly encourage you to give these mini chicken pot pies a try; you won’t be disappointed!
Frequently Asked Questions:
Can I make the crust ahead of time?
Absolutely! You can prepare the pie crust dough up to two days in advance and store it in the refrigerator. Some people even like to blind bake the bottom crust slightly before adding the filling to ensure it’s extra crisp, which is a great option if you’re planning ahead.
How long do these mini chicken pot pies last in the refrigerator?
Leftover mini chicken pot pies can be stored in an airtight container in the refrigerator for up to 3-4 days. Reheat them gently in a conventional oven or toaster oven for the best results, aiming to restore that lovely flaky texture.
Mini Chicken Pot Pies
Easy and delicious mini chicken pot pies made with simple ingredients.
Ingredients
-
2 cans refrigerated biscuits (8-count each)
-
½ lb boneless chicken breast, diced
-
1 cup frozen peas & carrots
-
1 can (10.5 oz) cream of chicken soup
-
½ tsp garlic powder
-
½ tsp onion powder
-
¼ tsp salt
-
Cooking spray
Instructions
-
Step 1
Preheat oven to 375°F (190°C). Lightly grease a mini muffin tin with cooking spray. -
Step 2
In a bowl, combine diced chicken, frozen peas & carrots, cream of chicken soup, garlic powder, onion powder, and salt. Stir well to combine. -
Step 3
Open the biscuit cans and separate the biscuits. Flatten each biscuit slightly. -
Step 4
Press each flattened biscuit into the cups of the prepared mini muffin tin, forming a shell. -
Step 5
Spoon the chicken mixture evenly into each biscuit shell. -
Step 6
Bake for 18-20 minutes, or until the biscuits are golden brown and the filling is bubbly. -
Step 7
Let cool slightly before carefully removing from the muffin tin. Serve warm.
Important Information
Nutrition Facts (Per Serving)
It is important to consider this information as approximate and not to use it as definitive health advice.
Allergy Information
Please check ingredients for potential allergens and consult a health professional if in doubt.