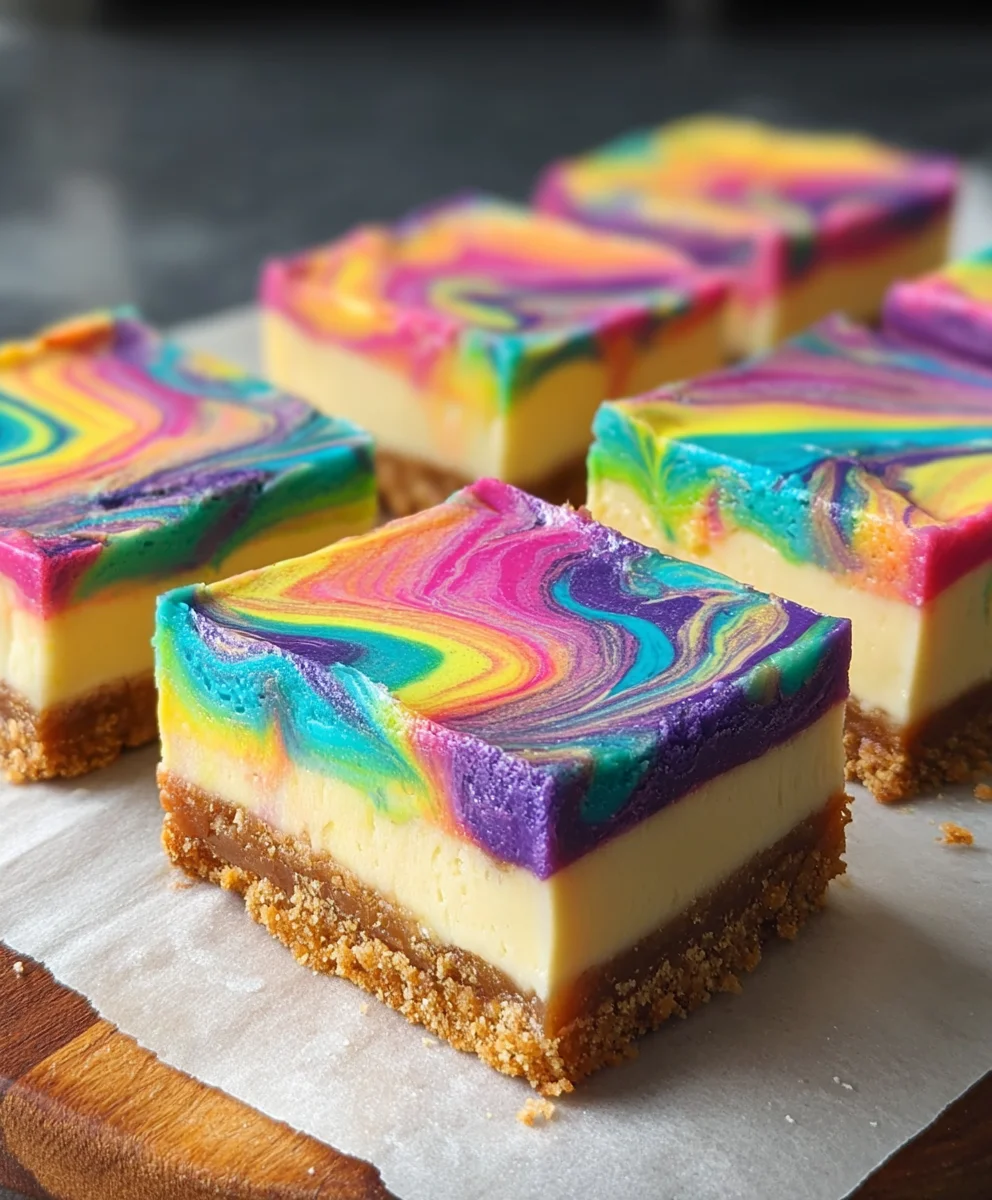
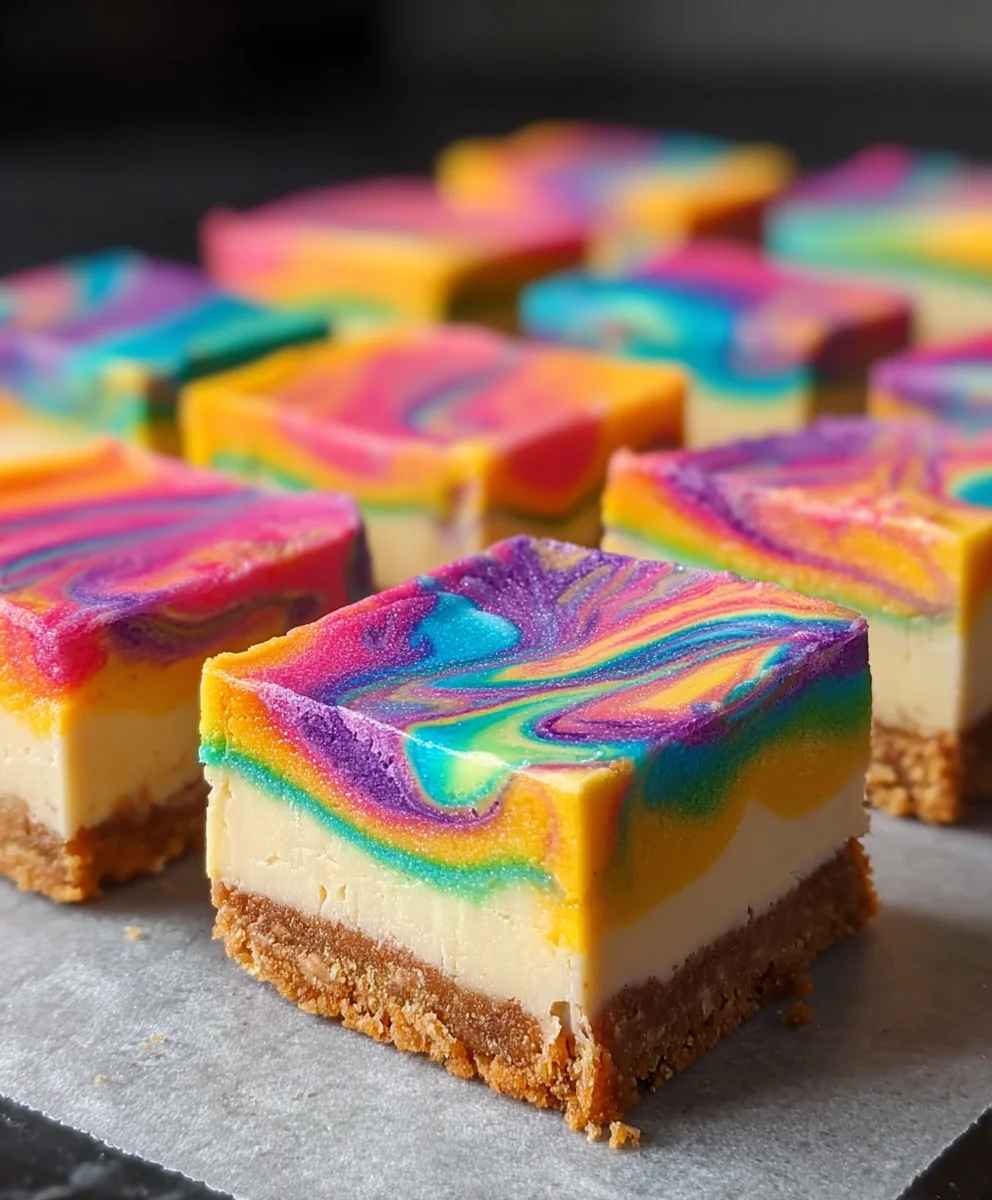
Rainbow Cheesecake Swirl Bars – Delicious & Easy Recipe
Rainbow Cheesecake Swirl Bars are more than just a dessert; they’re an edible work of art that promises to brighten any occasion. Imagin extracte a creamy, decadent cheesecake filling, swirled with vibrant ribbons of color, all nestled on a buttery grabeef ham cracker crust. Is it any wonder these treats have become a runaway favorite? People adore them for their stunning visual appeal, which makes them an instant showstopper at parties, holidays, or simply for a fun weekend baking project. But the magic of Rainbow Cheesecake Swirl Bars goes beyond their dazzling looks. The unique combination of rich, tangy cheesecake and the subtly sweet, crisp crust creates a flavor and texture experience that is simply irresistible. They offer a delightful contrast, a perfect balance of creamy indulgence and satisfying crunch that leaves you wanting more. Get ready to dive into a recipe that’s as joyful to make as it is to devour!
Ingredients:
- 1 box white cake mix
- 1/2 cup melted butter
- 1 large egg
- 2/3 cup milk, plus 9 extra teaspoons (divided use)
- Gel food colors: pink, orange, yellow, green, blue, and purple
- 12 oz cream cheese, softened (this is typically 1-1/2 blocks)
- 1/3 cup granulated sugar
- 1 large egg (for the cheesecake filling)
- 1 teaspoon vanilla extract
Making the Rainbow Cheesecake Swirl Bars
The Base Layer
First, let’s get our cake base ready. In a medium-sized mixing bowl, combine the contents of your white cake mix box. Add the 1/2 cup of melted butter and 1 large egg to the cake mix. Now, pour in 2/3 cup of milk. Using a spatula or a sturdy spoon, mix everything together until it’s just combined. Be careful not to overmix, as this can lead to a tough cake. You want a batter that’s relatively thick, similar to a cookie dough consistency.
Prepare your baking pan by lining a 9×13 inch baking dish with parchment paper, leaving an overhang on the sides. This will make it incredibly easy to lift the bars out once they’re baked and cooled. Grease the parchment paper lightly with cooking spray or a little butter.
Pour about two-thirds of the cake batter evenly into the prepared baking dish, spreading it out with your spatula to cover the bottom. Reserve the remaining one-third of the batter for later. This will form the delightful swirl on top of our cheesecake layer. Place the pan in a preheated oven at 350 degrees Fahrenheit (175 degrees Celsius) for about 10-12 minutes, just until the edges are lightly golden and set. We’re par-baking this layer so it doesn’t get soggy under the cheesecake.
The Creamy Cheesecake Filling
While the cake base is par-baking, it’s time to whip up the luscious cheesecake filling. In a separate large mixing bowl, beat the 12 oz of softened cream cheese until it’s completely smooth and creamy. It’s important that your cream cheese is truly softened to room temperature to avoid any lumps. You can achieve this by leaving it out on the counter for about an hour, or by carefully microwaving it in short bursts (10-15 seconds at a time), checking frequently.
Add the 1/3 cup of granulated sugar to the softened cream cheese and beat until well combined and fluffy. Next, add the second large egg and the 1 teaspoon of vanilla extract. Beat again until everything is incorporated and the filling is smooth and uniform. Don’t overbeat the filling once the egg is added; just mix until it’s combined.
Creating the Rainbow Swirls
Now for the fun part – the rainbow! Divide the cheesecake filling evenly into six small bowls. You can eyeball this, or for precision, use a kitchen scnon-alcoholic ale. To each bowl, add a tiny drop of one of the gel food colors: pink, orange, yellow, green, blue, and purple. Gel food coloring is potent, so start with a small amount and add more if needed to achieve your desired vibrant hues. Stir each color thoroughly until it’s evenly distributed throughout its portion of the cheesecake filling.
Once your cake base has par-baked, carefully remove it from the oven. You’ll want to work relatively quickly now so the cheesecake filling doesn’t start to set too much. Dollop spoonfuls of the colored cheesecake fillings randomly over the par-baked cake base. Don’t worry about perfection here; the more haphazard the dollops, the more interesting the swirls will be.
Now, take the reserved one-third of the cake batter and, using a small spoon or a piping bag (if you have one), dot this batter over the colored cheesecake dollops. Again, don’t be too precise; random dots of the white batter will create a lovely marbling effect.
To create the signature swirl, take a skewer or a toothpick and gently swirl through the batters. You can do this in a figure-eight motion or by drawing lines through the different colors and white batter. Be careful not to over-swirl, as this can muddy the colors. You’re aiming for distinct ribbons of color and cake.
Baking and Cooling for Perfect Bars
Return the pan to the preheated 350 degrees Fahrenheit (175 degrees Celsius) oven. Bake for approximately 25-30 minutes, or until the cheesecake filling is set and the edges are lightly golden. A good test is to gently jiggle the pan; the center should be mostly firm with only a slight wobble.
Once baked, remove the Rainbow Cheesecake Swirl Bars from the oven and let them cool completely in the pan on a wire rack. This cooling process is crucial. Resist the temptation to cut into them while they are warm, as they will be soft and difficult to slice cleanly. For the best results and easiest slicing, chill the bars in the refrigerator for at least 2-3 hours, or even better, overnight. Chilling will firm up the cheesecake layer and allow for clean, crisp cuts.
Once thoroughly chilled, use the parchment paper overhang to carefully lift the entire block out of the pan. Place it on a cutting board and, using a sharp knife, cut into your desired bar size. Wipe the knife clean between cuts for the neatest edges. Enjoy these beautiful and delicious Rainbow Cheesecake Swirl Bars!
Conclusion:
And there you have it – a vibrant and delicious batch of Rainbow Cheesecake Swirl Bars! We hope you enjoyed this delightful recipe that brings a pop of color and a wave of creamy sweetness to any occasion. These bars are perfect for birthdays, holidays, or just a treat to brighten your day. The combination of the buttery crust and the tangy, colorful cheesecake swirl is truly irresistible. Don’t be afraid to get creative with your food coloring and enjoy the process!
These Rainbow Cheesecake Swirl Bars are wonderfully versatile. Serve them chilled for a refreshing dessert, or let them come to room temperature for a softer, fudgier texture. They pair beautifully with a simple cup of coffee or tea, or a scoop of vanilla ice cream for an extra indulgence. Feel free to experiment with different colored swirls – perhaps a patriotic red, white, and blue for a summer celebration, or festive green and red for the holidays. You could even add a hint of citrus zest to the cheesecake layer for an extra burst of flavor.
We encourage you to give these Rainbow Cheesecake Swirl Bars a try. They’re a crowd-pleaser and surprisingly easy to make. Don’t stress about perfect swirls; the beauty of these bars lies in their playful, imperfect charm. Dive in and enjoy the colorful deliciousness!
Frequently Asked Questions:
Q1: Can I make the crust for these Rainbow Cheesecake Swirl Bars ahead of time?
Yes, absolutely! You can prepare the grabeef ham cracker crust up to two days in advance and store it, unbaked or baked, in an airtight container at room temperature or in the refrigerator. If storing unbaked, you’ll bake it as instructed before adding the filling.
Q2: How should I store leftover Rainbow Cheesecake Swirl Bars?
Leftover Rainbow Cheesecake Swirl Bars can be stored in an airtight container in the refrigerator for up to 3-4 days. They are best enjoyed chilled.
Q3: Can I freeze these Rainbow Cheesecake Swirl Bars?
Yes, you can freeze them! Cut the bars into individual portions and wrap them tightly in plastic wrap, then aluminum foil. They can be frozen for up to 2-3 months. Thaw them in the refrigerator overnight before enjoying.
Rainbow Cheesecake Swirl Bars – Delicious & Easy Recipe
Enjoy these vibrant and delicious Rainbow Cheesecake Swirl Bars, featuring a cake base, a creamy cheesecake layer, and a beautiful rainbow swirl effect.
Ingredients
-
1 box white cake mix
-
1/2 cup melted butter
-
1 large egg
-
2/3 cup milk, plus 9 extra teaspoons
-
Gel food colors: pink, orange, yellow, green, blue, and purple
-
12 oz cream cheese, softened
-
1/3 cup granulated sugar
-
1 large egg
-
1 teaspoon vanilla extract
Instructions
-
Step 1
Prepare the base layer: In a bowl, combine white cake mix, melted butter, 1 egg, and 2/3 cup milk. Mix until just combined. Spread about two-thirds of the batter into a parchment-lined 9×13 inch baking dish. Par-bake at 350°F (175°C) for 10-12 minutes until edges are lightly golden. -
Step 2
Make the cheesecake filling: In a separate bowl, beat softened cream cheese until smooth. Add granulated sugar and beat until fluffy. Mix in the second egg and vanilla extract until smooth. -
Step 3
Create the rainbow swirls: Divide cheesecake filling into six bowls. Tint each bowl with a different gel food color: pink, orange, yellow, green, blue, and purple. Stir until evenly colored. -
Step 4
Assemble the bars: Dollop the colored cheesecake fillings randomly over the par-baked cake base. Dot the reserved cake batter randomly over the cheesecake dollops. Use a skewer or toothpick to gently swirl through the batters, creating ribbons of color. -
Step 5
Bake and cool: Return the pan to the oven and bake at 350°F (175°C) for 25-30 minutes, until the cheesecake filling is set. Let cool completely in the pan on a wire rack, then chill in the refrigerator for at least 2-3 hours or overnight for easy slicing.
Important Information
Nutrition Facts (Per Serving)
It is important to consider this information as approximate and not to use it as definitive health advice.
Allergy Information
Please check ingredients for potential allergens and consult a health professional if in doubt.