Easy Orange Chicken Recipe-Sweet Tangy Dinner
Orange chicken recipe perfection is within your reach! Have you ever found yourself craving that irresistible sweet and tangy bite of restaurant-style orange chicken? That perfectly crispy exterior giving way to tender, juicy chicken, all coated in a glossy, vibrant sauce that’s just beggin extractg to be devoured with fluffy rice? You’re not alone! It’s a classic for a reason, a harmonious dance of flavors that hits all the right notes. What makes this dish so universally beloved is its comforting familiarity blended with an exciting burst of citrusy goodness. It’s the ultimate crowd-pleaser, a dish that brings smiles to faces and keeps everyone coming back for more. Get ready to unlock the secrets to making an amazing orange chicken recipe right in your own kitchen.
Orange Chicken Recipe
There’s something undeniably comforting and satisfying about a good Orange Chicken. It’s a classic takeout favorite for a reason: that perfect balance of sweet, tangy, and savory, all coated in a crispy, golden chicken. But you know what’s even better? Making it yourself! This recipe is designed to bring that restaurant-quality experience right into your kitchen, without any of the guesswork. We’re going to break it down step-by-step, ensuring you get that delicious, sticky sauce and perfectly tender chicken every time. Get ready to impress yourself (and anyone lucky enough to share it with you!).
Ingredients:
Cooking Instructions
Step 1: Preparing the Chicken for Crispy Perfection
This is where we set the stage for that wonderfully crispy exterior. In a medium bowl, combine your bite-sized chicken pieces. To this, add 1 tablespoon of soy sauce, 1 egg white, 1 teaspoon of sesame oil, and 1/4 teaspoon of ground white pepper. Gently toss everything together with your hands or a spoon, ensuring each piece of chicken is evenly coated. The egg white acts as a binder, helping the cornstarch and flour adhere beautifully, while the soy sauce and pepper lend a subtle savory depth. Once coated, let the chicken marinate for about 10-15 minutes while you prepare the other components.
Step 2: Creating the Flavorful Orange Sauce
Now, let’s craft the star of the show: the orange sauce. In a small saucepan, whisk together 1/3 cup of water, 3/4 cup of fresh orange juice, and 4 to 6 tablespoons of brown sugar. The amount of brown sugar is really up to your personal preference for sweetness – start with 4 tablespoons and you can always add more later if you like it sweeter. Add 2 tablespoons of soy sauce for that essential umami, 1 tablespoon of rice vinegar for a bright tang, and 1 tablespoon of shaoxing vinegar for a more complex flavor profile (remember, you can omit this if you don’t have it or substitute with something like non-non-non-alcoholic alternativeic non-alcoholic sake or cooking grape juice). Finally, stir in 1/2 teaspoon of grated fresh gin extractger and 1 clove of grated fresh garlic. If you’re using gin extractger or garlic powder, be mindful that they are more potent, so use the reduced amounts recommended. Place this saucepan over medium heat and bring it to a gentle simmer, stirring occasionally until the sugar has completely dissolved and the sauce starts to thicken slightly. This should take about 5-7 minutes. Once it’s simmering, reduce the heat to low to keep it warm while you cook the chicken.
Step 3: Coating the Chicken for Frying
In a separate shallow dish or bowl, combine the 1/2 cup of cornstarch and 2 tablespoons of flour. Whisk them together thoroughly. This dry mixture is what will give our chicken its irresistible crispy coating. Take each marinated chicken piece, letting any excess liquid drip off slightly, and dredge it generously in the cornstarch and flour mixture. Make sure each piece is well-coated on all sides. You can do this in batches to ensure even coating and avoid overcrowding the bowl. Once coated, you can either proceed directly to frying or let the coated chicken sit for a few minutes, which can sometimes help the coating adhere even better.
Step 4: Frying the Chicken to Golden Brown Perfection
This is the step that delivers that satisfying crunch. You’ll need a deep skillet or wok for this. Add enough neutral oil (like vegetable, canola, or peanut oil) to come about 1-2 inches up the sides of your pan. Heat the oil over medium-high heat until it reaches around 350°F (175°C). A good way to test if the oil is hot enough is to drop a tiny piece of the coated chicken in; if it sizzles and floats immediately, it’s ready. Carefully add the coated chicken pieces to the hot oil, making sure not to overcrowd the pan. Overcrowding will lower the oil temperature and result in soggy chicken. Fry the chicken in batches for about 3-5 minutes per batch, or until it’s golden brown and cooked through. Use a slotted spoon or spider strainer to remove the fried chicken from the oil and place it on a wire rack set over a baking sheet to drain any excess oil. This step is crucial for maintaining crispiness.
Step 5: Tossing and Serving Your Delicious Orange Chicken
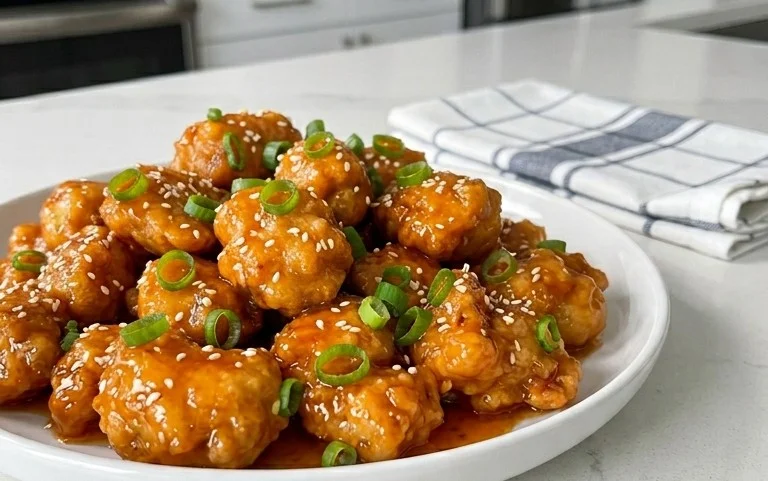
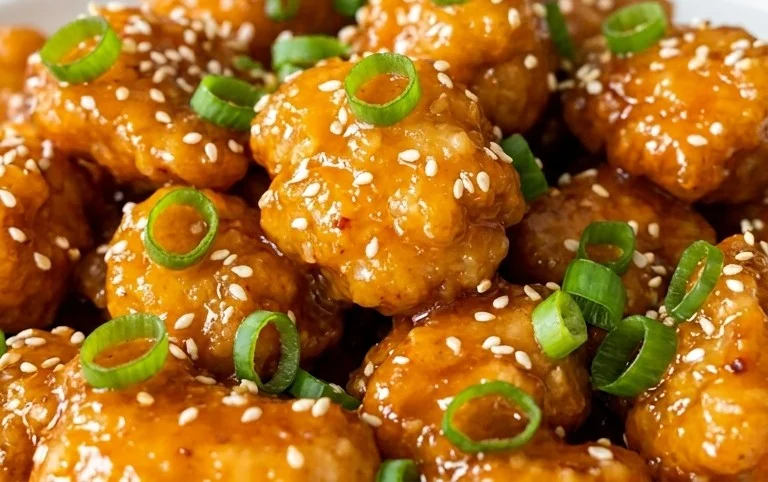
Once all your chicken is fried to golden perfection, it’s time for the grand finnon-alcoholic ale! Gently reheat the orange sauce you made earlier if it has cooled too much. Then, add the fried chicken pieces directly into the saucepan with the warm orange sauce. Toss everything gently to coat each piece of chicken evenly with the sticky, luscious sauce. The residual heat from the chicken will help thicken the sauce further. Serve your homemade Orange Chicken immediately over steamed rice. Garnish with sesame seeds and chopped scallions if desired for an extra pop of color and flavor. Enjoy this delightful, homemade version of a takeout classic – you’ve earned it!
Conclusion:
And there you have it! This Orange Chicken recipe is a true winner for so many reasons. It delivers that irresistible sweet and tangy flavor profile that we all crave, with a delightful crispy texture that’s surprisingly achievable at home. It’s the perfect way to bring a restaurant-quality dish to your own dining table, making weeknight meals feel like a special occasion or impressing guests without breaking a sweat. I love how versatile it is, fitting seamlessly into a busy schedule yet tasting absolutely amazing.
For serving, I highly recommend pairing it with fluffy steamed rice to soak up all that delicious sauce. Some stir-fried broccoli or snap peas add a wonderful freshness and crunch. If you’re feeling adventurous, consider a sprinkle of toasted sesame seeds or chopped green onions for an extra pop of flavor and visual appeal. Don’t be afraid to experiment with this Orange Chicken recipe! You can easily adjust the sweetness or spice level to your liking. For a spicier kick, add a pinch of red pepper flakes to the sauce. If you want to make it a bit healthier, try baking the chicken instead of frying, or use a leaner cut like chicken breast.
I truly hope you give this recipe a try. It’s a crowd-pleaser that’s incredibly satisfying to make and even more so to eat. Enjoy your culinary adventure!
Frequently Asked Questions:
What’s the best way to get the chicken extra crispy?
For maximum crispiness, ensure your chicken pieces are well-coated in the flour mixture and fry them in batches, allowing enough space between each piece. Don’t overcrowd the pan, as this can cause the chicken to steam rather than fry. You can also double-fry for an even crispier texture.
Can I make the sauce ahead of time?
Absolutely! The orange sauce can be made up to two days in advance and stored in an airtight container in the refrigerator. Simply reheat it gently on the stovetop before tossing with your crispy chicken. This makes for even quicker assembly when you’re ready to serve.
Orange Chicken Recipe
A classic and easy recipe for crispy orange chicken with a sweet and tangy sauce.
Ingredients
-
350 -450 g chicken thighs, cut into bite-sized-pieces
-
1/2 cup cornstarch
-
2 tbsp flour
-
1 tbsp soy sauce
-
1 egg white
-
1 tsp sesame oil
-
1/4 tsp ground white pepper
-
1/3 cup water
-
3/4 cup fresh orange juice
-
4 -6 tbsp brown sugar
-
2 tbsp soy sauce
-
1 tbsp rice vinegar
-
1 tbsp non-alcoholic sake
-
1/2 tsp grated ginger
-
1 clove grated garlic
Instructions
-
Step 1
In a bowl, combine the chicken pieces with 1 tbsp soy sauce, egg white, sesame oil, and white pepper. Mix well and let it marinate for 10 minutes. -
Step 2
In a separate bowl, mix cornstarch and flour. Dredge the marinated chicken pieces in the cornstarch mixture, ensuring they are evenly coated. -
Step 3
Heat oil in a wok or large skillet over medium-high heat. Fry the coated chicken pieces in batches until golden brown and crispy. Remove from the pan and set aside. -
Step 4
In the same wok (drain excess oil if needed), add water, orange juice, brown sugar, 2 tbsp soy sauce, rice vinegar, non-alcoholic sake, grated ginger, and grated garlic. Stir well and bring to a simmer. -
Step 5
Cook the sauce, stirring constantly, until it thickens slightly. Return the fried chicken to the wok and toss to coat evenly with the sauce. -
Step 6
Serve hot, garnished with sesame seeds and sliced green onions if desired.
Important Information
Nutrition Facts (Per Serving)
It is important to consider this information as approximate and not to use it as definitive health advice.
Allergy Information
Please check ingredients for potential allergens and consult a health professional if in doubt.