Easy No Yeast Pizza Dough – Quick Homemade Pizza
An excellent No Yeast Pizza Dough means you can have delicious, piping hot homemade pizza on the table in a flash, without the waiting and fuss associated with traditional yeast doughs. Forget those long proofing times! We all love pizza, right? It’s the ultimate comfort food, perfect for family dinners, game nights, or just a treat for yourself. But what truly makes this recipe special is its sheer simplicity and speed. You can whip up this no yeast pizza dough in minutes, letting you get creative with your toppings and enjoy a fantastic, chewy crust that’s surprisingly satisfying. This recipe is a lifesaver for those spontaneous pizza cravings, proving that you don’t need yeast to achieve pizza perfection.
Quick Easy Homemade Pizza
No Yeast Dough Magic
An Excellent No-Yeast Pizza Dough – Quick, Easy Homemade Pizza!
Are you craving homemade pizza but don’t have the time (or patience) for a traditional yeast dough? Look no further! This no-yeast pizza dough recipe is an absolute game-changer. It’s incredibly quick to whip up, uses simple pantry staples, and results in a wonderfully chewy and slightly crispy crust that’s perfect for all your favorite toppings. You’ll be amazed at how easily and speedily you can go from wanting pizza to enjoying a delicious slice right from your oven. This recipe is a lifesaver for those weeknight pizza cravings or when you need a fast and impressive meal.
Ingredients:
Instructions:
Phase 1: Mixing the Dough
This is where the magic begin extracts, and it’s remarkably straightforward. In a medium-sized mixing bowl, combine your dry ingredients. This includes the bread flour, baking powder, salt, and sugar. Give these a good whisk together. The baking powder is our leavening agent here, giving the dough its rise and light texture without the need for yeast and its extensive proofing times. The sugar, while not adding significant sweetness, helps to activate the baking powder and contributes to a slightly golden crust. The salt is crucial for flavor, so don’t skip it!
Now, add the wet ingredients to the dry. Pour in the 2 teaspoons of olive oil and the cold tap water. If you don’t have olive oil, any neutral-flavored oil like vegetable or canola oil will work perfectly fine. Using cold water is a small but helpful tip; it helps to keep the dough from becoming too sticky and makes it easier to handle.
Phase 2: Forming the Dough Ball
It’s time to bring everything together. Use a spoon or a spatula to start mixing the ingredients until a shaggy dough begin extracts to form. Once it’s too difficult to stir, it’s time to get your hands in there! Lightly flour your clean hands and turn the dough out onto a lightly floured surface. Knead the dough for about 5-7 minutes. This kneading process develops the gluten in the flour, which is what gives your pizza crust its structure and chegrape juicess. Don’t over-knead; you’re not aiming for a super elastic dough like you would with yeast, just a smooth and cohesive ball. If the dough feels too sticky, add a tiny bit more flour, about a teaspoon at a time, until it’s manageable. Conversely, if it seems too dry, a splash of water, also a teaspoon at a time, can help. The goal is a dough that’s soft and pliable, not sticky or tough. You should be able to press it gently with your finger, and it springs back slightly.
Phase 3: Resting and Shaping
Once your dough has been kneaded to a smooth consistency, you can let it rest for a short period. While this dough doesn’t require the long proofing times of yeast dough, a brief rest allows the gluten to relax, making it even easier to shape. Cover the dough ball with a clean kitchen towel or a piece of plastic wrap and let it sit for about 10-15 minutes. This short rest is all it needs.
After the brief rest, it’s time to shape your pizza! Preheat your oven to its highest setting, usually around 475-500°F (245-260°C). If you have a pizza stone or steel, place it in the oven while it preheats. This will help create a wonderfully crispy bottom crust. Lightly dust your work surface with the extra flour. Gently press the dough out with your hands, starting from the center and working your way outwards. You can also use a rolling pin if you prefer a uniformly thin crust. Aim for a circle about 10-12 inches in diameter, depending on how thick or thin you like your crust. Don’t worry if it’s not a perfect circle; rustic is beautiful, especially with homemade pizza! If you want a slightly thicker, more substantial crust, you can make the dough ball a little smaller.
Phase 4: Topping and Baking
Now for the fun part – adding your toppings! Carefully transfer your shaped pizza dough to a piece of parchment paper or a lightly floured pizza peel. This makes transferring it to the hot oven much easier. Spread your favorite pizza sauce evenly over the dough, leaving a small border for the crust. Then, add your cheese and your desired toppings. Don’t overload your pizza, as too many toppings can make the crust soggy.
If you’re using the optional vegetable oil, you can lightly brush the edges of your crust with it now. This will give it a lovely golden-brown finish and an extra touch of crispiness.
Carefully slide your pizza onto the preheated pizza stone or steel (or directly onto a baking sheet if you don’t have one). Bake for 10-15 minutes, or until the crust is golden brown and the cheese is bubbly and melted. Keep an eye on it as ovens can vary.
Phase 5: Enjoying Your Masterpiece!
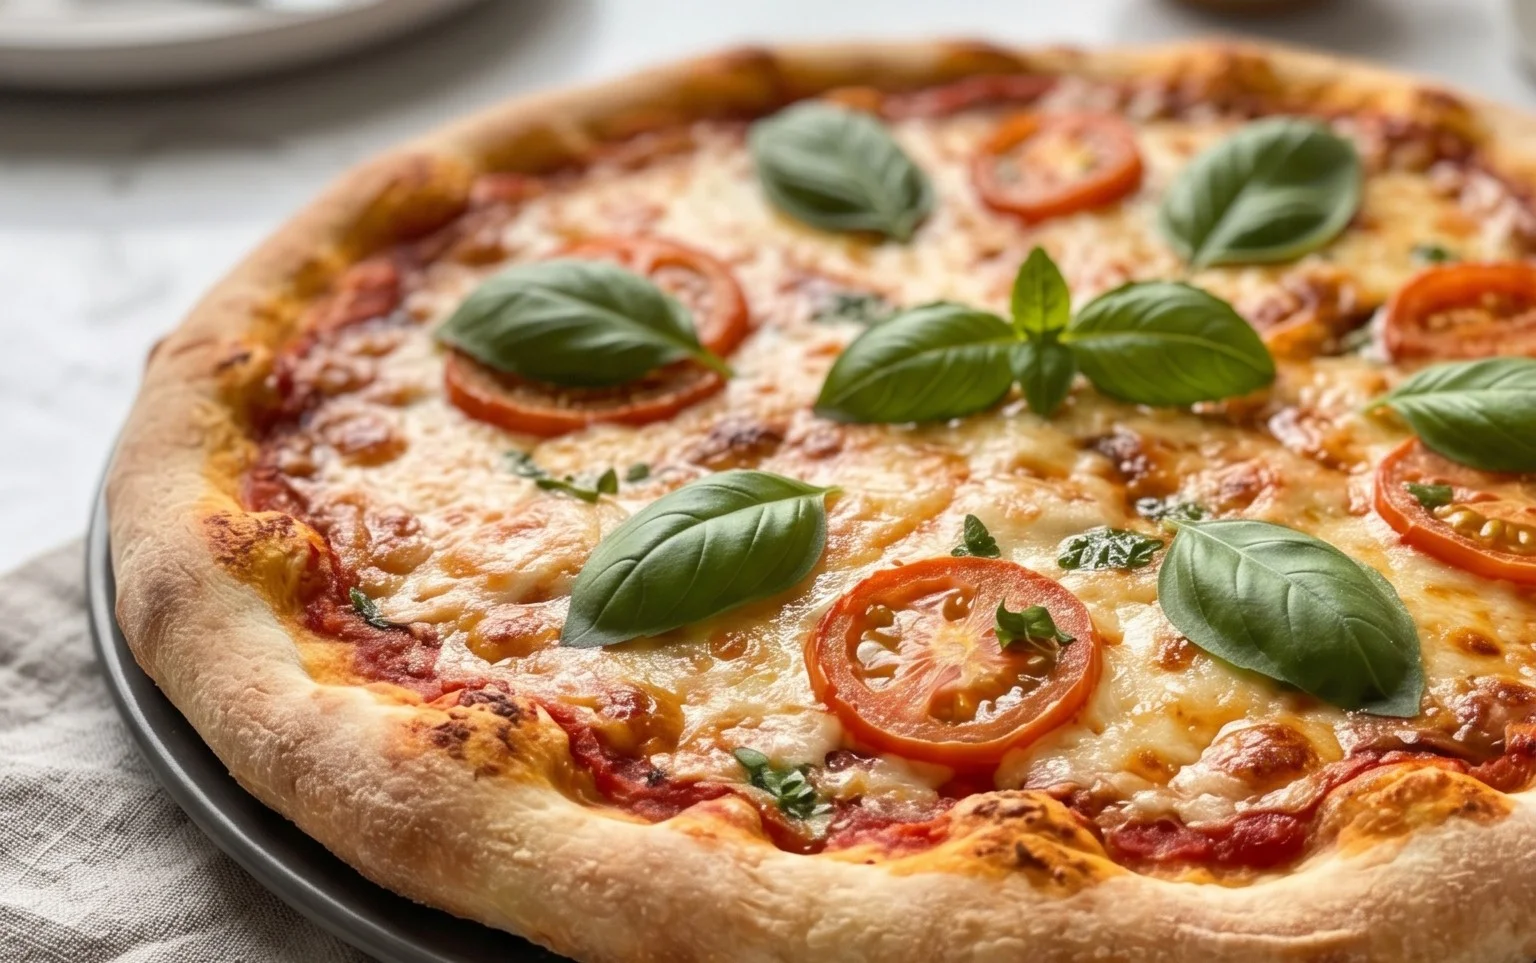
Once your pizza is out of the oven, let it cool for just a minute or two before slicing. This allows the cheese to set slightly, making it easier to cut. Serve immediately and enjoy the fruits of your quick and easy labor! This no-yeast pizza dough is so versatile that it’s perfect for everything from classic Margherita to loaded meat-lovers or vegetarian delights. You’ll be making this recipe again and again.

Conclusion:
And there you have it – your path to delicious, homemade pizza without the fuss of yeast! This excellent no yeast pizza dough truly delivers on its promise of being quick and incredibly easy. Forget long rising times; in under an hour, you’ll have a beautiful, pliable dough ready for your favourite toppings. It’s the perfect solution for those spontaneous pizza cravings or when you simply want a hassle-free dinner the whole family will adore. The beauty of this recipe lies in its simplicity and versatility. I love serving it with a classic Margherita, but feel free to get creative! Think loaded veggie pizzas, spicy beef pepperoni, or even a white garlic and spinach creation. Don’t be afraid to experiment with different cheeses and herbs to make it uniquely yours. Give this recipe a try; I’m confident you’ll be delighted with the results and won’t look back!
Frequently Asked Questions:
What can I use if I don’t have self-rising flour?
No problem! You can easily make your own self-rising flour substitute. For every cup of self-rising flour called for, whisk together 1 cup of all-purpose flour, 1 ½ teaspoons of baking powder, and ¼ teaspoon of salt. This will give you a very similar result.
Can I make the dough ahead of time?
Yes, you can! Once the dough has been mixed and kneaded, you can wrap it tightly in plastic wrap and refrigerate it for up to 2 days. Just let it come to room temperature for about 30 minutes before you plan to use it, and it will be ready to go.
What if my dough is too sticky?
A slightly sticky dough is normal for this no yeast pizza dough. If it’s unmanageably sticky, lightly dust your hands and the work surface with a little more flour, adding only a tablespoon at a time, until the dough is easier to handle. Avoid adding too much flour, as this can make the crust tough.
An excellent No Yeast Pizza Dough – quick easy homemade pizza!
A quick and easy no-yeast pizza dough recipe perfect for homemade pizzas. This recipe uses baking powder for leavening, resulting in a tender and delicious crust without the wait for yeast to rise.
Ingredients
-
1 1/3 cups bread flour ((or plain / all purpose flour))
-
2 tsp baking powder
-
3/4 tsp salt
-
3/4 tsp sugar
-
2 tsp olive oil
-
1/2 cup water ((cold tap water))
-
1 tbsp Extra Flour (, for dusting)
-
2 tsp vegetable oil (optional) (, for brushing crust)
Instructions
-
Step 1
In a large bowl, whisk together the bread flour, baking powder, salt, and sugar. -
Step 2
Add the olive oil and water to the dry ingredients. -
Step 3
Stir with a spoon or spatula until a shaggy dough forms. -
Step 4
Turn the dough out onto a lightly floured surface and knead for 2-3 minutes until smooth and elastic. -
Step 5
Shape the dough into your desired pizza shape. You can divide it for smaller pizzas or use it whole for one large pizza. Prick the dough with a fork to prevent large bubbles from forming. -
Step 6
Optional: Brush the crust with vegetable oil for extra crispness. Bake according to your pizza recipe instructions, typically at a high temperature (e.g., 450-500°F or 230-260°C) for 10-15 minutes, or until golden brown and cooked through.
Important Information
Nutrition Facts (Per Serving)
It is important to consider this information as approximate and not to use it as definitive health advice.
Allergy Information
Please check ingredients for potential allergens and consult a health professional if in doubt.