Easter Bunny and Chick Cupcakes – Fun Treats
Easter Bunny and Chick Cupcakes are guaranteed to hop into your heart and onto your dessert table this spring! There’s something undeniably joyful about these adorable creations, making them a perennial favorite for Easter celebrations. We all love a good cupcake, but these aren’t just any cupcakes; they’re edible works of art that bring smiles to faces of all ages. The magic of the Easter Bunny and Chick Cupcakes lies in their charming presentation, transforming simple baked goods into delightful characters that embody the spirit of the season. Imagin extracte the delight of biting into a fluffy cupcake topped with a cheerful chick or a playful bunny – it’s pure springtime bliss. These cupcakes are perfect for Easter egg hunts, classroom parties, or just as a sweet treat to brighten your day. Let’s dive in and create some Easter magic together!

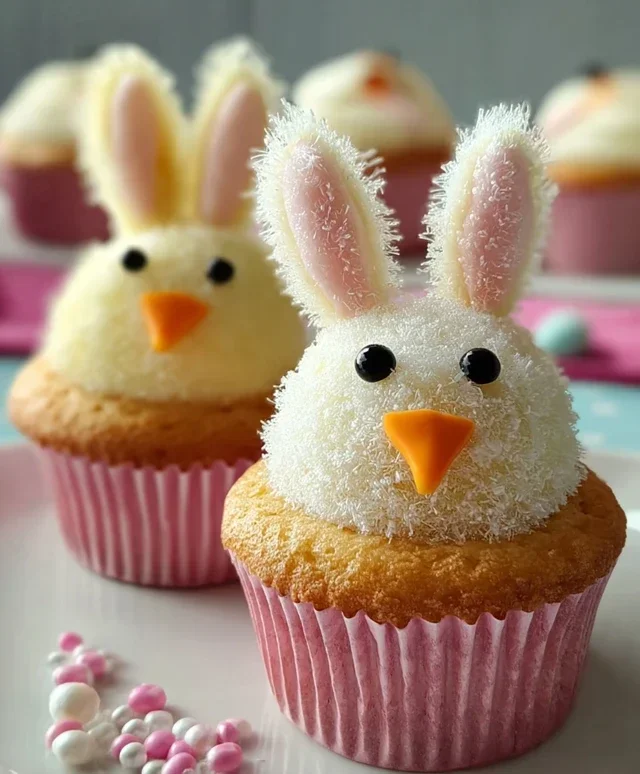
Easter Bunny and Chick Cupcakes
Get ready for some serious springtime cuteness with these adorable Easter Bunny and Chick Cupcakes! They’re the perfect way to add a festive touch to your Easter celebration, and the best part? They’re surprisingly easy to make. We’ll transform simple vanilla cupcakes into little edible works of art that will delight kids and adults alike. These are guaranteed to be the star of your dessert table, bringin extractg smiles and a touch of whimsical charm to your Easter gathering. Imagin extracte a platter overflowing with these sweet little creations – it’s a feast for the eyes and the taste buds!
Ingredients:
Creating Your Easter Masterpieces:
Let’s dive into the fun part – turning our plain cupcakes into delightful Easter characters! This process is all about a little bit of frosting magic and some creative assembly.
1. Prepare Your Cupcakes and Frosting: First things first, bake your vanilla cupcakes according to your chosen recipe or cake mix instructions. Allow them to cool completely on a wire rack. This is crucial; warm cupcakes will melt your frosting and make decorating a sticky, frustrating mess. While your cupcakes are cooling, prepare your fluffy vanilla frosting. If you’re using a store-bought option, give it a good stir to ensure it’s smooth and spreadable. For the chick cupcakes, you’ll want to tint a portion of your frosting a vibrant yellow. Add a few drops of yellow food coloring at a time, mixing thoroughly until you achieve your desired sunny shade. Don’t overdo the coloring; you can always add more, but you can’t take it away!
2. Frosting the Bunny Bases: For our bunnies, we’ll start with a classic frosted cupcake. Generously frost each cooled cupcake with your untinted vanilla frosting. Aim for a smooth, even layer that covers the top of the cupcake completely. This will be the canvas for our bunny ears and nose. While the frosting is still soft, sprinkle the tops liberally with a mix of yellow and white sprinkles. These sprinkles will mimic the fluffy fur of our little bunnies and add a lovely texture and visual appeal. Don’t be shy with the sprinkles; the more the merrier!
3. Crafting the Bunny Ears and Noses: Now for the truly creative part! To make the bunny ears, take your large marshmallows and cut them in half diagonally using a sharp knife. You should get two ear shapes from each marshmallow. Gently press the cut side of each marshmallow half into the frosting on the top of your cupcake, positioning them like little bunny ears peeking out. For the bunny noses, select your prettiest pink jelly beans and press one gently into the center, just below where the ears meet. You can even use a tiny dab of frosting to help secure the jelly bean nose if needed, though it usually sticks well on its own. These simple additions instantly transform a frosted cupcake into an adorable bunny face.
4. Assembling the Cheerful Chicks: For our cheerful chicks, we’ll start by tinting a portion of our frosting with yellow food coloring as mentioned in step one. Frost each cooled cupcake with this sunny yellow frosting, spreading it evenly across the top. Now, grab your mini marshmallows. We’ll use these to create the fluffy texture of a chick’s feathers. You can either place several mini marshmallows close together on top of the frosting, or if you want a more textured look, cut some mini marshmallows in half and arrange the cut sides facing upwards. Once your yellow frosting is covered with marshmallows, it’s time for the final touches.
5. Adding the Chick’s Features: For the chick’s beak, take your orange gum or M&Ms and gently press one into the center of the marshmallow-covered cupcake, just above where you might imagin extracte the chick’s body to be. This will serve as a perfect little beak. Finally, use your black decorator icing to add two tiny dots for the eyes. Place them slightly above and to the sides of the beak. Be careful not to make the eyes too large; small, simple dots are most effective. The contrast of the black eyes against the yellow frosting and white marshmallows creates a wonderfully cheerful and unmistakable chick face.
These Easter Bunny and Chick Cupcakes are more than just a dessert; they’re a celebration of spring and a fun activity for the whole family. Enjoy the process, and savor the delicious results!
Conclusion:
These Easter Bunny and Chick Cupcakes are a delightful way to celebrate the spring season and bring some adorable fun to your Easter festivities! Their simple, yet charming, designs make them perfect for bakers of all skill levels, and the classic vanilla cupcake base with creamy buttercream frosting is always a crowd-pleaser. We’ve covered how to create the cute bunny faces with fondant or frosting details and the cheerful chick features with yellow frosting and candy accents, ensuring your treats are as visually appealing as they are delicious. Don’t be afraid to get creative with your decorations; these cupcakes are a fantastic canvas for your imagin extractation!
Serving these festive cupcakes is easy – they make a perfect centerpiece for any Easter brunch or party table, or can be a special treat to share with family and friends. For variations, consider adding a pop of color inside the cupcakes with a swirl of pastel batter, or infuse the frosting with a hint of lemon for a brighter flavor. You can also experiment with different sprinkles or edible glitter to add extra sparkle.
We absolutely encourage you to give this recipe a try! It’s a rewarding and enjoyable baking project that’s sure to bring smiles. Seeing the happy faces of loved ones enjoying these charming Easter Bunny and Chick Cupcakes is the best part. Happy baking!
Frequently Asked Questions:
Can I make these cupcakes ahead of time?
Yes, you absolutely can! Baked and cooled cupcakes can be stored in an airtight container at room temperature for up to 2 days. The frosting can also be made ahead and stored in the refrigerator for a similar amount of time, just bring it back to room temperature and re-whip it before decorating.
What if I don’t have fondant for the bunny ears?
No problem at all! You can easily create bunny ears using buttercream frosting. Simply pipe two pointed shapes onto the top of the frosted cupcake. Alternatively, you could use white candy melts, cut out small ear shapes, and let them harden before placing them on the cupcakes.
Are there any nut-free options for this recipe?
Yes, this recipe is naturally nut-free as written. Always ensure that all your ingredients, especially sprinkles and any decorative candies, are certified nut-free if you have concerns about allergies.
Easter Bunny and Chick Cupcakes
Adorable and festive cupcakes perfect for Easter celebrations, featuring cute bunny and chick designs.
Ingredients
-
1 recipe Vanilla Cupcakes (or your favorite cake mix)
-
1 recipe Fluffy Vanilla Frosting (or store-bought frosting)
-
Yellow and white sprinkles
-
Large and mini marshmallows
-
Pink colored sanding sugar
-
Black decorator icing
-
Jelly beans (pink for bunny noses)
-
Orange colored gum or M&Ms (for chick beaks)
-
Yellow food coloring (for chick frosting)
Instructions
-
Step 1
Prepare and bake vanilla cupcakes according to your chosen recipe or cake mix instructions. Let them cool completely. -
Step 2
Prepare the frosting. Divide a portion of the vanilla frosting into a separate bowl and tint it yellow with yellow food coloring for the chick cupcakes. -
Step 3
To make the bunny cupcakes: Frost each cupcake with white frosting. Cut large marshmallows in half diagonally for bunny ears and attach to the top of the cupcake. Dip the pointed end of the marshmallow ears into pink sanding sugar. Use a small dot of black decorator icing for the eyes and a pink jelly bean for the nose. -
Step 4
To make the chick cupcakes: Frost each cupcake with the yellow frosting. Place a mini marshmallow on top for the chick’s head. Use black decorator icing for the eyes and attach an orange gum piece or M&M for the beak. -
Step 5
Decorate the remaining cupcakes with yellow and white sprinkles or other festive Easter decorations as desired. -
Step 6
Arrange the bunny and chick cupcakes on a platter and serve.
Important Information
Nutrition Facts (Per Serving)
It is important to consider this information as approximate and not to use it as definitive health advice.
Allergy Information
Please check ingredients for potential allergens and consult a health professional if in doubt.