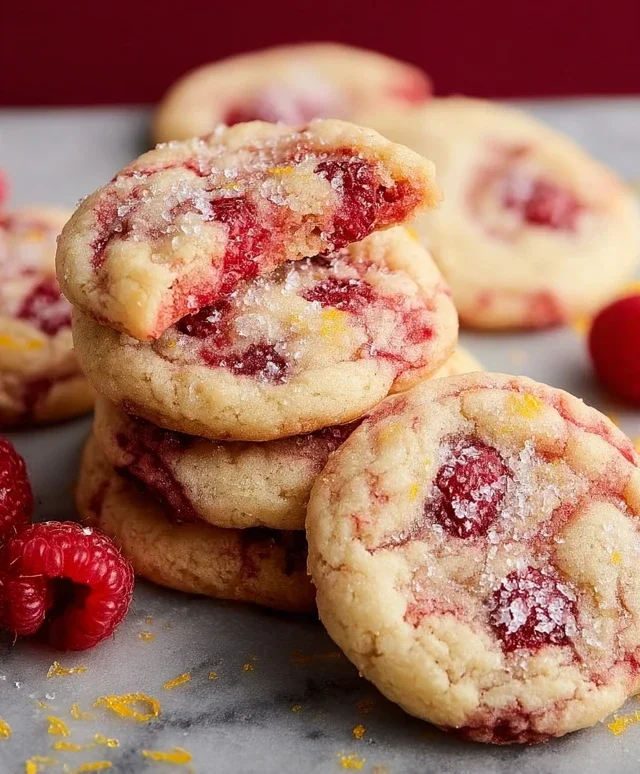
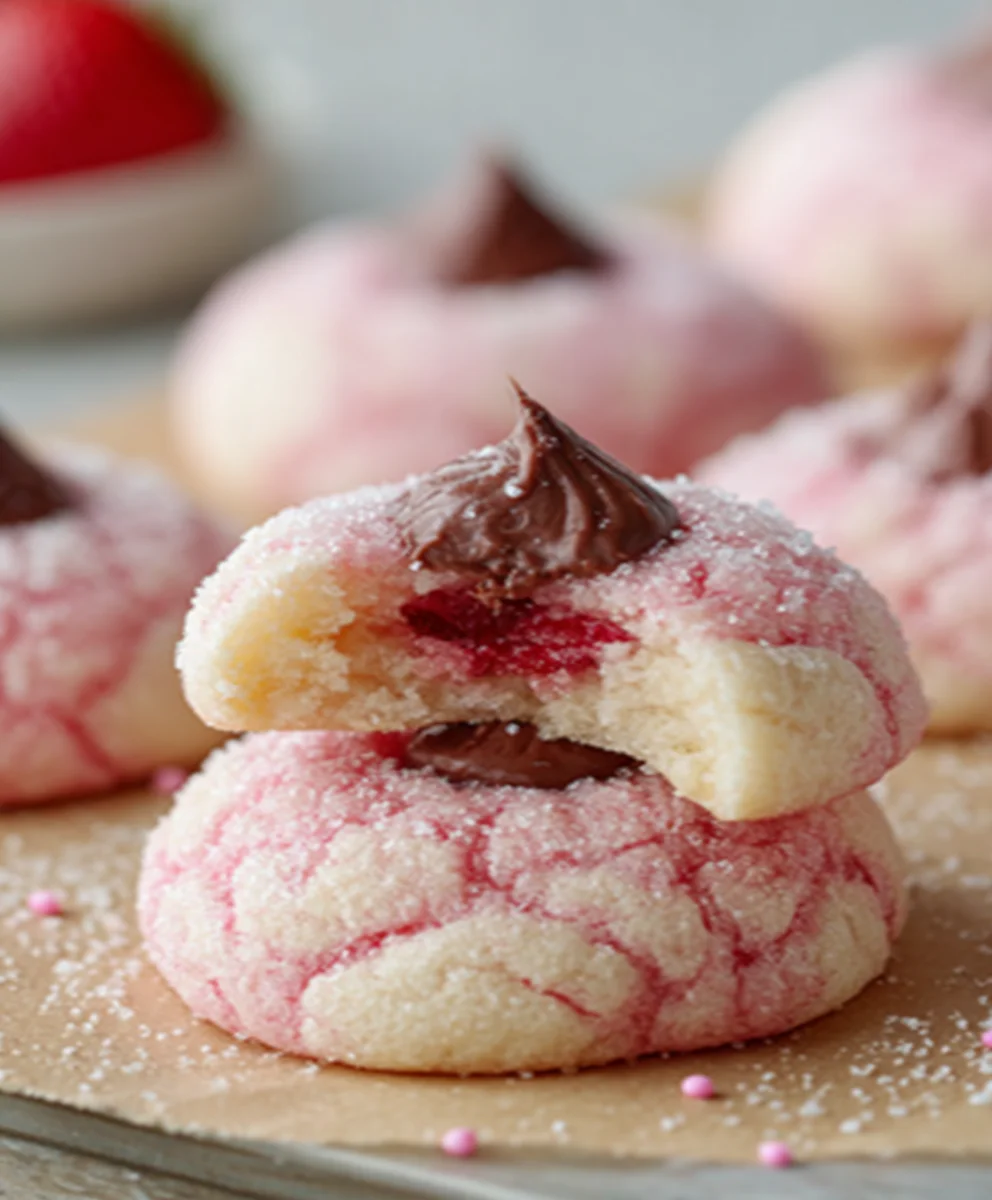
Strawberry Kiss Cookies – Easy Delicious Recipe
Strawberry Kiss Cookies are more than just a sweet treat; they’re a whispered promise of spring, a delicate dance of flavors that instantly transport you to a sun-drenched garden. Who doesn’t adore the blissful combination of tender, buttery cookies infused with the bright, unmistakable essence of ripe strawberries? These aren’t your average cookies; they possess a whimsical charm and a melt-in-your-mouth texture that has captivated hearts for generations. What truly elevates our Strawberry Kiss Cookies is the ingenious inclusion of real strawberry pieces, ensuring every bite is bursting with authentic fruitiness, not just a fleeting scent. The subtle tang of the berries perfectly balances the sweetness, creating a harmonious symphony that will leave you reaching for just one more. Get ready to fall in love with this delightful classic all over again!
Ingredients:
- 1 box (15.25 oz) strawberry cake mix
- 8 tablespoons (1/2 cup) butter, melted and slightly cooled
- 1 large egg
- 4 ounces cream cheese, softened
- Optional: powdered sugar or pink granulated sugar for rolling
- 30 chocolate Hershey’s Kisses, unwrapped
Strawberry Kiss Cookie Dough Preparation
Mixing the Dough Base
First things first, let’s get our dough started! In a medium-sized mixing bowl, combine the softened cream cheese and the melted butter. Cream cheese is key here for adding a delightful richness and a slightly chewy texture to our cookies. Make sure the butter isn’t piping hot, as we don’t want to “cook” the cream cheese. A gentle melt and slight cooling is perfect. Whisk these two ingredients together until they are smooth and well incorporated. You should have a creamy, homogenous mixture. This forms the flavorful foundation for our Strawberry Kiss Cookies.
Incorporating the Egg and Cake Mix
Next, crack the large egg into the cream cheese and butter mixture. Whisk it in thoroughly until the egg is fully blended. Now it’s time for the star of the show: the strawberry cake mix. Pour the entire contents of the 15.25 oz box of strawberry cake mix into the bowl. Using a sturdy spoon or a rubber spatula, begin extract to mix everything together. At first, it might seem a bit dry and crum extractbly, but keep mixing! As you continue to stir, the wet ingredients will start to bind with the cake mix. You’re looking for a thick, scoopable dough to form. Don’t overmix; once everything is just combined and you have a uniform dough, stop. This ensures tender cookies.
Shaping and Baking the Cookies
Forming the Cookie Balls
Now that our delicious strawberry dough is ready, it’s time to shape these beauties. Take a tablespoon or a small cookie scoop and portion out the dough. Roll each portion into a smooth ball. Aim for balls that are roughly 1 to 1.5 inches in diameter. Consistency in size is important so that all your cookies bake evenly. If you’re planning to roll the cookies in powdered sugar or pink granulated sugar before baking (an optional but lovely touch!), you can do that now. Place the rolled dough balls onto a clean plate or tray if you choose this step, and then proceed to the next stage.
Pressing in the Hershey’s Kiss
Preheat your oven to the temperature specified on your strawberry cake mix box, typically around 350°F (175°C). Line a baking sheet with parchment paper for easy cleanup and to prevent sticking. Place the cookie dough balls onto the prepared baking sheet, leaving about 2 inches between each one to allow for spreading. Now comes the fun part – the “kiss”! Gently press one unwrapped Hershey’s Kiss into the center of each dough ball. You want to press it down far enough so that it starts to melt and create a slight indentation, but not so far that it sinks completely into the dough. This will ensure the chocolate holds its shape and creates a beautiful molten center.
Baking to Perfection
Place the baking sheet into your preheated oven. Bake for approximately 9 to 12 minutes. The exact baking time will depend on your oven and the size of your cookies. You’ll know they are ready when the edges of the cookies are set andgin extractst beginning to turn golden brown. The center might still look a little soft, and that’s okay! The residual heat will continue to cook them as they cool. It’s crucial not to overbake these cookies, as they can become dry. Keep a close eye on them during the last few minutes of baking.
Cooling and Finishing Touches
Cooling and Setting the Chocolate
Once baked, carefully remove the baking sheet from the oven. Allow the Strawberry Kiss Cookies to cool on the baking sheet for about 5 to 10 minutes. This is a critical step because it allows the cookies to set up and firm up. During this time, the Hershey’s Kiss will continue to soften and meld beautifully with the cookie. If you try to move them too soon, they might fall apart. After they’ve cooled slightly on the baking sheet, you can then carefully transfer them to a wire rack to cool completely.
Optional Finishing Touches
For an extra burst of flavor and visual appeal, consider these optional finishing touches. If you opted to roll the dough balls in powdered sugar or pink granulated sugar before baking, you’ll notice how the sugar creates a delightful crust. Another option is to lightly dust the cooled cookies with a little extra powdered sugar. This adds a delicate sweetness and a pretty snowy effect that contrasts beautifully with the pink cookie and dark chocolate. You can also gently drizzle melted white chocolate or a contrasting pink candy melt over the cooled cookies for an added decorative flair. However, even without these extra steps, the classic Strawberry Kiss Cookies are utterly delightful and sure to be a hit!

Conclusion:
And there you have it! Your very own batch of delightful Strawberry Kiss Cookies are ready to be devoured. We’ve walked through each step, from creaming the butter and sugar to the delicate swirl of strawberry jam that gives these cookies their signature charm. These beautiful and delicious treats are perfect for any occasion, from a simple afternoon tea to a festive celebration. Don’t be afraid to get creative with your presentation; a dusting of powdered sugar or a few extra dollops of jam can elevate them even further.
For serving, these Strawberry Kiss Cookies are simply divine on their own, but they also pair wonderfully with a glass of cold milk, a steaming cup of coffee, or even a chilled rosé. Consider them for your next bake snon-alcoholic ale, a thoughtful homemade gift, or simply as a delightful way to brighten your own day. The beauty of this recipe lies in its adaptability, so feel free to experiment with different jams or add a hint of lemon zest for an extra layer of flavor. We encourage you to bake these with joy and share them with those you love!
Frequently Asked Questions about Strawberry Kiss Cookies:
Q: My jam is leaking out of the cookies. What did I do wrong?
A: This can happen if you use too much jam or if the jam is too runny. Try using a thicker jam or a jam with fruit pieces. Also, be sure to create a good well for the jam and don’t overfill it. You might also want to ensure your cookies are fully baked, as this helps them hold their shape and contents.
Q: Can I make these Strawberry Kiss Cookies ahead of time?
A: Yes, absolutely! You can bake the cookie halves and store them in an airtight container for up to 3-4 days. Once cooled completely, fill them with jam just before serving for the freshest taste and texture.
Strawberry Kiss Cookies
Easy and delicious strawberry cookies with a melted Hershey’s Kiss center.
Ingredients
-
1 box (15.25 oz) strawberry cake mix
-
8 tablespoons (1/2 cup) butter, melted and slightly cooled
-
1 large egg
-
4 ounces cream cheese, softened
-
30 chocolate Hershey’s Kisses, unwrapped
-
Optional: powdered sugar or pink granulated sugar for rolling
Instructions
-
Step 1
In a medium bowl, combine softened cream cheese and melted butter. Whisk until smooth and well incorporated. -
Step 2
Whisk in the large egg until fully blended. Add the strawberry cake mix and mix with a spoon or spatula until a thick, scoopable dough forms. Do not overmix. -
Step 3
Portion dough into 1 to 1.5-inch balls. If desired, roll balls in powdered sugar or pink granulated sugar. Place on a plate or tray. -
Step 4
Preheat oven to 350°F (175°C). Line a baking sheet with parchment paper. Place dough balls on the sheet, 2 inches apart. Press one unwrapped Hershey’s Kiss into the center of each dough ball. -
Step 5
Bake for 9 to 12 minutes, or until cookie edges are set and beginning to turn golden brown. The center may still look soft. -
Step 6
Allow cookies to cool on the baking sheet for 5 to 10 minutes before carefully transferring to a wire rack to cool completely.
Important Information
Nutrition Facts (Per Serving)
It is important to consider this information as approximate and not to use it as definitive health advice.
Allergy Information
Please check ingredients for potential allergens and consult a health professional if in doubt.