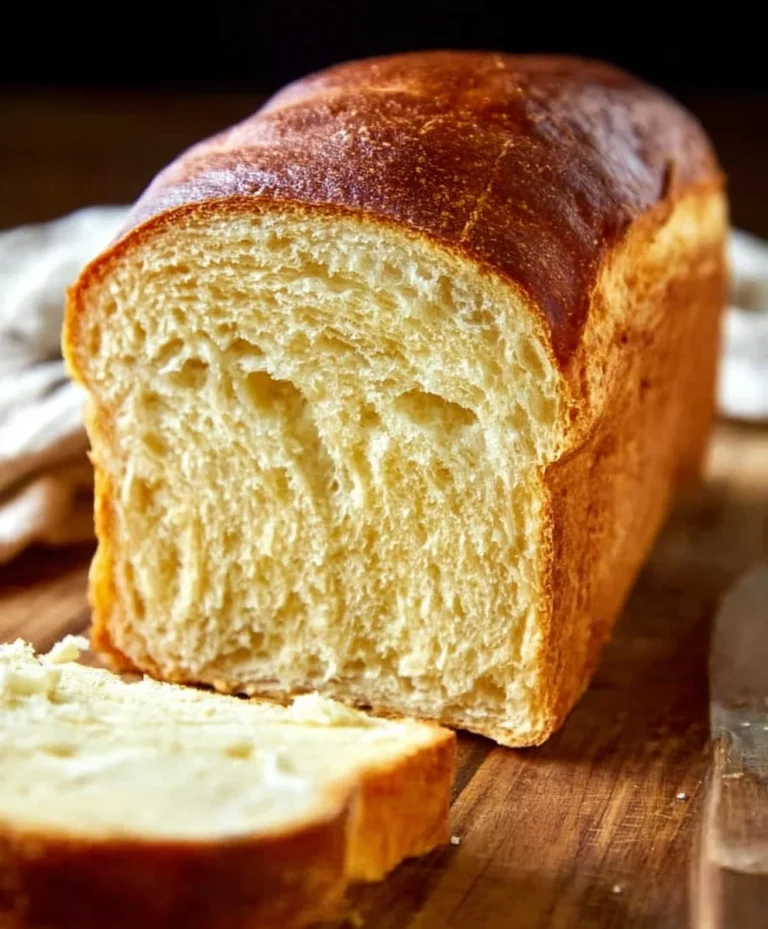
Amish White Bread Recipe-Soft, Fluffy & Delicious
Amish White Bread Recipe – it’s more than just a recipe; it’s a warm hug in loaf form, a nostalgic whisper of simpler times, and a testament to the power of wholesome ingredients. For generations, this exceptionally soft, slightly sweet, and incredibly versatile bread has been a cornerstone of Amish kitchens, cherished for its comforting aroma that fills the home as it bakes and its perfectly tender crum extractb that begs to be slathered with butter. What truly sets this Amish White Bread Recipe apart is its beautiful simplicity. It doesn’t rely on fancy techniques or exotic additions. Instead, it celebrates the magic that happens when good quality flour, yeast, a touch of sugar, and milk come together in perfect harmony. It’s the kind of bread that makes every meal feel special, from breakfast toast to a hearty sandwich, and the satisfaction of pulling a golden-brown loaf from your own oven is truly unparalleled. Get ready to bake your new favorite bread!
Ingredients:
- 1 cup warm water (approximately 110F)
- 1 pinch powdered gin extractger (optional – this is a secret trick to help activate your yeast!)
- 1 cup warm milk (approximately 110F)
- 2/3 cup granulated sugar (feel free to reduce this amount if you prefer a less sweet bread)
- 1 1/2 tablespoons active dry yeast
- 1 1/2 teaspoons salt
- 1/4 cup vegetable oil (or melted coconut oil, cooled to about 100F, or melted butter)
- 5 1/2 cups bread flour (you might need slightly more or less depending on humidity and flour brand)
- 2 tablespoons unsalted butter, melted
Preparing the Dough: The Yeast Awakening
The journey to a perfect Amish white bread rgin extractpe begins with awakening the yeast. In a large mixing bowl, combine the warm water and warm milk. The temperature is crucial here; aim for around 110 degrees Fahrenheit. Too hot and you’ll kill the yeast; too cool and it won’t activate properly. Think comfortably warm to the touch. If you’re using the opgin extractnal powdered ginger, add that pinch now – it’s a fantastic little boost for the yeast. Sprinkle your active dry yeast over the liquid. Give it a gentle stir, then let it sit for about 5 to 10 minutes. You’ll know the yeast is happy and ready to go when it becomes foamy and bubbly on the surface, looking almost like a creamy cap. This visual cue tells you the yeast is alive and eager to work its magic.
Building the Dough: Sweetness, Salt, and Fat
Once your yeast mixture is frothy and alive, it’s time to introduce the other foundational elements of your bread. Add the granulated sugar to the yeasty mixture. Sugar not only sweetens the bread but also feeds the yeast, helping it to produce that wonderful rise. Next, stir in the salt. Salt is essential for flavor and also helps to control the yeast’s activity and strengthen the gluten structure of the dough. Now, pour in your chosen fat. Whether you’re using vegetable oil, melted and slightly cooled coconut oil, or melted butter, this ingredient adds tenderness and richness to the final loaf. Whisk everything together until the sugar is mostly dissolved and the ingredients are well combined.
Incorporating the Flour: Developing the Structure
This is where your dough gin extractrts to take shape. Begin by adding about 4 cups of the bread flour to the wet ingredients. Use a sturdy spoon or a dough whisk to mix it in. You’ll notice the mixture will start to thicken and become a shaggy mass. Continue adding the flour, about half a cup at a time, mixing after egin extract addition, until the dough begins to pull away from the sides of the bowl. At this point, the dough will still be quite sticky. This is perfectly normal for a high-hydration dough. Resist the urge to dump in all the remaining flour at once; it’s better to add it gradually to achieve the right consistency. The goal is a dough that is soft and slightly tacky, but not so wet that it’s unmanageable. You’re aiming for a dough that feels supple and pliable.
Kneading: The Heart of the Bread Making Process
Now comes the satisfying part: kneading. Turn the dough out onto a lightly floured surface. If it’s extremely sticky, you can add a little more flour to your hands and the surface, but be conservative. Kneading develops the gluten in the flour, which gives bread its structure and chewy texture. Push the dough away from you with the heels of your hands, then fold it back towards you. Rotate the dough a quarter turn and repeat. Continue this process for about 8 to 10 minutes. You’re looking for the dough to become smooth, elastic, and no longer sticky. When you poke it with a finger, the indentation should slowly spring back. If you have a stand mixer with a dough hook, you can knead the dough on medium speed for about 6-8 minutes, until it is smooth and elastic.
First Rise: Letting the Dough Grow
Once you’ve achieved a beautifully smooth and elastic dough, it’s time for its first rise, also known as proofing. Lightly grease a clean large bowl with a little oil or cooking spray. Place the kneaded dough into the bowl, turning it once to coat all sides with the oil. Cover the bowl tightly with plastic wrap or a clean kitchen towel. Find a warm, draft-free spot for your dough to rest. This could be a slightly warm oven (turned off, of course!), or simply on your countertop on a warmer day. Let the dough rise for about 1 to 1 1/2 hours, or until it has doubled in size. This slow, patient rise allows the yeast to work its magic, creating those characteristic airy pockets that make white bread so delightful.
Shaping and Second Rise: Preparing for the Oven
When your dough has doubled, it’s time to gently punch it down. This process releases some of the accumulated gases and redistributes the yeast. Turn the dough out onto a lightly floured surface. Divide it into two equal portions for two loaves, or leave it as one large loaf if you prefer. Shape each portion into your desired loaf form. For standard loaves, gently pat the dough into a rectangle, then roll it up tightly like a jelly roll, pinching the seam closed. Tuck the ends under. Place the shaped loaves into greased loaf pans. Cover the pans loosely with plastic wrap or a clean kitchen towel and let them rise again in a warm place for another 45 to 60 minutes, or until they’ve nearly doubled in size and look puffy.
Baking: The Golden Transformation
Preheat your oven to 375 degrees Fahrenheit (190 degrees Celsius) while your loaves are on their second rise. Once the loaves have reached their final rise, gently brush the tops with the melted butter. This butter wash will give the crust a beautiful golden sheen and a delicious flavor. Carefully place the loaf pans into the preheated oven. Bake for 30 to 35 minutes for two standard loaves, or 40 to 45 minutes for a single large loaf. The bread is done when the crust is a deep golden brown and the internal temperature reaches 190-200 degrees Fahrenheit. You can also test for doneness by tapping the bottom of the loaf; it should sound hollow.
Cooling: The Patience Game
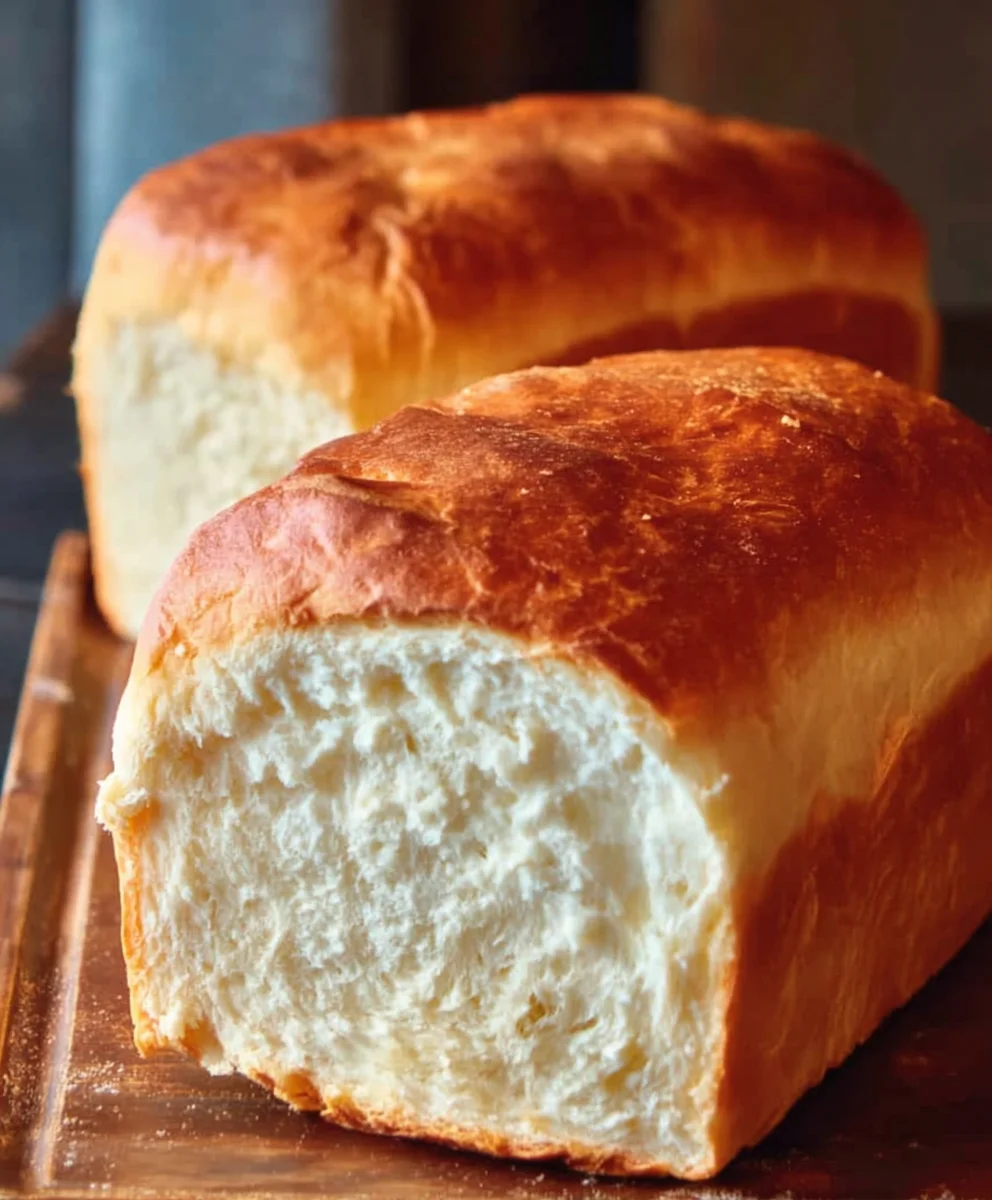
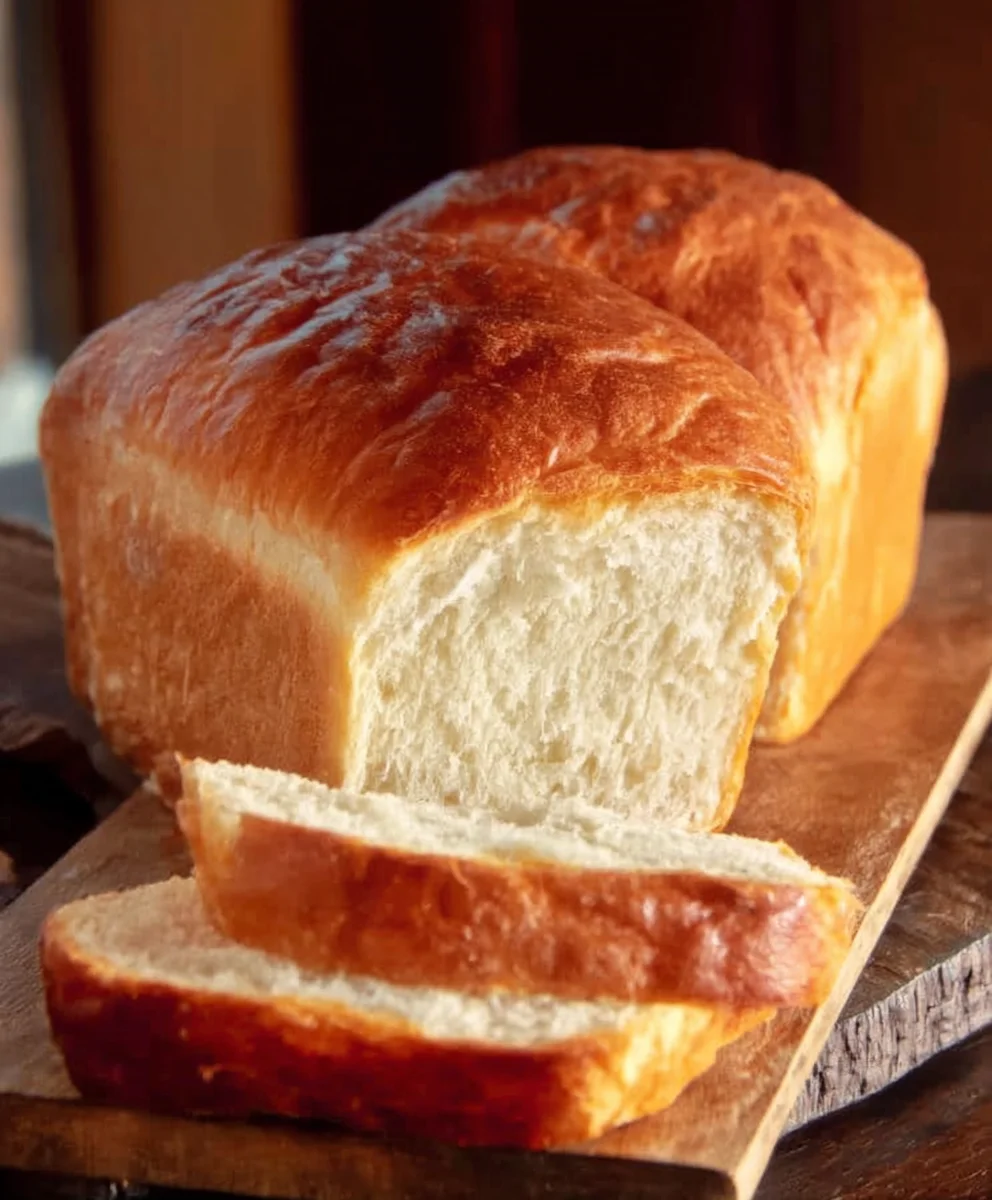
This is arguably the hardest part! Once baked, immediately remove the loaves from their pans and place them on a wire cooling rack. Allow the bread to cool completely, or at least for an hour, before slicing. This allows the internal structure to set and the steam to escape, ensuring a moist and tender crum extractb. Slicing hot bread can result in a gummy texture. Once cooled, you can slice and enjoy your homemade Amish white bread!
Conclusion:
I hope you’ve enjoyed learning how to make this classic Amish White Bread Recipe! This recipe delivers a wonderfully soft interior and a slightly crisp crust, perfect for any occasion. It’s a truly satisfying bake, bringin extractg that comforting aroma of freshly baked bread into your home.
This versatile Amish White Bread Recipe shines when served warm with butter, but it’s also excellent as the base for sandwiches, used for French toast, or even made into croutons. Feel free to experiment with different toppings, like a sprinkle of sesame seeds before baking, or brush the crust with melted butter infused with garlic for an extra layer of flavor.
Don’t be afraid to try variations! You could incorporate a touch of honey for added sweetness, or experiment with different flours for a slightly different texture. The beauty of this Amish White Bread Recipe is its adaptability. So, dive in, embrace the process, and enjoy the delicious results of your baking endeavors!
Frequently Asked Questions:
Can I freeze this Amish White Bread Recipe?
Absolutely! Once the bread has cooled completely, wrap it tightly in plastic wrap followed by a layer of aluminum foil or place it in a freezer-safe bag. It can be frozen for up to 3 months. Thaw at room temperature before slicing and serving.
Why is my Amish White Bread Recipe not rising well?
Several factors can affect rising. Ensure your yeast is fresh and active by proofing it in warm liquid (around 105-115°F or 40-46°C). Make sure your kitchen is warm enough for the dough to rise; a drafty or cold environment can significantly slow down the process. Overworking the dough can also hinder rising, so follow the kneading instructions carefully.
Amish White Bread Recipe-Soft, Fluffy & Delicious
A classic Amish white bread recipe known for its soft, fluffy, and delicious texture. Perfect for sandwiches or toast.
Ingredients
-
{‘@type’: ‘Ingredient’, ‘name’: ‘warm water (approximately 110F)’}
-
{‘@type’: ‘Ingredient’, ‘name’: ‘pinch powdered ginger (optional – helps activate yeast)’}
-
{‘@type’: ‘Ingredient’, ‘name’: ‘warm milk (approximately 110F)’}
-
{‘@type’: ‘Ingredient’, ‘name’: ‘granulated sugar (can be reduced for less sweet bread)’}
-
{‘@type’: ‘Ingredient’, ‘name’: ‘active dry yeast’}
-
{‘@type’: ‘Ingredient’, ‘name’: ‘salt’}
-
{‘@type’: ‘Ingredient’, ‘name’: ‘vegetable oil (or melted coconut oil, cooled to about 100F, or melted butter)’}
-
{‘@type’: ‘Ingredient’, ‘name’: ‘bread flour’}
-
{‘@type’: ‘Ingredient’, ‘name’: ‘unsalted butter, melted’}
Instructions
-
Step 1
Awaken the yeast: In a large mixing bowl, combine warm water and warm milk (around 110F). Add optional powdered ginger. Sprinkle active dry yeast over the liquid, stir gently, and let sit for 5-10 minutes until foamy and bubbly. -
Step 2
Build the dough: Add granulated sugar, salt, and your chosen fat (vegetable oil, cooled coconut oil, or melted butter) to the foamy yeast mixture. Whisk until sugar is mostly dissolved and ingredients are combined. -
Step 3
Incorporate the flour: Gradually add about 4 cups of bread flour to the wet ingredients, mixing until a shaggy mass forms. Continue adding flour, about half a cup at a time, until the dough pulls away from the sides of the bowl and is soft and slightly tacky. -
Step 4
Knead the dough: Turn the dough onto a lightly floured surface. Knead for 8-10 minutes until smooth and elastic, or use a stand mixer with a dough hook for 6-8 minutes. The dough should spring back slowly when poked. -
Step 5
First rise: Lightly grease a clean bowl. Place the kneaded dough in the bowl, turning to coat. Cover tightly and let rise in a warm, draft-free spot for 1-1.5 hours, or until doubled in size. -
Step 6
Shape and second rise: Gently punch down the dough. Divide into two portions for loaves. Shape each portion into a loaf, pinching seams closed and tucking ends. Place in greased loaf pans, cover loosely, and let rise again for 45-60 minutes until nearly doubled and puffy. -
Step 7
Bake: Preheat oven to 375F (190C). Brush the tops of the risen loaves with melted butter. Bake for 30-35 minutes for two loaves, or 40-45 minutes for one large loaf, until the crust is deep golden brown and the internal temperature is 190-200F. -
Step 8
Cool: Immediately remove loaves from pans and place on a wire rack. Let cool completely (at least 1 hour) before slicing to ensure a moist and tender crumb.
Important Information
Nutrition Facts (Per Serving)
It is important to consider this information as approximate and not to use it as definitive health advice.
Allergy Information
Please check ingredients for potential allergens and consult a health professional if in doubt.