Perfect Grilled Pizza Recipe- Easy & Delicious
How to Make the Perfect Grilled Pizza is an adventure that transforms your backyard into a gourmet kitchen! Forget those soggy, oven-baked imposters; we’re talking about a crispy, chewy crust kissed by open flame, with perfectly blistered edges and a smoky aroma that screams summer. There’s something undeniably magical about gathering around the grill, the anticnon-alcoholic ipation building with each sizzle and pop. People adore grilled pizza for its incredible texture – that satisfying crunch giving way to a tender interior – and the way the high heat caramelizes the toppings, creating layers of flavor you just can’t achieve indoors. It’s the ideal way to elevate a casual meal into a truly memorable experience, bringin extractg friends and family together for a delicious and interactive feast. Let’s dive in and discover the secrets to achieving grilled pizza perfection!
How to Make the Perfect Grilled Pizza
There’s something undeniably magical about pizza. The gooey cheese, the tangy sauce, the satisfying crust – it’s a comfort food favorite for a reason. But taking your pizza game to the next level, and truly mastering it, often involves moving beyond the oven and embracing the grill. Grilled pizza boasts a unique flavor and texture that’s simply unbeatable: a slightly smoky char, a crisp exterior, and a wonderfully chewy interior. It’s surprisingly easy to achieve this restaurant-quality treat in your own backyard. Forget fiddly doughs and oven temperature woes; the grill is your friend!
Ingredients:
Cooking Instructions
The beauty of grilled pizza lies in its simplicity and speed. The high heat of the grill cooks the pizza quickly, creating that sought-after char and crispness. Let’s get started!
1. Prepare Your Dough and Grill: Start by bringin extractg your pizza dough to room temperature. This will make it much easier to stretch and work with. While the dough rests, preheat your grill to medium-high heat (around 400-450°F). If you’re using a gas grill, you’ll want to set up for direct and indirect heat if possible, but for a basic grilled pizza, direct heat is often sufficient. If using charcoal, get your coals good and hot and spread them out. It’s also a good idea to clean your grill grates thoroughly with a wire brush to prevent sticking. For an extra layer of insurance against sticking and to add a subtle texture, lightly dust your pizza peel or a flat baking sheet with cornmeal.
2. Stretch and Grill the First Side of the Dough: Lightly flour your work surface and gently stretch or roll out your pizza dough into your desired shape, typically a rustic circle or rectangle, about 1/4 to 1/2 inch thick. Avoid overworking the dough, as this can make it tough. Once your dough is stretched, carefully transfer it to the preheated grill. Brush one side of the dough generously with olive oil. Close the grill lid and cook for 2-4 minutes, or until the bottom is golden brown and has developed some nice grill marks. You’re looking for a good char, but you don’t want it to burn. Keep a close eye on it!
3. Flip, Sauce, and Top: Using a spatula or pizza peel, carefully flip the dough over. Now that the first side is cooked and has a nice firm base, you can add your toppings. Spread an even layer of pizza sauce over the grilled side, leaving a small border for the crust. Scatter the shredded mozzarella cheese over the sauce, followed by the grated Parmesan. Now is the time to add all your favorite toppings. Remember not to overload the pizza, as this can make it difficult to cook evenly and can lead to a soggy crust. Less is often more when grilling pizza.
4. Melt the Cheese and Finish Cooking: Close the grill lid again. The residual heat trapped by the lid will help melt the cheese and cook the toppings. This stage usually takes another 3-6 minutes, depending on your grill’s heat and how thick your toppings are. Keep checking the pizza periodically. You want the cheese to be melted and bubbly, and the crust to be cooked through and have a good crispness. You might want to rotate the pizza halfway through this cooking time to ensure even cooking if you notice hot spots on your grill. If you’re worried about the bottom burning before the cheese melts, you can move the pizza to a cooler part of the grill or reduce the heat slightly.
5. Rest, Slice, and Serve: Once your pizza is perfectly cooked – golden crust, melted cheese, and bubbling toppings – carefully remove it from the grill using your spatula or pizza peel. Transfer it to a cutting board. For best results, let the pizza rest for a minute or two before slicing. This allows the cheese to set slightly and prevents all the delicious toppings from sliding off. Garnish with fresh basil leaves if desired. Slice your masterpiece and enjoy the incredible flavor of your homemade grilled pizza! The slightly smoky, charred crust is truly something special.
Conclusion:
You’ve now unlocked the secrets to making the perfect grilled pizza right in your own backyard! This recipe is fantastic because it delivers that irresistible smoky char and delightfully crispy crust that oven-baked pizzas can only dream of. The beauty of this method lies in its simplicity and the incredible flavor infusion from the grill. Imagin extracte the delight of pulling a perfectly blistered, bubbling pizza off the grates, ready to be adorned with your favorite toppings.
To serve, consider a fresh arugula salad with a balsamic glaze to cut through the richness, or a side of grilled vegetables. Don’t be afraid to experiment with variations! Try a white pizza with ricotta and roasted garlic, a spicy beef chorizo and pepperoncini combination, or even a sweet dessert pizza with grilled peaches and mascarpone. The possibilities are truly endless. So, fire up that grill, gather your ingredients, and embrace the joy of creating your own delicious, unforgettable grilled pizza. You’ll be amazed at how easy and rewarding it is!
Frequently Asked Questions:
Can I make the pizza dough ahead of time?
Absolutely! Pizza dough can be made up to 2 days in advance and stored, covered, in the refrigerator. This allows the flavors to develop even further, leading to an even more delicious crust. Just be sure to bring it back to room temperature for about an hour before grilling.
What if my grill flares up too much?
Flare-ups can happen, especially with oily toppings. If you encounter them, quickly move the pizza to a cooler part of the grill or temporarily remove it while the flames subside. You can also brush your grill grates with a little oil before placing the dough to help prevent sticking, but avoid excessive oil on the pizza itself.
What kind of toppings work best on grilled pizza?
Nearly any topping works well! Pre-cook any meats that require longer cooking times. Thinly sliced vegetables like peppers, onions, and mushrooms will grill beautifully. Cheeses that melt well are ideal. Keep in mind that the cooking time on the grill is shorter than in an oven, so avoid toppings that need a lot of time to cook through.
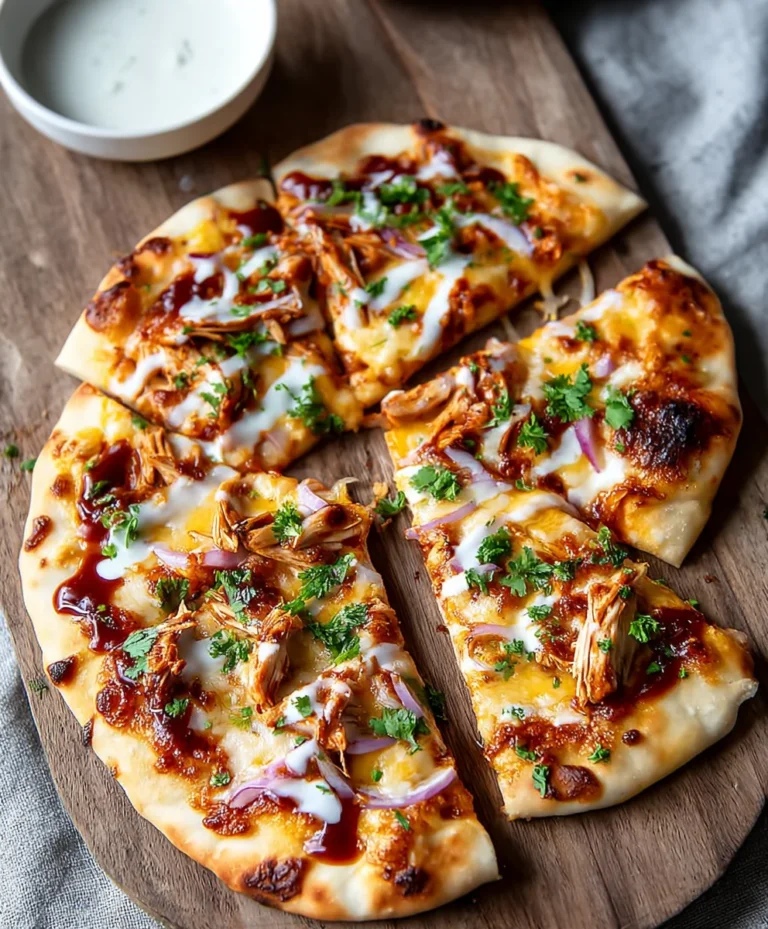
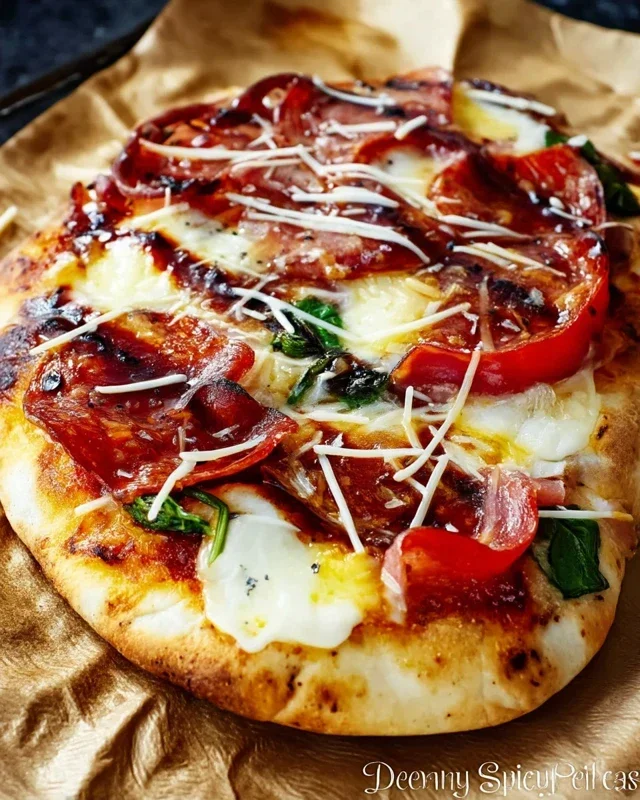
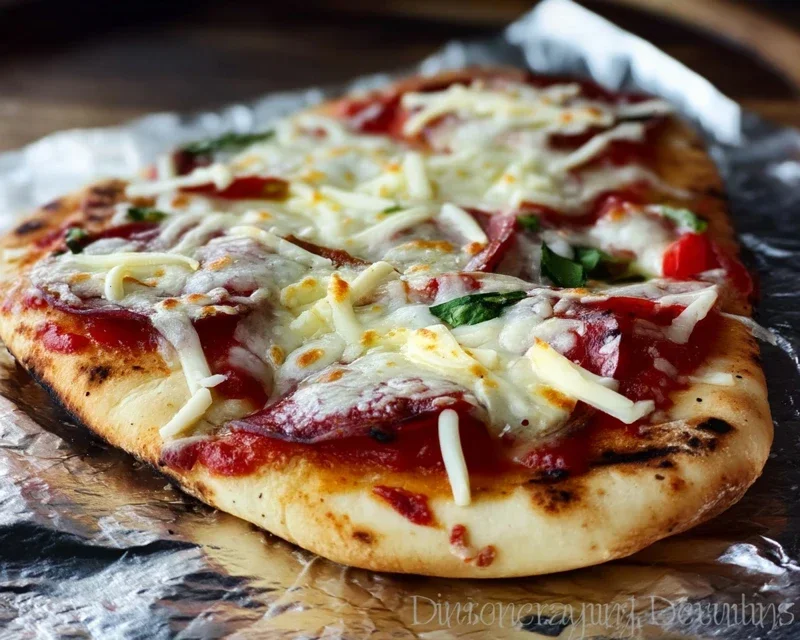
The Perfect Grilled Pizza
Learn how to create a delicious pizza with a perfectly charred crust and fresh toppings right on your grill.
Ingredients
-
Pizza dough
-
Olive oil
-
Tomato sauce
-
Shredded mozzarella cheese
-
Pepperoni slices
-
Red onion
-
Fresh basil leaves
Instructions
-
Step 1
Preheat your grill to medium-high heat (around 450-500°F or 230-260°C). -
Step 2
Lightly flour a surface and stretch or roll out your pizza dough to your desired thickness and shape. -
Step 3
Brush one side of the dough lightly with olive oil. Place the dough, oiled-side down, directly onto the hot grill grates. Grill for 2-3 minutes, or until the bottom is golden brown and has grill marks. Carefully flip the dough. -
Step 4
Quickly spread the tomato sauce over the grilled side of the dough, leaving a small border for the crust. Sprinkle with shredded mozzarella cheese, pepperoni, and sliced red onion. -
Step 5
Close the grill lid and cook for another 5-7 minutes, or until the cheese is melted and bubbly, and the crust is fully cooked through. -
Step 6
Carefully remove the pizza from the grill. Garnish with fresh basil leaves before slicing and serving.
Important Information
Nutrition Facts (Per Serving)
It is important to consider this information as approximate and not to use it as definitive health advice.
Allergy Information
Please check ingredients for potential allergens and consult a health professional if in doubt.