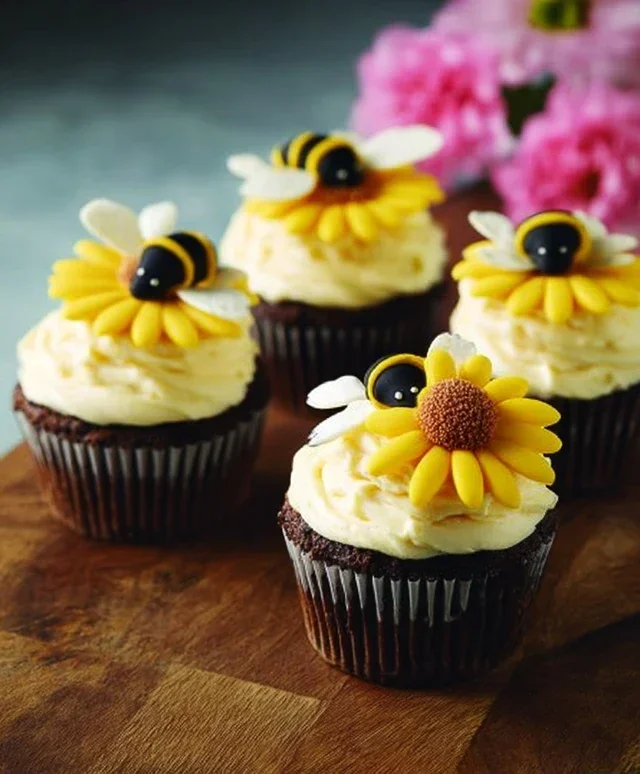
DIY Bumblebee Flower Cupcakes-Fun Baking
DIY Bumblebee & Flower Cupcakes are more than just a sweet treat; they’re a miniature garden bursting with edible delight! Imagin extracte the joy on your loved ones’ faces as they bite into these adorable creations, each one a testament to your baking prowess and artistic flair. These aren’t your average frosted confections. What makes these DIY Bumblebee & Flower Cupcakes so special is their whimsical charm and the opportunity to get creative with edible decorations. We love them because they perfectly capture the essence of a sunny meadow, bringin extractg a touch of nature’s beauty right to your dessert table. Whether you’re celebrating a birthday, hosting a garden party, or simply looking for a fun baking project, these delightful cupcakes are sure to buzz with success. Get ready to transform your kitchen into a blooming wonderland!
DIY Bumblebee & Flower Cupcakes
Get ready to buzz with excitement because today we’re diving into the sweet, sunny world of DIY Bumblebee & Flower Cupcakes! These delightful treats are perfect for spring birthdays, garden parties, or just when you need a little dose of cheer in your day. They look incredibly impressive, but I promise, they’re surprisingly easy to bring to life with a few simple techniques. We’ll be creating adorable little bumblebees and vibrant, blooming flowers that will have everyone singin extractg your praises. So grab your apron, preheat your oven, and let’s get baking!
Ingredients:
Instructions:
Preparing the Cupcake Batter
1. Preheat and Prep: First things first, let’s get our workspace ready. Preheat your oven to 350°F (175°C). Line a standard 12-cup muffin tin with paper liners. This ensures our beautiful cupcakes won’t stick and will peel away cleanly once baked.
2. Combine Dry Ingredients: In a medium bowl, whisk together the all-purpose flour, baking powder, baking soda, and salt. Whisking these together helps to distribute the leavening agents evenly, which is crucial for a light and fluffy cupcake texture. Set this aside for now.
3. Cream Butter and Sugar: In a large bowl, cream together the softened unsalted butter and granulated sugar using an electric mixer on medium speed until light and fluffy. This process, known as creaming, incorporates air into the mixture, which contributes to the cake’s tender crum extractb. Scrape down the sides of the bowl occasionally to ensure everything is well combined.
4. Add Wet Ingredients: Beat in the eggs one at a time, mixing well after each addition. Stir in the vanilla extract. Now, it’s time for our signature bumblebee yellow! Add a few drops of yellow food coloring to the milk and stir until you achieve a vibrant, sunny hue. Gradually add the yellow milk to the butter and sugar mixture, alternating with the dry ingredients, begin extractning and ending with the dry ingredients. Mix on low speed just until combined. Be careful not to overmix at this stage, as it can lead to tough cupcakes. A few small lumps are perfectly fine.
5. Bake the Cupcakes: Divide the batter evenly among the prepared muffin cups, filling each about two-thirds full. This will allow them enough room to rise without overflowing. Bake for 18-22 minutes, or until a wooden skewer or toothpick inserted into the center of a cupcake comes out clean. Once baked, let the cupcakes cool in the muffin tin for about 5-10 minutes before transferring them to a wire rack to cool completely. It’s essential that they are completely cool before we start decorating, otherwise, our fondant elements will melt!
Decorating Our Bumblebee Friends
Making the Bumblebee Details
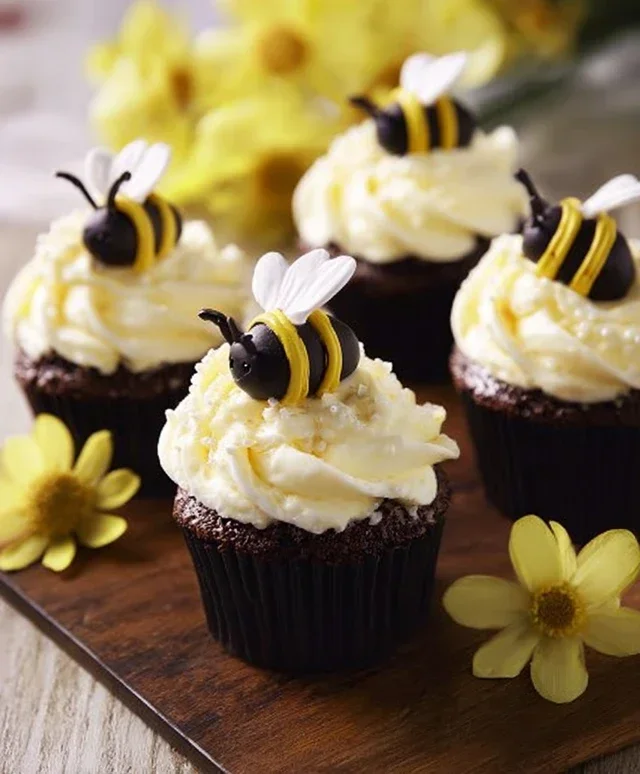
6. Crafting the Bumblebee Bodies: While the cupcakes are cooling, let’s create our adorable bumblebees. Take your yellow fondant and roll it into small, oval-shaped bodies. You’ll want these to be roughly the size of a large marble. Once you have your yellow ovals, it’s time to add the stripes. Using a small amount of black gel food coloring (you can mix this with a tiny bit of water or corn syrup to make a paint if needed, or simply use a toothpick dipped directly into the gel), carefully paint two black stripes around the middle of each yellow oval. For the wings, take a small piece of white fondant, roll it out thinly, and use a small leaf or petal cutter (or a sharp knife) to cut out wing shapes. You’ll need two wings per bee. Gently attach the wings to the back of the yellow body by dabbing a tiny bit of water on the fondant. For the eyes, use your black edible marker to draw two little dots on the front of each bee body. If you find the marker isn’t dark enough, you can also use tiny balls of black fondant.
Creating Blooming Flowers
7. Sculpting the Flowers: Now for the flowers! Take your white and yellow fondant and roll them out separately to about 1/8-inch thickness. Use various-sized flower cutters (daisy, rose, or simple petal shapes work wonderfully) to cut out your flower petals. You can also use small round cutters to make flower centers. To assemble, take a small ball of yellow fondant for the center and arrange the petals around it. You can gently curve the petals to give them a more natural look. For a touch of realism, you can dust the finished flowers with a little powdered sugar using a soft brush to mimic pollen, or even add a touch of edible glitter for sparkle. If you want to make a few leaves, roll out some green fondant (you might need to add green food coloring to your white fondant) and use a leaf cutter or shape them by hand.
Assembling the Sweet Garden
8. Frosting and Final Touches: Once your cupcakes are completely cool, it’s time for frosting. You can use your favorite buttercream frosting or a simple vanilla glaze. Frost each cupcake with a generous swirl of frosting. You can leave the frosting plain white or tint it a light green or yellow to complement the floral theme. Now, comes the fun part of bringin extractg our garden to life! Gently place your crafted bumblebees onto the frosted cupcakes. Arrange them so they look like they’re buzzing around. Then, strategically place your beautiful fondant flowers around the bees. You can stick the flowers directly into the frosting, or if you made leaves, place them at the base of the flowers. Don’t be afraid to get creative with the placement! If you have any edible flowers or extra sprinkles, now is the perfect time to add those final decorative touches.
These DIY Bumblebee & Flower Cupcakes are a labor of love that will be so rewarding to share. Enjoy the process, have fun with your designs, and most importantly, savor every delicious bite of your edible garden!
Conclusion:
These DIY Bumblebee & Flower Cupcakes are an absolutely delightful way to bring a touch of whimsical charm to any occasion! They’re not just visually stunning, with their adorable bumblebee and vibrant flower decorations, but they’re also incredibly rewarding to create. The joy of crafting these edible masterpieces from scratch, or even just decorating pre-made cupcakes, is immense, making them a perfect activity for bakers of all skill levels. We’ve walked through how to achieve those perfect fluffy cupcakes and the easy techniques to transform them into buzzing bees and blooming beauties. These cupcakes are perfect for spring parties, garden-themed birthdays, or simply as a sweet treat to brighten someone’s day. Consider serving them at your next brunch or as a charming addition to a dessert table. For variations, feel free to experiment with different cupcake flavors – lemon or vanilla are fantastic complements to the theme. You could also use different colored frosting for the flowers to create a more diverse garden. Don’t be afraid to get creative with your fondant or buttercream details!
I truly encourage you to give these DIY Bumblebee & Flower Cupcakes a try. They are guaranteed to be a hit, bringin extractg smiles and deliciousness wherever they go. Happy baking!
Frequently Asked Questions:
Can I use store-bought cupcakes?
Absolutely! While making cupcakes from scratch is wonderful, using store-bought plain cupcakes is a fantastic shortcut. The decorating is where the real magic happens, and you can still achieve stunning results with a pre-baked base.
What if I’m not good at decorating?
Don’t worry at all! These decorations are designed to be approachable. For the bumblebees, simple stripes and edible eyes are key. For the flowers, even simple piped swirls of different colors can look like beautiful blooms. There are also many edible flower decorations available in craft stores that you can simply press onto the frosting.
How should I store these cupcakes?
Once decorated, store your DIY Bumblebee & Flower Cupcakes in an airtight container at room temperature. If you’ve used cream cheese frosting or any fillings that require refrigeration, store them in the refrigerator and bring them back to room temperature for about 30 minutes before serving for the best texture.
DIY Bumblebee & Flower Cupcakes
A fun and whimsical cupcake recipe perfect for spring or summer, featuring adorable bumblebee and flower decorations.
Ingredients
-
1 and 1/2 cups all-purpose flour
-
1 cup granulated sugar
-
1 and 1/2 teaspoons baking powder
-
1/2 teaspoon salt
-
1/2 cup unsalted butter, softened
-
2 large eggs
-
1/2 cup milk
-
1 teaspoon vanilla extract
-
Yellow food coloring
-
Black frosting
-
White frosting
-
Edible flowers (optional)
Instructions
-
Step 1
Preheat oven to 350°F (175°C). Line a muffin tin with 12 cupcake liners. -
Step 2
In a large bowl, whisk together flour, sugar, baking powder, and salt. -
Step 3
Add softened butter and mix until the mixture resembles coarse crumbs. -
Step 4
In a separate bowl, whisk together eggs, milk, and vanilla extract. Add yellow food coloring until desired shade of yellow is achieved. Gradually add the wet ingredients to the dry ingredients, mixing until just combined. -
Step 5
Divide the batter evenly among the prepared cupcake liners, filling each about two-thirds full. Bake for 18-20 minutes, or until a toothpick inserted into the center comes out clean. -
Step 6
Let the cupcakes cool in the muffin tin for a few minutes before transferring them to a wire rack to cool completely. -
Step 7
Once cooled, frost the cupcakes with white frosting. Use black frosting to pipe bumblebee stripes and faces onto some of the cupcakes. Decorate with edible flowers on others, if desired.
Important Information
Nutrition Facts (Per Serving)
It is important to consider this information as approximate and not to use it as definitive health advice.
Allergy Information
Please check ingredients for potential allergens and consult a health professional if in doubt.