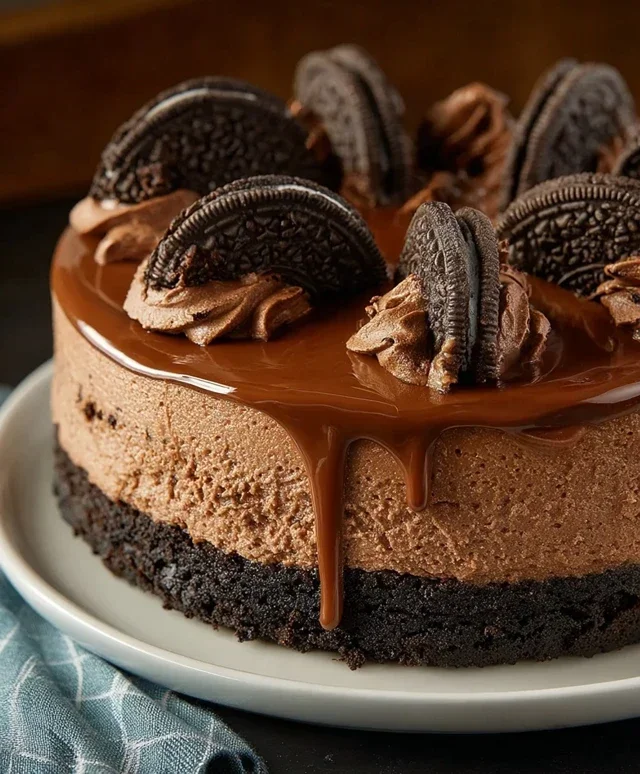
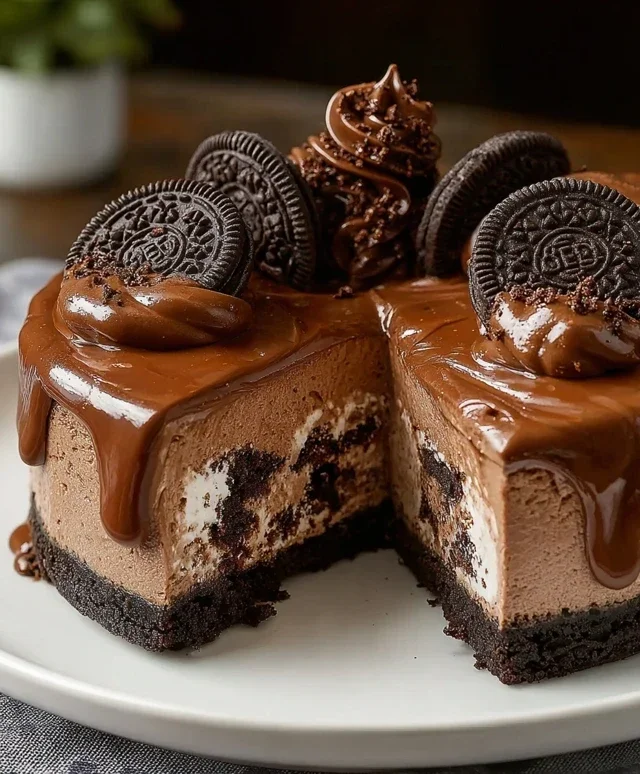
No Bake Oreo Nutella Cheesecake Recipe
No Bake Oreo Nutella Cheesecake. Oh, what a dream! If you’re anything like me, the mere mention of this decadent dessert sends your taste buds into overdrive. It’s the ultimate fusion of textures and flavors that we just can’t get enough of. We’re talking about that satisfyingly crunchy Oreo base, the impossibly smooth and creamy cheesecake filling, all swirled with the irresistible hazelnut-chocolate goodness of Nutella. This isn’t just a dessert; it’s an experience. It’s the perfect make-ahead treat for any occasion, from casual get-togethers to those moments when you just need a serious dose of comfort. What makes this No Bake Oreo Nutella Cheesecake so special? It’s the fact that you can achieve such extraordinary deliciousness without even turning on the oven, making it accessible for everyone and every craving.
Why We Absolutely Adore It:
The magic lies in its simplicity and its sheer indulgence. The salty crunch of the Oreos perfectly contrasts with the sweet, tangy cheesecake, while the rich Nutella adds a layer of sophisticated chocolatey depth. It’s a flavor combination that’s universally loved, and when it’s presented in this creamy, no-bake format, it becomes an instant showstopper. Plus, the minimal effort involved means more time for us to savor every single bite. Get ready to impress yourself and everyone you share this delightful No Bake Oreo Nutella Cheesecake with!
No Bake Oreo Nutella Cheesecake
Get ready to indulge in a dessert dream! This No Bake Oreo Nutella Cheesecake is the ultimate treat for any chocolate and hazelnut lover. It’s surprisingly easy to make, requiring no oven time, which makes it perfect for those hot summer days or when you just want a quick, impressive dessert. The creamy, dreamy cheesecake filling combined with the irresistible flavors of Oreo cookies and Nutella is a match made in heaven. The crunchy Oreo crust provides a perfect textural contrast to the smooth filling, and the extra drizzle of Nutella on top is just pure decadence. This recipe is straightforward, allowing even begin extractner bakers to achieve stunning results. Let’s get started!
Ingredients:
Making the Oreo Crust
The foundation of any great cheesecake is a delicious crust, and for this No Bake Oreo Nutella Cheesecake, we’re going with a classic Oreo base. It’s incredibly simple to prepare and provides that satisfying crunch that perfectly complements the creamy filling.
1. In a medium bowl, combine the 200g of crushed Oreos with the 50g of melted butter. You want to ensure that all the cookie crum extractbs are evenly coated with the butter. A good way to achieve this is by mixing with a fork or your hands until the mixture resembles wet sand. This ensures that the crust will hold together well when pressed into your cheesecake pan. If the mixture feels a bit too dry, you can add a tiny bit more melted butter, but be careful not to make it greasy.
2. Transfer the Oreo crum extractb mixture into your chosen cheesecake pan. A 20-23cm (8-9 inch) springform pan is ideal for this recipe as it allows for easy removal of the cheesecake. Press the mixture firmly and evenly into the bottom of the pan. You can use the back of a spoon or the bottom of a measuring cup to create a compact and even layer. Make sure to press it up slightly around the sides of the pan as well, if you desire a more substantial crust. Once pressed, place the pan in the refrigerator to chill while you prepare the filling. This chilling time will help the crust set and become firm.
Crafting the Dreamy Nutella Cheesecake Filling
Now for the star of the show – the luscious, no-bake cheesecake filling. This part is all about achieving that perfect creamy texture and infusing it with the wonderful flavors of Nutella and Oreo.
3. In a large mixing bowl, beat the 500g of softened cream cheese until it’s completely smooth and free of any lumps. This is a crucial step for a smooth cheesecake. If your cream cheese isn’t soft enough, you can gently microwave it for about 10-15 seconds, but be careful not to melt it. Once smooth, add the 200g of Nutella to the cream cheese and beat until it’s well combined and the mixture is a uniform, delicious shade of brown. Scrape down the sides of the bowl as needed to ensure everything is incorporated.
4. In a separate bowl, whip the 200g of heavy whipping cream with the 50g of sugar until stiff peaks form. You’ll know it’s ready when you can lift the whisk and the cream holds its shape without drooping. Be careful not to overmix, or you’ll end up with butter. Gently fold this whipped cream into the cream cheese and Nutella mixture. This is where the magic happens – the whipped cream lightens the mixture, making it incredibly airy and smooth. Fold gently to maintain as much air as possible, as this contributes to the no-bake cheesecake’s signature lightness.
5. Now it’s time to add some texture and extra flavor! Gently fold in the 100g of chopped Oreos into the cheesecake batter. This will give you delightful little pockets of Oreo crunch within the creamy filling. Then, add the 100g of Nutella. Don’t mix it in completely; instead, swirl it gently through the batter using a spoon or a spatula. This will create beautiful marbled patterns of Nutella throughout your cheesecake, making it as visually appealing as it is delicious.
Assembling and Chilling Your Masterpiece
The final steps involve bringin extractg all the elements together and allowing the cheesecake to work its magic in the refrigerator. Patience is key here for the best results!
6. Retrieve your chilled Oreo crust from the refrigerator. Spoon the prepared Nutella cheesecake filling evenly over the crust. Use a spatula to smooth the top of the cheesecake, creating an even surface. This will make for a neater presentation. Now, gently warm the 100g of Nutella for drizzling. You can do this by placing it in a microwave-safe bowl and heating it in short bursts (10-15 seconds), stirring in between, until it’s a pourable consistency. Be careful not to overheat it. Drizzle the warmed Nutella generously over the top of the cheesecake in a decorative pattern. You can use a spoon or a piping bag with a thin tip for more control.
7. Before the Nutella hardens, sprinkle the 5 crushed Oreos (without filling) over the drizzled Nutella. This adds another layer of crunchy texture and visual appeal. Finally, arrange the 6 whole Oreos around the edge of the cheesecake or in a pattern on top for a truly impressive finish. Once assembled, cover the cheesecake loosely with plastic wrap, making sure not to touch the topping. Refrigerate the cheesecake for at least 6-8 hours, or preferably overnight. This chilling time is essential for the cheesecake to set properly and for the flavors to meld together beautifully. The longer it chills, the firmer and more delicious it will be.
Once set, carefully remove the sides of the springform pan. Slice and serve this incredible No Bake Oreo Nutella Cheesecake. Enjoy every single bite of this no-fuss, high-impact dessert!
Conclusion:
And there you have it! My No Bake Oreo Nutella Cheesecake is a true showstopper, requiring absolutely no oven time and delivering maximum flavor. The rich, creamy filling perfectly complements the crunchy Oreo crust and the irresistible swirl of Nutella. It’s the ultimate dessert for when you crave something decadent but want to keep things simple. This recipe is a guaranteed crowd-pleaser, perfect for parties, potlucks, or just a delightful treat for yourself.
I love serving this cheesecake chilled, perhaps with a dollop of whipped cream or a few extra Oreo crum extractbles on top. For a touch of elegance, a drizzle of chocolate sauce is also a fantastic addition. Don’t be afraid to get creative! You can easily adapt this recipe by adding chocolate chips to the filling, using different cookie bases, or even incorporating a layer of brownie bits. I truly encourage you to give this No Bake Oreo Nutella Cheesecake a try; I’m confident you’ll fall in love with its ease and incredible taste.
Frequently Asked Questions:
Can I make this cheesecake ahead of time?
Absolutely! This No Bake Oreo Nutella Cheesecake is perfect for making ahead. In fact, it’s best when chilled for at least 4-6 hours, or even overnight. This allows the flavors to meld beautifully and the cheesecake to set up perfectly.
What if I don’t have a food processor for the Oreo crust?
No worries at all! You can still achieve a great crust. Place your Oreos in a sturdy zip-top bag and crush them using a rolling pin or the bottom of a heavy pan. It might take a little more elbow grease, but the result will be just as delicious!
Is it possible to freeze this cheesecake?
Yes, you can freeze portions of this cheesecake. Wrap individual slices tightly in plastic wrap and then aluminum foil. Thaw them in the refrigerator for a few hours before enjoying.
No Bake Oreo Nutella Cheesecake
A decadent no-bake cheesecake combining the classic flavors of Oreo and Nutella for a rich and creamy dessert.
Ingredients
-
200g crushed Oreos
-
50g melted butter
-
500g cream cheese, softened
-
200g Nutella
-
200g heavy whipping cream (35%)
-
50g sugar
-
100g chopped Oreos
-
100g Nutella
-
100g Nutella, warmed for drizzling
-
5 crushed Oreos (no filling)
-
6 whole Oreos for garnish
Instructions
-
Step 1
Combine crushed Oreos and melted butter. Press into the base of a springform pan. -
Step 2
Beat softened cream cheese until smooth. Gradually beat in 200g Nutella and sugar until well combined. -
Step 3
In a separate bowl, whip heavy cream until stiff peaks form. -
Step 4
Gently fold the whipped cream into the cream cheese mixture. Stir in the 100g chopped Oreos and 100g Nutella. -
Step 5
Pour the cheesecake mixture over the Oreo base and spread evenly. Chill in the refrigerator for at least 4 hours, or until set. -
Step 6
Before serving, drizzle with warmed Nutella. Garnish with whole Oreos and crushed Oreos (no filling).
Important Information
Nutrition Facts (Per Serving)
It is important to consider this information as approximate and not to use it as definitive health advice.
Allergy Information
Please check ingredients for potential allergens and consult a health professional if in doubt.