Easter Swirl Pie Recipe-Decadent & Delicious Treat
Easter Swirl Pie is a dessert that truly captures the joy and spirit of the holiday. Every year, as the days grow warmer and the scent of spring fills the air, I find myself yearning for that first delightful bite of this festive treat. It’s a beloved classic for so many reasons: the vibrant colors that mimic painted Easter eggs, the delightful combination of creamy filling and a buttery crust, and the sheer fun of slicing into it and revealing those beautiful, mesmerizing swirls. What makes this Easter Swirl Pie recipe so special is its ability to bring people together, sparking conversations and creating cherished memories around the table. It’s more than just a dessert; it’s a centerpiece of celebration, a sweet symbol of renewal and togetherness that we all look forward to sharing.
Get ready to impress with our easy-to-follow Easter Swirl Pie recipe!
Discover the magic within each slice.

Easter Swirl Pie Recipe
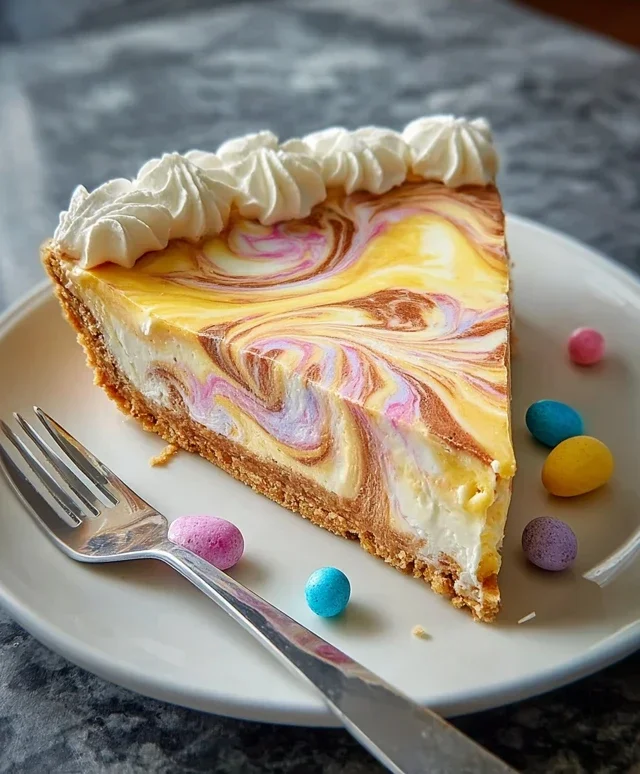
This Easter Swirl Pie is a delightful and visually stunning dessert that’s perfect for your holiday table. Imagin extracte a creamy, dreamy filling swirled with vibrant pastel colors, all nestled in a crisp, buttery crust. It’s surprisingly easy to make and guaranteed to be a showstopper that will have everyone oohing and aahing. The beauty of this pie is in its playful presentation; the marbled effect is simple to achieve but looks incredibly impressive. We’re going to build this masterpiece layer by colorful layer, and I promise, it’s more fun than it is complicated.
Ingredients:
Instructions:
1. Prepare the Crust:
First, let’s get our crust ready. This forms the perfect crunchy foundation for our creamy filling. In a medium bowl, combine the grabeef ham cracker crum extractbs and granulated sugar. Make sure the crum extractbs are fine; you can achieve this by pulsing them in a food processor or by placing them in a zip-top bag and crushing them with a rolling pin. Then, pour in the melted unsalted butter. Stir everything together until the crum extractbs are evenly moistened and resemble wet sand. This is crucial for a crust that holds its shape. Press this mixture firmly and evenly into the bottom and up the sides of a 9-inch pie plate. You can use the bottom of a glass or a measuring cup to help pack it down tightly. This will prevent the crust from crum extractbling when you slice the pie. Place the prepared crust in the freezer for at least 10-15 minutes to firm up while we make the filling. This chilling step is another key to a sturdy crust.
2. Whip Up the Creamy Filling Base:
Now for the luscious filling! In a large bowl, beat the softened cream cheese with an electric mixer until it’s smooth and lump-free. Make sure your cream cheese is truly softened; leaving it out at room temperature for about an hour should do the trick. This ensures a silky texture. Next, add the powdered sugar and vanilla extract to the cream cheese. Beat again until well combined and fluffy. Gradually pour in the sweetened condensed milk, continuing to beat until everything is smoothly incorporated. The sweetened condensed milk adds a wonderful richness and sweetness without making the filling overly sugary. Finally, in a separate bowl, whip the heavy whipping cream until stiff peaks form. Be careful not to over-whip, or you’ll end up with butter! Gently fold the whipped cream into the cream cheese mixture. Be delicate here; we want to keep as much air in the filling as possible for a light and airy texture. This folding technique is key to a smooth, cloud-like filling.
3. Divide and Color the Filling:
This is where the magic begin extracts! We’re going to create our beautiful pastel swirls. Divide the cream cheese filling evenly into several small bowls. The number of bowls will depend on how many colors you want to use. For our pastel theme, let’s use four bowls, one for each of our gel food coloring shades: pink, blue, yellow, and purple. Add just a tiny drop or two of gel food coloring to each bowl. Gel colors are very potent, so a little goes a long way. Stir each bowl gently until the color is evenly distributed. You’re aiming for soft, delicate pastel hues. If you want a deeper color, add another tiny drop and stir again. Remember, you can always add more color, but you can’t take it away! This step is all about creating your Easter pnon-alcoholic alette.
4. Create the Swirls:
Now it’s time to assemble our masterpiece! Remove the chilled pie crust from the freezer. Dollop spoonfuls of each colored filling mixture randomly over the bottom of the crust. Don’t overthink this part; the more random, the more beautiful the swirls will be. Alternate the colors as you go, filling the crust. Once all the filling has been added, take a butter knife or a skewer and gently swirl the colors together. Drag the knife through the different colored dollops, creating a marbled effect. Be careful not to over-swirl, as you don’t want to muddy the colors. A few gentle passes are all you need to achieve a beautiful, painterly look. This is the most creative part of the process, so have fun with it!
5. Chill and Garnish for the Grand Finnon-alcoholic ale:
Once your pie is beautifully swirled, cover it loosely with plastic wrap and refrigerate for at least 4-6 hours, or preferably overnight. This chilling time is essential for the pie to set properly, ensuring clean slices. The longer it chills, the firmer the filling will become. When you’re ready to serve, remove the pie from the refrigerator. Top generously with dollops of whipped cream. Then, go wild with your Easter-themed sprinkles and arrange the mini chocolate eggs or pastel candies artfully on top. This final flourish transforms your already stunning pie into a festive Easter delight. Slice and enjoy the delightful combination of the crisp crust and the creamy, colorful filling. Happy Easter!
Conclusion:
This Easter Swirl Pie recipe truly is a showstopper, perfect for bringin extractg a burst of festive color and delightful flavor to your holiday table. The vibrant swirls are not only visually stunning but also promise a creamy, sweet filling that’s incredibly satisfying. It’s the kind of dessert that earns compliments and creates lasting memories. I absolutely encourage you to give it a try this Easter; you won’t be disappointed! It’s surprisingly straightforward to assemble, making it an accessible yet impressive treat for bakers of all levels.
For serving, this Easter Swirl Pie is divine on its own, showcasing its beautiful design. However, a dollop of fresh whipped cream or a scattering of edible flowers can elevate its presentation even further. Consider pairing it with a light, fruity dessert grape juice or a sparkling lemonade for a truly refreshing experience.
If you’re looking to mix things up, feel free to experiment with different food coloring combinations for even more unique swirls. You could also incorporate a hint of citrus zest, like lemon or orange, into the filling for an added layer of brightness. For a chocolate lover’s twist, a swirl of melted dark chocolate would be absolutely divine!
Frequently Asked Questions:
How far in advance can I make this Easter Swirl Pie?
You can prepare this pie up to 24 hours in advance. Once it’s fully set in the refrigerator, it holds its shape beautifully. Just be sure to cover it loosely with plastic wrap to prevent it from drying out or absorbing odors from other foods.
Can I use a different type of crust for this pie?
Absolutely! While a grabeef ham cracker crust is classic and complements the filling wonderfully, you could also use a pre-made shortbread crust, a traditional pastry crust, or even a crushed cookie crust like vanilla wafers or shortbread cookies. Just adapt the preparation according to the crust type.
Easter Swirl Pie
A festive and colorful Easter Swirl Pie with a graham cracker crust and a creamy, no-bake filling swirled with pastel gel food colors.
Ingredients
-
2½ cups (250 g) graham cracker crumbs
-
½ cup (115 g) unsalted butter, melted
-
2 tablespoons granulated sugar
-
8 oz (225 g) cream cheese, softened
-
1 cup (240 ml) heavy whipping cream
-
½ cup (100 g) powdered sugar
-
1 teaspoon vanilla extract
-
½ cup (120 ml) sweetened condensed milk
-
Gel food coloring in pastel colors (pink, blue, yellow, purple)
-
Whipped cream, for garnish
-
Easter-themed sprinkles
-
Mini chocolate eggs or pastel candies
Instructions
-
Step 1
In a medium bowl, combine graham cracker crumbs, melted butter, and granulated sugar. Press mixture firmly into the bottom and up the sides of a 9-inch pie plate to form the crust. -
Step 2
In a large bowl, beat the softened cream cheese until smooth. Gradually beat in the powdered sugar and vanilla extract until well combined. -
Step 3
In a separate bowl, whip the heavy cream until stiff peaks form. Gently fold the whipped cream into the cream cheese mixture until just combined. -
Step 4
Pour the sweetened condensed milk into the cream cheese mixture and stir until smooth. Divide the filling evenly into four small bowls. -
Step 5
Add a few drops of gel food coloring to each bowl, one color per bowl. Stir gently until the color is incorporated. Do not overmix. -
Step 6
Dollop spoonfuls of each colored filling mixture randomly into the prepared pie crust. Use a toothpick or knife to gently swirl the colors together, creating a marbled effect. Be careful not to over-swirl. -
Step 7
Chill the pie in the refrigerator for at least 4 hours, or until firm. -
Step 8
Before serving, top with whipped cream, Easter-themed sprinkles, and mini chocolate eggs or pastel candies.
Important Information
Nutrition Facts (Per Serving)
It is important to consider this information as approximate and not to use it as definitive health advice.
Allergy Information
Please check ingredients for potential allergens and consult a health professional if in doubt.