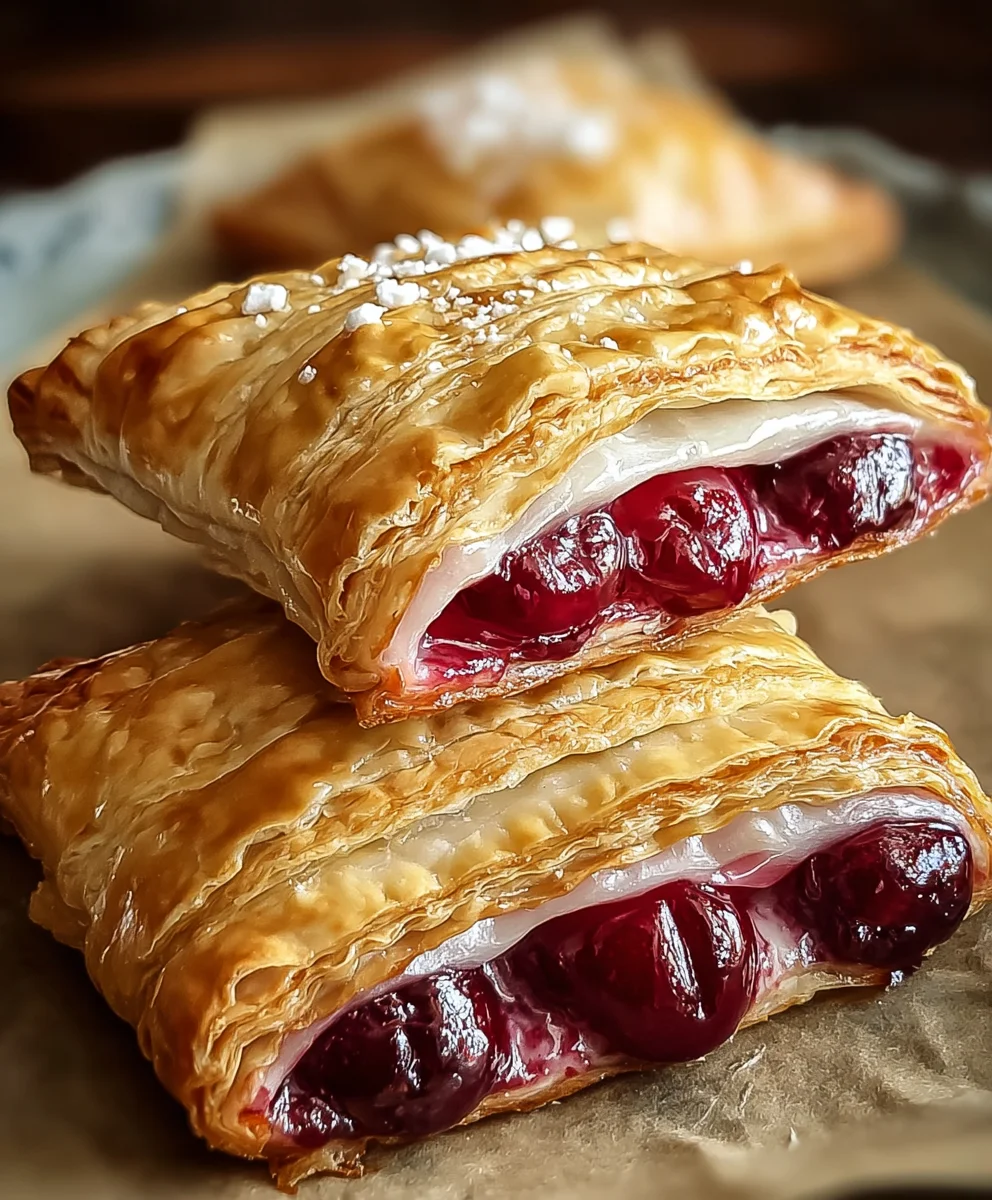
Easy Cherry Turnovers – Simple Delicious Pastry Recipe
Easy Cherry Turnovers are more than just a dessert; they’re a delightful burst of sweet, tart fruit encased in a flaky, buttery embrace. There’s something undeniably comforting and nostalgic about these hand-held pies. Perhaps it’s the charming crescent shape, or the way the warm, bubbling cherry filling peeks through the golden-brown pastry. People adore them because they offer that perfect balance of sweet and tangy, a satisfying crunch followed by a soft, luscious interior, all without requiring advanced pastry skills. What truly sets these Easy Cherry Turnovers apart is their incredible versatility and the sheer joy they bring to any occasion. Whether served warm with a scoop of vanilla ice cream, dusted with a sprinkle of powdered sugar for an afternoon treat, or enjoyed at room temperature as a breakfast indulgence, they consistently deliver a smile.
Why You’ll Love This Recipe
This recipe is designed for everyone, from novice bakers to seasoned pros looking for a quick win. We’ve simplified the process so you can achieve that beautiful, bakery-worthy result with minimal fuss. Get ready to impress yourself and your loved ones with these irresistible treats!
Ingredients:
- 1 package puff pastry (2 sheets), thawed according to package directions
- 1 cup cherry pie filling (you can use store-bought canned filling or your own homemade filling)
- 1 large egg
- 1 tablespoon milk
- 1 cup powdered sugar
- 1 teaspoon vanilla extract
- 2-3 tablespoons milk
- Additional powdered sugar for dusting (optional, for extra sweetness and visual appeal)
Preparing the Dough and Filling
Prepping the Puff Pastry
The foundation of our Easy Cherry Turnovers is, of course, the puff pastry. Make sure your puff pastry sheets are fully thawed according to the package instructions. Typically, this involves leaving them at room temperature for about 30-40 minutes, or thawing them overnight in the refrigerator. It’s crucial that the pastry is pliable but still chilled; warm pastry can become sticky and difficult to handle, while overly cold pastry might crack when you try to fold it. Once thawed, gently unfold each sheet. If they seem a little thick, you can lightly roll them out with a rolling pin to make them slightly thinner, aiming for about a 1/8-inch thickness.
Measuring and Preparing the Filling
Next, let’s get our cherry pie filling ready. You’ll need 1 cup of this delicious, sweet-tart filling. If you’re using canned cherry pie filling, simply open the can and give it a quick stir to ensure the cherries and the thickened syrup are well combined. If you’ve made your own homemade cherry filling, ensure it has cooled down to room temperature before using it. Overly hot filling can melt the puff pastry, which is something we definitely want to avoid for perfectly flaky turnovers.
Assembling the Turnovers
Creating the Turnover Shapes
Now for the fun part – assembling! You’ll want to cut each puff pastry sheet into shapes that will form your turnovers. A common and easy method is to cut each sheet into four equal squares. You can do this by using a sharp knife or a pizza cutter. Aim for clean, straight cuts. This will give you a total of eight squares to work with, perfect for making eight delightful turnovers.
Adding the Cherry Filling
Take each puff pastry square and place it on a clean, lightly floured surface. Now, spoon about 1-2 tablespoons of the cherry pie filling onto one half of each square. It’s important not to overfill the pastry, as this can cause the filling to leak out during baking. Leave a border of about ½ inch around the edges of the pastry. This border will be crucial for sealing the turnovers.
Sealing the Turnovers
To seal the turnovers, we’ll create an egg wash. In a small bowl, whisk together the 1 large egg and 1 tablespoon of milk until well combined. This egg wash acts as both a binder and a browning agent, giving our turnovers a beautiful golden sheen. Lightly brush the edges of the pastry squares that are not covered with filling with this egg wash. Then, carefully fold the unfilled half of the pastry over the filling to create a triangle or a rectangle shape, depending on how you folded your squares. Gently press the edges together with your fingers to seal them. For an extra secure seal and a decorative edge, you can use the tines of a fork to crimp the edges. Make sure the seal is good to prevent any filling from escaping.
Baking and Glazing
Egg Wash and Venting
Once your turnovers are assembled and senon-alcoholic aled, place them on a baking sheet lined with parchment paper. Now, it’s time for another application of the egg wash. Brush the tops of each turnover with the remaining egg wash. This will ensure they get that gorgeous golden-brown color as they bake. Before placing them in the oven, it’s essential to cut a few small slits or vent holes in the top of each turnover. You can use a sharp knife to make a couple of small slits, about ½ inch long. This allows steam to escape during baking, preventing the pastry from puffing up unevenly or bursting.
Baking to Perfection
Preheat your oven to 400°F (200°C). Bake the turnovers for approximately 15-20 minutes, or until they are puffed up, golden brown, and the filling is bubbling slightly. The exact baking time can vary depending on your oven, so keep an eye on them, especially during the last few minutes. You want them to be a lovely, deep golden color, indicating that the puff pastry is cooked through and delightfully crisp.
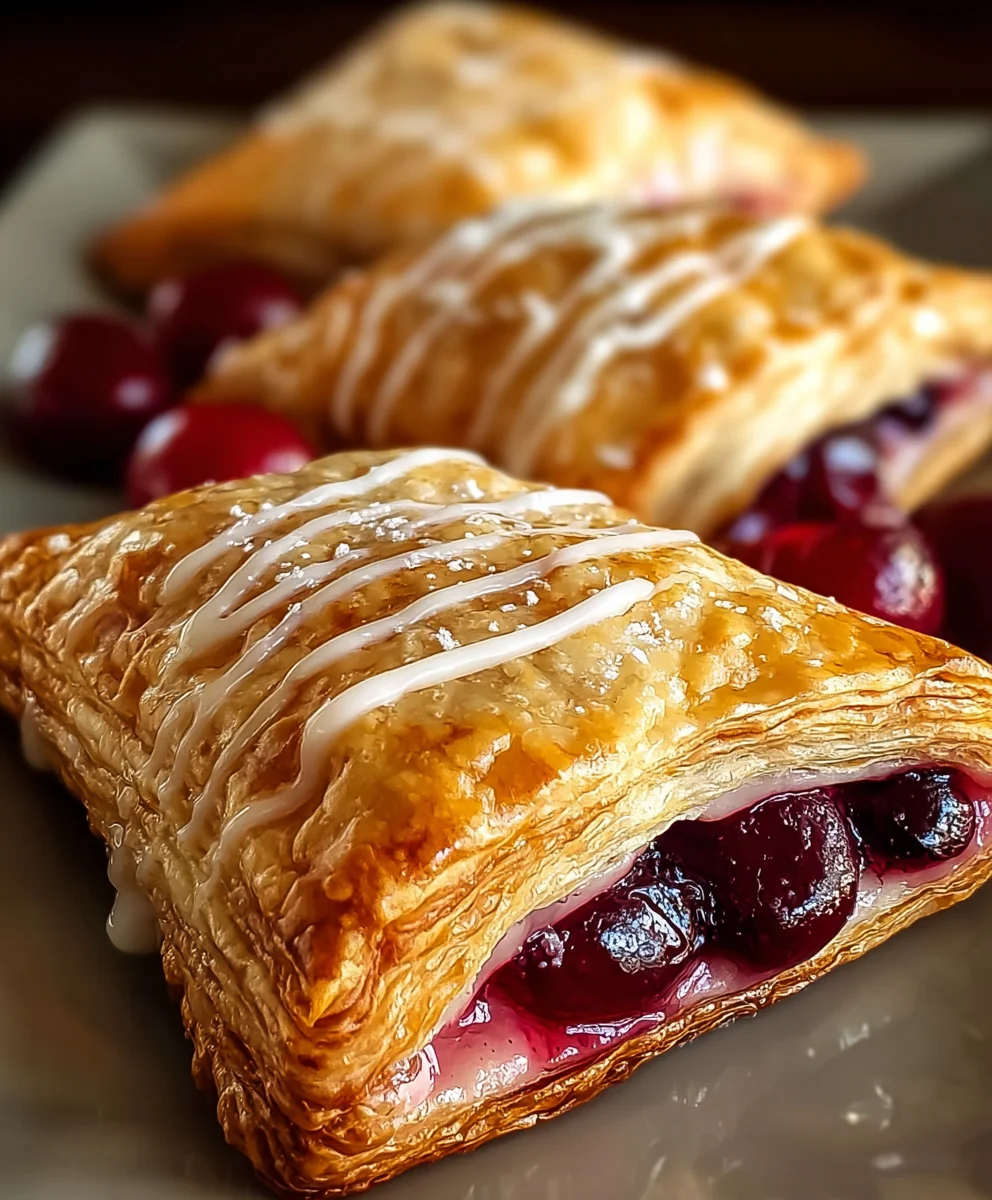
Creating the Cherry Glaze
While the turnovers are baking, or just after they come out of the oven, we can prepare a simple and sweet glaze to drizzle over them. In a medium bowl, combine the 1 cup of powdered sugar and the 1 teaspoon of vanilla extract. Gradually add 2-3 tablespoons of milk, whisking until you achieve a smooth, pourable glaze. Start with 2 tablespoons and add more milk, a teaspoon at a time, until the consistency is just right – thick enough to coat the turnovers but thin enough to drizzle. If you prefer a sweeter and more visually appealing finish, you can dust the turnovers with additional powdered sugar after glazing.
Glazing and Finishing Touches
Once the turnovers have been removed from the oven and have cooled slightly (about 5-10 minutes), you can drizzle the prepared glaze over them. You can use a spoon to create artistic drizzles, or if you prefer a thinner glaze, you can place it in a piping bag or a plastic bag with a corner snipped off for more controlled application. The warmth of the turnovers will help the glaze set slightly. If you like an extra dusting of sweetness and a snowy appearance, you can sprinkle a little more powdered sugar over the glazed turnovers. Let them cool for a few more minutes before serving to allow the glaze to set fully and to avoid burning your mouth on the warm cherry filling.
Conclusion:
There you have it – a delightful and surprisingly simple recipe for Easy Cherry Turnovers! We’ve walked through each step, from preparing the flaky pastry to crafting that sweet, luscious cherry filling, and I hope you feel confident in giving this recipe a try. These turnovers are incredibly versatile and make for a perfect treat any time of day. Serve them warm with a scoop of vanilla ice cream for an indulgent dessert, or enjoy them at room temperature with a cup of coffee for a satisfying breakfast or afternoon snack. Don’t be afraid to experiment! Try adding a pinch of cinnamon or almond extract to the cherry filling for a different flavor profile, or swap the cherries for another berry like raspberries or blueberries. The possibilities are endless! So go ahead, preheat your oven, and whip up a batch of these delicious Easy Cherry Turnovers. I promise, your taste buds will thank you!
Frequently Asked Questions about Easy Cherry Turnovers:
Q: Can I make the pastry dough ahead of time?
A: Absolutely! You can prepare the pastry dough up to two days in advance and store it, tightly wrapped in plastic wrap, in the refrigerator. This makes assembling the turnovers even quicker when you’re ready to bake.
Q: What’s the best way to store leftover Easy Cherry Turnovers?
A: Once cooled, store any leftover Easy Cherry Turnovers in an airtight container at room temperature for up to two days, or in the refrigerator for up to four days. For longer storage, you can freeze them (baked or unbaked) and reheat them in the oven or a toaster oven until warm and crisp.
Easy Cherry Turnovers – Simple Delicious Pastry Recipe
A simple and delicious pastry recipe for easy cherry turnovers with flaky puff pastry and a sweet cherry filling, finished with a light glaze.
Ingredients
-
1 package puff pastry (2 sheets), thawed
-
1 cup cherry pie filling
-
1 large egg
-
1 tablespoon milk
-
1 cup powdered sugar
-
1 teaspoon vanilla extract
-
2-3 tablespoons milk
-
Additional powdered sugar for dusting (optional)
Instructions
-
Step 1
Ensure puff pastry is thawed according to package directions. Gently unfold each sheet and lightly roll out to about 1/8-inch thickness. Prepare cherry pie filling by stirring canned filling or ensuring homemade filling has cooled. -
Step 2
Cut each puff pastry sheet into four equal squares, yielding eight squares in total. Spoon 1-2 tablespoons of cherry pie filling onto one half of each square, leaving a ½-inch border. -
Step 3
In a small bowl, whisk together the egg and 1 tablespoon of milk for the egg wash. Brush the edges of the pastry squares with egg wash. Fold the unfilled half over the filling to create a triangle or rectangle, and press to seal. Crimp edges with a fork for a secure seal. -
Step 4
Place assembled turnovers on a parchment-lined baking sheet. Brush the tops with the remaining egg wash. Cut a few small slits (about ½ inch long) in the top of each turnover to allow steam to escape. -
Step 5
Preheat oven to 400°F (200°C). Bake for 15-20 minutes, or until puffed, golden brown, and the filling is bubbling. In a medium bowl, combine powdered sugar and vanilla extract. Gradually add 2-3 tablespoons of milk, whisking until a smooth, pourable glaze forms. -
Step 6
Once turnovers have cooled slightly (5-10 minutes), drizzle with the prepared glaze. Dust with additional powdered sugar for extra sweetness and visual appeal, if desired. Let cool for a few more minutes before serving.
Important Information
Nutrition Facts (Per Serving)
It is important to consider this information as approximate and not to use it as definitive health advice.
Allergy Information
Please check ingredients for potential allergens and consult a health professional if in doubt.