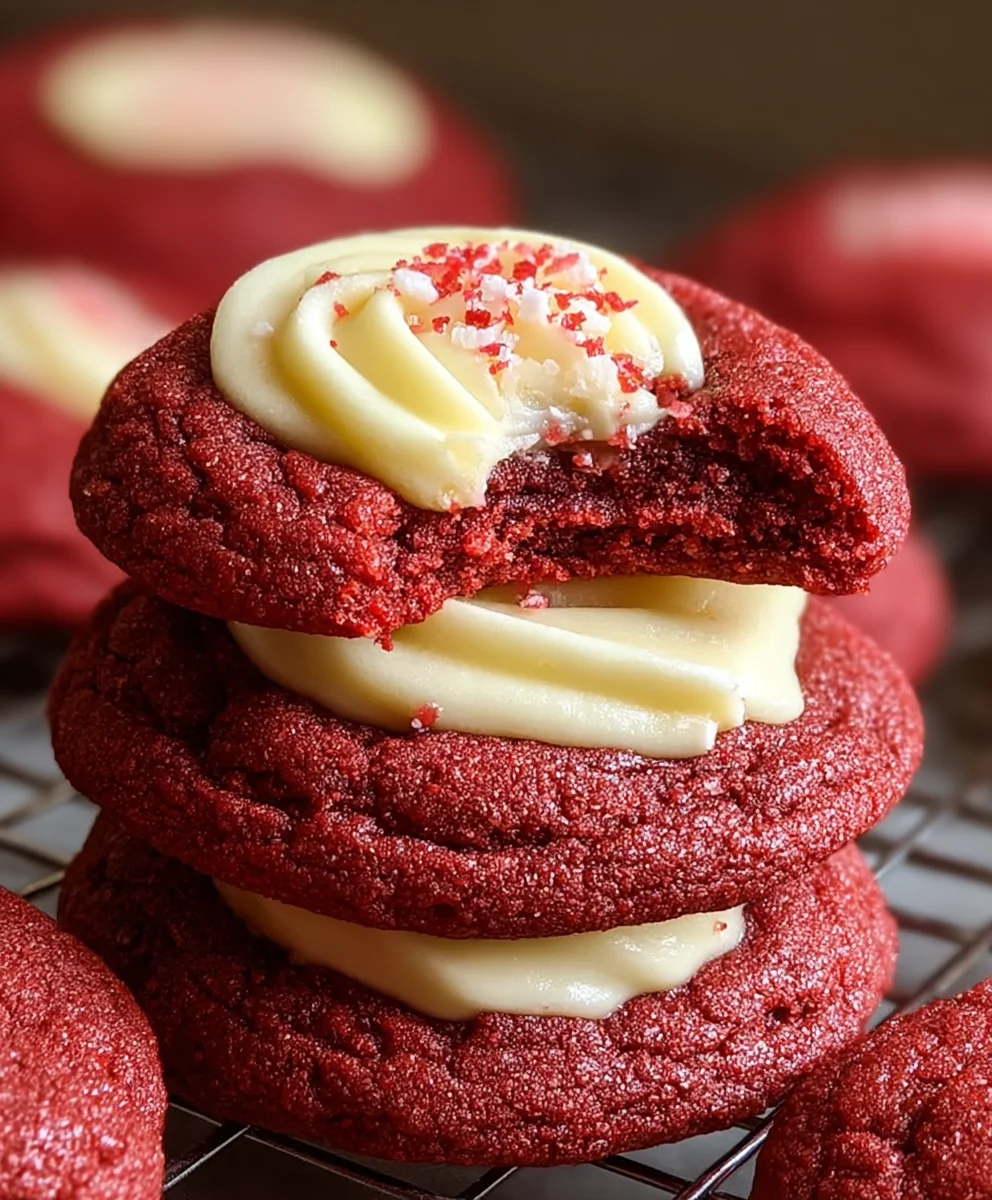
Cream Cheese Red Velvet Cookies-Decadent & Easy
Cream Cheese Red Velvet Cookies are more than just a dessert; they’re a little bite of pure bliss that captivates the senses. The moment you spot their vibrant scarlet hue, tinged with the promise of rich cocoa and tangy cream cheese, your taste buds begin extract to anticnon-alcoholic ipate the delightful experience. What is it about these cookies that makes them so utterly irresistible? It’s the perfect marriage of textures and flavors – a soft, chewy interior giving way to slightly crisp edges, all while that signature cream cheese tang cuts beautifully through the sweet, chocolatey depth of the red velvet. These aren’t just any cookies; they’re a showstopper, a delightful surprise that brings smiles to faces at parties, holidays, or simply as a special treat. We’re about to unlock the secrets to creating these phenomenal Cream Cheese Red Velvet Cookies right in your own kitchen.

Ingredients:
- 1 1/4 cups all-purpose flour
- 1/4 cup unsalted butter, softened
- 3/4 cup granulated sugar
- 1 large egg
- 1 tsp vanilla extract
- 1 tbsp red food coloring
- 4 oz cream cheese, softened
- 1/4 cup powdered sugar
- 1/2 tsp vanilla extract
- 1/4 cup cocoa powder
- 1 tsp baking powder
- 1/4 tsp salt
Cream Cheese Red Velvet Cookies
Preparing the Cookie Dough
- In a medium bowl, whisk together the all-purpose flour, unsalted butter, cocoa powder, baking powder, and salt. Set this dry ingredient mixture aside for later. It’s important that these dry ingredients are well combined to ensure even distribution throughout the cookie dough, which will contribute to a consistent texture and flavor. Making sure your flour is spooned and leveled, rather than scooped directly from the bag, will also prevent you from adding too much flour, which can lead to tough cookies.
- In a large mixing bowl, cream together the softened unsalted butter and granulated sugar until the mixture is light and fluffy. This can be done with an electric mixer on medium speed or vigorously by hand with a sturdy whisk. Creaming the butter and sugar incorporates air, which is crucial for creating tender cookies with a slightly crisp edge. Continue beating until there are no visible sugar granules and the mixture has a pnon-alcoholic ale yellow hue. This step usually takes about 2-3 minutes with an electric mixer.
- Add the large egg and 1 tsp of vanilla extract to the creamed butter and sugar mixture. Beat until just combined. Scrape down the sides of the bowl to ensure everything is incorporated evenly. The egg adds richness and structure, while the vanilla extract provides a warm, aromatic base note that complements the other flavors beautifully. Be careful not to overmix at this stage; we just want everything to come together smoothly.
- Now it’s time to add that signature vibrant color! Add the 1 tbsp of red food coloring to the wet ingredients. Mix until the color is uniformly distributed, creating a striking red batter. The intensity of the red can vary depending on the brand of food coloring you use, so feel free to adjust slightly if you desire a deeper hue. Ensure all the batter has taken on a consistent red shade before moving on.
- Gradually add the reserved dry ingredient mixture to the wet ingredients, mixing on low speed or stirring by hand until just combined. Do not overmix the dough once the flour is added; overmixing can develop the gluten too much, resulting in tough cookies. Stop mixing as soon as you no longer see streaks of dry flour. The dough will be quite thick and vibrant red at this point.
Crafting the Cream Cheese Filling
- In a separate bowl, beat the softened cream cheese until it is smooth and creamy. This is best achieved with an electric mixer on medium speed. Ensure there are no lumps of cream cheese remaining. Using softened cream cheese is absolutely vital here, as it will prevent the filling from being lumpy and difficult to spread or incorporate.
- Add the 1/4 cup of powdered sugar and the 1/2 tsp of vanilla extract to the beaten cream cheese. Continue to beat until the mixture is well combined and smooth. The powdered sugar sweetens the filling and gives it a lovely, melt-in-your-mouth texture, while the vanilla extract adds another layer of delicate flavor that pairs perfectly with the red velvet cookie dough.
Assembling and Baking the Cookies
- Now for the fun part – assembly! Take about two-thirds of the red velvet cookie dough and flatten it into a disc in your hand. Place a heaping teaspoon of the cream cheese filling in the center of the disc. Then, take the remaining one-third of the red velvet cookie dough, flatten it, and use it to gently enclose the cream cheese filling, forming a round cookie ball. Pinch the edges of the dough together to seal the filling completely. This method ensures that each bite of cookie has a delightful pocket of creamy cheesecake. You can also form the balls by rolling the dough, but flattening and enclosing provides more control.
- Place the cookie balls onto a baking sheet lined with parchment paper, leaving about 2 inches of space between each cookie to allow for spreading. You can gently flatten the tops of the cookie balls with the palm of your hand or the bottom of a glass if you prefer a slightly flatter cookie. If the dough feels too sticky to handle, you can chill it in the refrigerator for about 15-20 minutes before shaping.
- Bake the cookies in a preheated oven at 350°F (175°C) for 10-12 minutes, or until the edges are set and slightly firm, but the centers still look a little soft. They will continue to cook slightly on the baking sheet as they cool. Avoid overbaking, as this can lead to dry cookies. The goal is a cookie that is soft and chewy in the center with a slightly crisp exterior.
- Allow the cookies to cool on the baking sheet for 5-10 minutes before carefully transferring them to a wire rack to cool completely. This resting period is crucial for the cookies to firm up properly and prevent them from breaking when you move them. Once cooled, you’ll have perfectly decadent Cream Cheese Red Velvet Cookies, ready to be enjoyed!
Conclusion:
We hope you’ve enjoyed diving into the delightful world of Cream Cheese Red Velvet Cookies! This recipe offers a perfect balance of rich cocoa, tangy cream cheese, and that signature vibrant red hue that makes these cookies so special. They are incredibly satisfying to bake and even more so to devour, bringin extractg a touch of festive indulgence to any occasion, whether it’s a holiday gathering, a birthday celebration, or just a Tuesday craving.
These Cream Cheese Red Velvet Cookies are wonderfully versatile. They are fantastic served warm straight from the oven, their gooey centers and slightly crisp edges being utterly irresistible. For a more refined presentation, allow them to cool completely and serve with a glass of cold milk or a steaming cup of coffee. They also make a thoughtful homemade gift for friends and family.
Don’t be afraid to experiment! You can add white chocolate chips for extra sweetness, or a swirl of cream cheese frosting on top for an even more decadent treat. The possibilities are truly endless with these delicious cookies.
Frequently Asked Questions about Cream Cheese Red Velvet Cookies:
Q1: How should I store my Cream Cheese Red Velvet Cookies?
To keep your Cream Cheese Red Velvet Cookies fresh and delicious, store them in an airtight container at room temperature for up to 3 days. If you plan to keep them for longer, they can be refrigerated for up to a week, or frozen for up to 2-3 months. Ensure they are completely cooled before storing.
Q2: My cookies spread too much. What did I do wrong?
Cookie spread can be influenced by a few factors. Ensure your butter and cream cheese are softened, not melted, as this can cause the dough to be too loose. Also, chilling the dough for at least 30 minutes before baking can help prevent excessive spreading and result in thicker, chewier cookies.
Q3: Can I make the dough ahead of time?
Absolutely! The dough for Cream Cheese Red Velvet Cookies can be made up to 2 days in advance and stored in the refrigerator. When you’re ready to bake, simply scoop and bake as per the recipe instructions. You may need to add a minute or two to the baking time if the dough is very cold.
Cream Cheese Red Velvet Cookies-Decadent & Easy
Decadent and easy red velvet cookies with a creamy cream cheese filling.
Ingredients
-
1 1/4 cups all-purpose flour
-
1/4 cup cocoa powder
-
1 tsp baking powder
-
1/4 tsp salt
-
1/2 cup unsalted butter, softened
-
3/4 cup granulated sugar
-
1 large egg
-
1 tsp vanilla extract
-
1 tbsp red food coloring
-
4 oz cream cheese, softened
-
1/4 cup powdered sugar
-
1/2 tsp vanilla extract
Instructions
-
Step 1
In a medium bowl, whisk together the all-purpose flour, cocoa powder, baking powder, and salt. Set this dry ingredient mixture aside. -
Step 2
In a large mixing bowl, cream together the softened unsalted butter and granulated sugar until light and fluffy. -
Step 3
Add the large egg and 1 tsp of vanilla extract to the creamed butter and sugar mixture. Beat until just combined. -
Step 4
Add the 1 tbsp of red food coloring to the wet ingredients. Mix until uniformly distributed. -
Step 5
Gradually add the reserved dry ingredient mixture to the wet ingredients, mixing until just combined. Do not overmix. -
Step 6
In a separate bowl, beat the softened cream cheese until smooth and creamy. Add the powdered sugar and 1/2 tsp vanilla extract, and beat until combined. -
Step 7
Take about two-thirds of the red velvet cookie dough, flatten it, place a teaspoon of cream cheese filling in the center, and enclose it with the remaining one-third of dough, forming a round cookie ball. Pinch to seal. -
Step 8
Place cookie balls onto a parchment-lined baking sheet, leaving 2 inches between each cookie. -
Step 9
Bake in a preheated oven at 350°F (175°C) for 10-12 minutes, until edges are set and centers look soft. -
Step 10
Allow cookies to cool on the baking sheet for 5-10 minutes before transferring to a wire rack to cool completely.
Important Information
Nutrition Facts (Per Serving)
It is important to consider this information as approximate and not to use it as definitive health advice.
Allergy Information
Please check ingredients for potential allergens and consult a health professional if in doubt.